Learn how to draw a vampire - an elegant vampire in a long coat creeping up onto his next victim. Easy step by step drawing using simple triangle shapes.
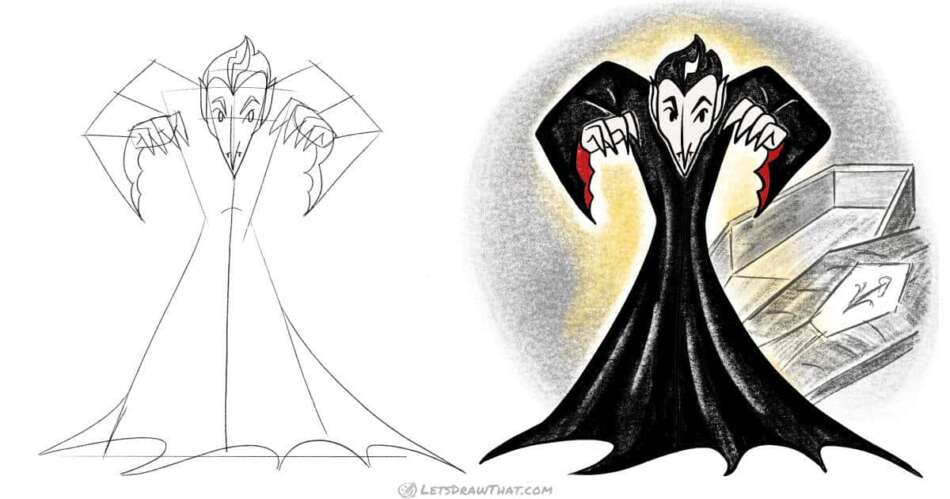
Today we will learn how to draw a vampire. We will draw a skinny vampire with a long face and pointy chin and nose, creeping up on his next victim.
We build many parts of the vampire’s body from easy triangle shapes. Also, to keep the drawing simple, we dress our vampire in a full-length long coat. He looks well dressed without the need to draw all the clothing!
min
You will need: pencil, fineliner pen, colored pencils, eraser and drawing paper or sketchbook
Disclaimer: LetsDrawThat.com participates in the Amazon Associates Program. If you purchase a product using a link on our website, we earn a small commission, at no extra cost to you. This is one way how you can support this website.
Halloween Drawing Activities Mega Bundle – Save 90%
Halloween Printable Bundle for hours of creative activities. Get $75+ worth of Halloween products as a 90% off discounted bundle for only $9.90!
- 23 spooky Halloween drawing tutorial booklets with step-by-step instructions and five BONUS drawing activity sheets
- 30 Boo-tiful Halloween coloring pages
- 30 printable Halloween cards to color
How to draw a vampire: step by step sketch
Step 1: Sketch the base head and body

Our how to draw a vampire tutorial starts by sketching three overlapping triangles. Start with the upper body triangle, flat at the top and pointing down. Then add a slightly larger upside-down triangle for the base – this will be the vampire’s long coat.
The final triangle is a small and downward-pointing one for the head. Draw it sticking about one third above the shoulder line, and slightly curve all the sides. To finish off, mark a face cross over the head.
Step 2: Sketch the arms and hands

The vampire’s arms continue the triangle theme. Start where the head meets the shoulder line, and draw the upper half of a triangle – one line up and out and another one back down at an open angle.
The lower parts of the arms start with a straight line back from the elbow for half the length of the “base” of the arm triangle. Then suggest simple hands with two rectangles at an angle. Finally, add the upper line for the forearm back to shoulder.
Step 3: Improve the vampire's face shape

Let’s work on the vampire’s face shape next. First, make the face into a nice heart by adding two arcs for the hairline. Next, square off the upper part of the head and come back to the chin line with square cheekbones.
Finally, add a long pointed nose – this is just a simple asymmetrical “V” shape.
Step 4: Draw the hair, eyes, and ears
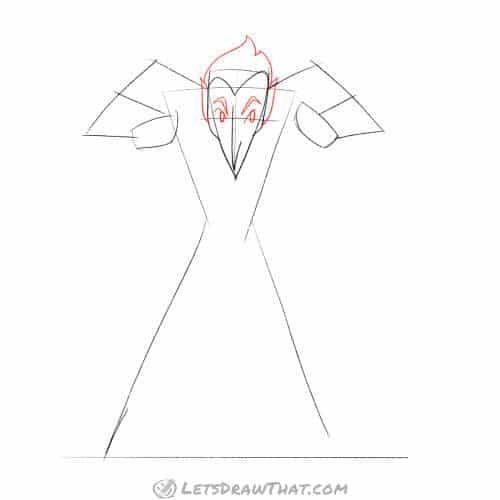
Add ears to the vampire’s head. Rather than the usual “C” shape, let’s draw them pointy at the top, to keep with the triangle theme. Next, draw the outer hair line. You can choose any hairdo you like for your vampire – here we are going for two swooshy waves.
Time to draw some eyes. These are simple small ovals cut off at the top with inward sloping lines. To enhance the creepy evil expression, we add similarly inward sloping eyebrows – these look like small boomerangs.
Step 5: Improve details - hair, hands, mouth

Let’s add a few zig-zag lines, starting at the middle of the forehead, to add some texture to the wavy hair.
Next, draw the vampire’s mouth and fangs! There is not much space on the narrow pointy chin, so they are just small, but they are an important vampire trademark. The mouth is arced down and the fangs are just two tiny triangles (again), pointed down.
As the final detail in this step, let’s start drawing the vampire’s clawed fingers. Each finger is just two lines at 90-degree angles. At this stage, our fingers look like rakes!
Step 6: Finish drawing the hands and sleeves
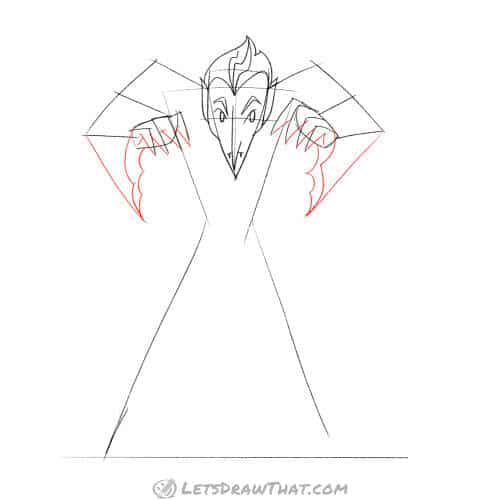
Let’s fix those rake fingers. Add another line to each finger, to make them into – you guessed it – pointed triangles. Now those hands are proper scary claws.
Next, improve the sleeves of our vampire’s coat. Add another line down from the elbow to draw wide sleeves. Finish the sleeve with tattered edges.
Step 7: Draw the vampire's long coat

Our vampire sketch is almost finished. The final step is to add some jagged and tattered edges to the vampire’s coat. Feel free to go wild – our coat comes out to the floor in several pointy folds. Add a final line running in the middle from the top to the bottom of the coat – that is the front coat opening.
That is it for the sketch.
How to draw a vampire: outline step by step
Step 1: Draw the vampire's face
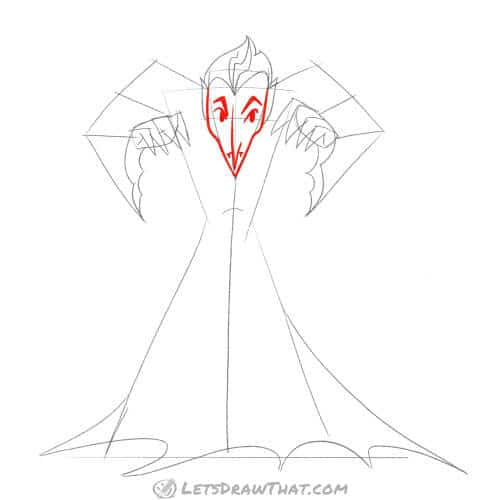
We start outlining our vampire by drawing the face contour. Join the squared-off head with the pointed chin by rounding off the cheekbones. Then draw the long pointed nose, outline the mouth, and draw the fangs. Then redraw and fill in the eyes and eyebrows.
Step 2: Outline the hair and ears
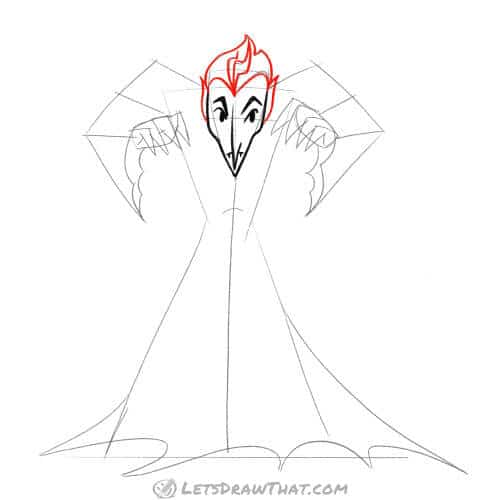
The next step is to outline the hair – feel free to make any final adjustments – and the ears.
Step 3: Draw the vampire's arms and hands
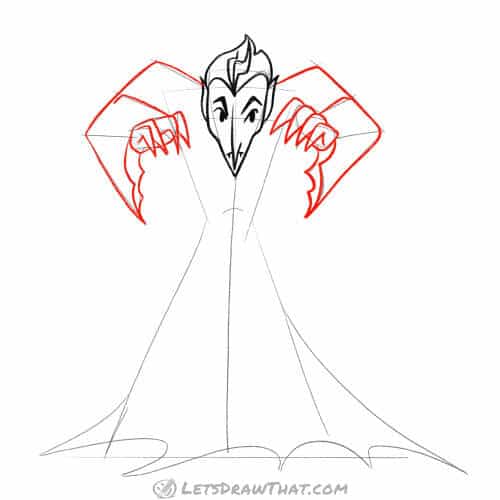
Start with outlining the hands- we are rounding off the finger joints, but keeping the sharp, pointy, claw-like fingertips.
Next, draw the coat sleeves. Notice we have skipped one of the sketch lines used to draw the hand – the forearm is now hidden inside the wide coat sleeve. We have also added a little downfold to the upper sleeve line.
Step 4: Draw the vampire's long coat
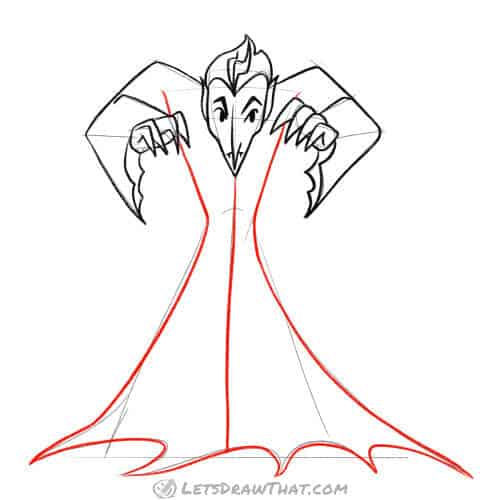
As the final step, outline the long coat – starting at the top, going to the narrow waist, and then widening out all the way down to the floor. Outline the jagged folds on the ground and the front coat split line. Our vampire drawing is done.
Here is another drawing in a similar style:
How to Draw a Superhero: Drawing Step by Step
Learn how to draw a superhero with a strong body from simple triangle shapes and detailed hero costume. Easy step by step instructions.How to draw a vampire: finished drawing
How to draw a vampire: finished outline drawing

Here is the completed drawing after erasing and cleaning up the sketch lines.
This is only one way how to draw a vampire – we have used a simple long coat to make the drawing easy. You can also dress your vampire in fancy full evening dress – that would make it harder to draw.
But we really like the way the vampire has turned out, despite how simple it is to draw. The contrast between the innocent face and the creepy pose is just the right mix of cute and scary.
How to draw a vampire: finished drawing coloured-in

As usual, we like to finish the drawing in colour – surely black is also a colour, right?
To add some colour contrast, we have coloured the inside of the wide sleeves in dark burgundy red and added a bit of a yellowish glow around our vampire. Is that from a candle we cannot see?
As a tip for shading the long coat folds: If you draw over the highlights, bring them back with an eraser – just use the corner of your eraser to “draw” the white back in.
Oh, and do not mind the coffin. Every vampire needs a comfortable place to hide and sleep during the day, right? Drawing a coffin in perspective is beyond the level of this tutorial, though. So you are on your own.


