How to draw a pig: base sketch step by step
Step 1: Sketch two ovals for the pig’s head and snout

We will learn how to draw a pig by starting with the usual simple shapes to build the character. We will use just a few ovals for a really easy pig drawing.
Start by drawing a larger oval for the pig’s head.
Then add a smaller oval inside the head for the pig’s trademark – the snout. This oval is flatter at the bottom, almost like a rounded-off “D” letter shape. As our pig will be looking slightly to the left, we have placed the snout slightly off-center to the left as well.
Step 2: Sketch an oval for the pig’s body

Next, draw another large oval for the pig’s body. As you can see in the picture, the body crosses over the head shape. Also, the oval is slightly wider and more rounded at the back, and a touch more pointed at the front – sort of a slight egg shape.
Feel free to play with the size of the body oval – you can make your pig fatter or thinner, taller or smaller, depending on how you stretch the body oval.
Step 3: Sketch the pig’s legs

Now it is time to give our pig some legs. They are made from two parts – the rectangle for the leg, and a small rhombus for the hoof. If you want to draw really simple shapes, both of these can be just regular rectangles.
But as you can see in the picture, the legs will look much better if you will make the leg slightly wider at the top and draw the tops of the hooves at an angle.
We have added a helping ground line to keep the legs the same length – and immediately broke the alignment with the front leg hoof sticking down to add some interest.
Step 4: Draw the pig’s ears

Time to draw another piggy trademark – big floppy ears.
Let’s start with the easy straight ear on the right. That one is drawn as a flat curve going up to the ear tip, and a bulked out curve returning back to the head, for kind of a leaf shape.
Now for the other folded ear. The base shape is the same as the straight-up ear. But then add a small curved triangle going down for the bent end of the ear. The bent-down end of the ear covers the lower line of the straight part of the ear – that is why we have left it out.
Step 5: Draw the pig’s face and tail
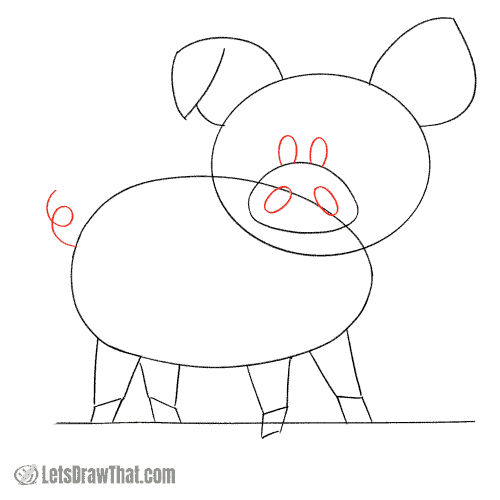
The sketching for our pig is almost done – let’s add a few final details:
Draw two small simple ovals for the eyes sitting just over the top center of the snout.
Then draw the nostrils in the snout – just two more small ovals at an angle, one on each side of the snout.
And finally, a small but very important piggy trademark feature – the curly twisted tail.

How to draw a pig: outline the drawing step by step
Step 1: Draw the pig’s head

With the sketch complete, it is time to start outlining our pig drawing. Let’s start with the head.
Outline the right straight ear first. Extend the ear just slightly into the head oval – that way the ear looks like it is in front closer to us since the pig’s head is turned looking left.
Then outline the head and the folded ear – there are no changes there, the outline is a straight copy of the sketch lines.
Step 2: Draw the pig's face

Now draw the pig’s face. The snout and the nostrils are again just a simple outline of the sketch. Color in the eyes, leaving out a small white “shine” on the right side – another way to make our pig look to the left.
Step 3: Draw the pig's legs

Next, outline the pig’s legs. There are a few subtle changes here:
Notice the two legs that are extended slightly over the body’s oval edge – this will make them stand out in front of the body and give the pig drawing some depth – a similar trick as we have done with the straight ear.
Another simple change is all the hooves are slightly rounded, for a more natural and interesting shape. Also, add a short line to each hove to separate the two pig’s toes.
Step 4: Draw the pig’s body
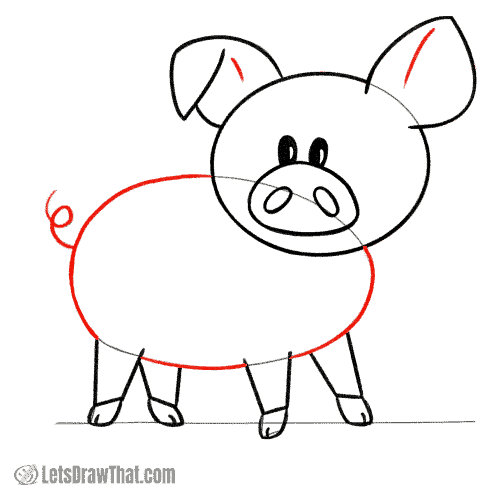
Time to finish our easy pig drawing. Complete the body outline – break the body outline for the two legs that we have drawn as the legs in front of the body closer to us. Draw through the two legs that are behind the body, further from us.
Then draw out the twisted tail.
Oh, and a final improvement: Draw two short lines inside the ears, to suggest the fold in the ear.

How to draw a pig: finished drawing
How to draw a pig: finished outline drawing

And here is the polished result of our “how to draw a pig” tutorial once we have erased the sketch lines.
As you see, turning the two ovals into a cute and adorable cartoon pig is simple, if you only add the main piggy’s “trademark” features. The snout, ears, and pigtail can be drawn with just a few lines, making for a very easy pig drawing.
Easy pig drawing coloured-in

Now that you know how to draw a pig, all that is left is to color in our easy pig drawing.
An adorable and cute cartoon pig needs to be the traditional pink color, of course. We have used lighter pink for all of the body head and snout, with some darker pink for shading.
The hoofs and nostrils are rusty brown. We have also drawn some lush green grass for our pig to stand on.
And that is the end of our “how to draw a pig” tutorial. If you want to draw some more really easy animals, check out our spider, cat, bumblebee, turtle, chick, or easy mouse drawing tutorials – all of those are made from just one or two basic shapes.