How to draw a cat with only three ovals

For our first cat, we will start very simple. We will use a little cheat – because our cat is laying down, we can not see the body. That means we do not need to draw it!
So here is how to draw a cat from three simple ovals – one for head and two for paws. Then we add the face, ears and tail, which will make our ovals into a cat. Easy, hey?
Finally, if this is too simple and you want to have more fun, we will turn out lazy Kitty into a lady cat and a mighty cat pirate. Let’s get started.
How to draw a cat with only three ovals: base sketch
Step 1: Oval for the head

Grab your pencil, and draw an oval. This will be our cat’s head.
Use a thin pencil, and draw only lightly. That way we can erase our sketching later.
You can also go around a couple of times to get the shape right. Later we will trace over the thin pencil with a thicker outline, which will hide most of the double line.
Something like this is perfect.
Step 2: Sketch the front paws
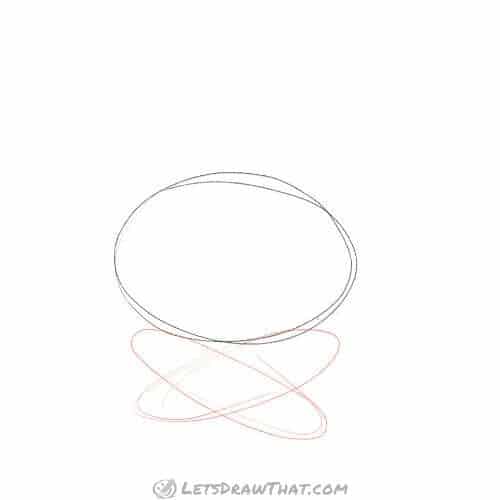
Now in a similar way, sketch two ovals under our head – these will be our front paws.
Draw them one across the other, just touching the outline of our head.
Easy.
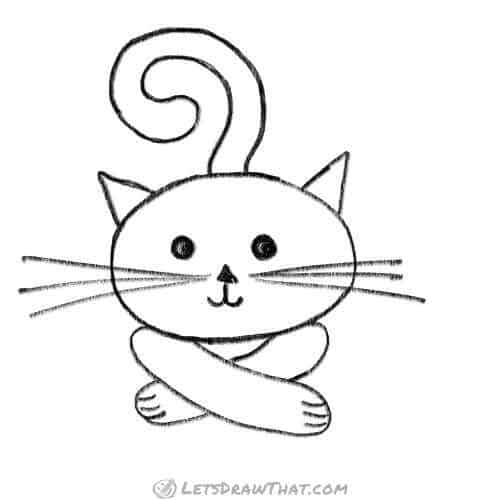
Step 3: Make it a cat

Now we have our ovals in place, let’s make them into a cat.
So what makes oval look like a cat?
Well, you give it a face. Draw two simple dots for eyes first.
Then a small triangle for a nose.
Next the mouth. Simple cat’s mouth looks a little bit like an anchor. Short line down, and then a little arc on each side. Nice, happy smile for our cat.
Next, two triangles for the ears, one each side of the head. Pointy ears together with the anchor mouth magically change our oval into cat’s head!
The final mark of an every self-respecting cat is a long curly tail. Let’s add one sticking out behind the head.
How to draw a cat with only three ovals: outline the drawing
Step 1: Draw the cat from the sketch

Our cat sketch is done, let’s trace it and complete the drawing.
Grab a thick soft pencil, or a black colouring pencil and trace the drawing. This time we want a nice, thick line, so draw bit harder with your pencil.
Trace the face – eyes, nose, mouth. Add whiskers – another must have cat feature!
Next outline the head, ears and tail.
Finally, we are getting to paws. We want them one laying over the other. So first draw the complete one paw. Then trace the outline of the second one, but stop where it crosses the other paw. Complete the tip of the second paw.
Add few lines at the end of paws for fingers and we are done.
How to draw a cat with only three ovals: finished drawing
How to draw a cat with only three ovals: finished outline drawing
Now you can use your eraser, and clean up the sketching.
Go lightly over the visible sketch lines and erase them. Do not worry if you happen to erase a bit of the outline – you can always draw it back!
Good work! You have just learned how to draw a cat from just a few ovals. That is your first cat drawing done!
How to draw a cat with only three ovals: finished drawing coloured-in - pretty cat

Well, now that you know how to draw a cat, there is nothing stopping you from having a bit of fun and improving on the simple kitty we have drawn.
Here our lazy Kitty has become a young cat lady simply by adding some fancy hair and redrawing eyes with eyelashes.
How to draw a cat with only three ovals: finished drawing coloured-in - pirate cat

Not into pretty lady cats? Here is how to draw a cat pirate. Eye-patch, hook and bandanna will turn anyone into a pirate, including our lazy kitty.
Add an angry eye and turn the lips down and we have one seriously grumpy tomcat. No wonder, when all that is left of his ship is few planks!
How to draw a cat using circles
Our second cat is drawn from simple circles. That makes it look very chubby.
Circle Chubby is sitting and looking straight at us, so we need to draw him a simple circle body. We also add few simple details to improve our cat drawing – different eyes and extra face features.
So let’s grab a pencil and learn how to draw a cat from few sketched circles.
How to draw a cat using circles: base sketch step by step
Step 1: Sketch the body
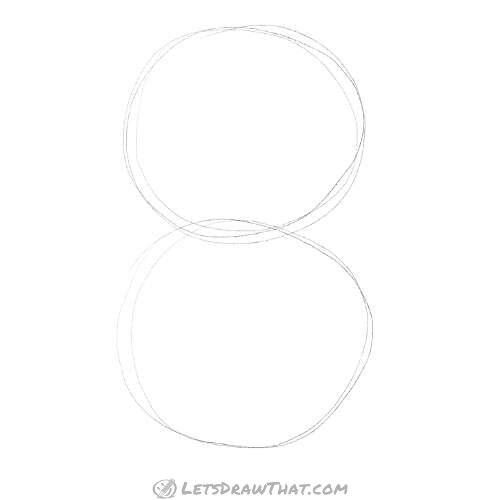
OK, let’s start drawing a snowman.
Hey, I thought we are learning how to draw a cat, not a snowman?
Oh, you do not like drawing snowmen?
Actually, we are drawing a cat. But we are going to use simple circles to draw a simple cat. And here are the first two circles.
We put one on the top of the other, slightly overlapping. So they look like snowman.
See?
Step 2: Sketch the face

Now, let’s add few more circles inside the head circle, to draw a cat face.
Two circles for the eyes, with two small inside for the eye pupil.
Next one small circle in the middle of the face for the nose.
And two more slightly bigger, hanging from the nose like a moustache – for the cat’s cheeks.
There.
Step 3: Sketch the rear legs
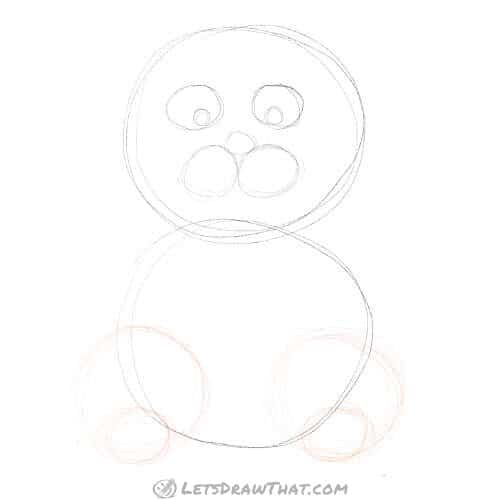
Now let’s move down to draw more circles around for the body.
We will add two larger circles, one each side of the body circle, for the back paw thighs. Draw them about halfway over the body circle, and nicely lined up with the body at the bottom.
Nice work!
Now two smaller circles inside, one in each leg, for the paws.
Done.
Step 4: Sketch the ears

Now, two more circles on the body for the paws and two more on the head for the ears.
And look – we have a lovely teddy bear!
What? A teddy bear?
But I want to know how to draw a cat, not a teddy bear!
Oh, do you? You do not like teddy bears?
OK, then do not draw those circles.
Let’s try this step again…
Step 5: Sketch the ears – cat ears this time
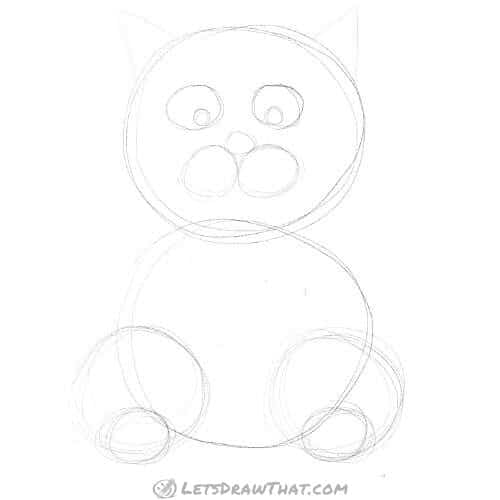
OK, since you do not want to draw a teddy bear, we will need to add two cat ears.
It seems that circles do not work well for cat ears, so let’s draw two pointed triangles instead – one each side of the head. Same way we did in our “how to draw a cat with only three ovals” tutorial.
Now that looks more like a cat.
Step 6: Sketch the front legs

Here are couple more little circles for our cat’s paws.
Draw them over the lower part of the body, between the rear paws. And again – line them up nicely on the floor.
Now for the front legs. Here the circles do not work again like they did not work for the ears.
So let’s draw two sausages. Start about three quarters up the body, and join them down to front paw circles.
Just like that! Nice work.
Step 7: Sketch the tail
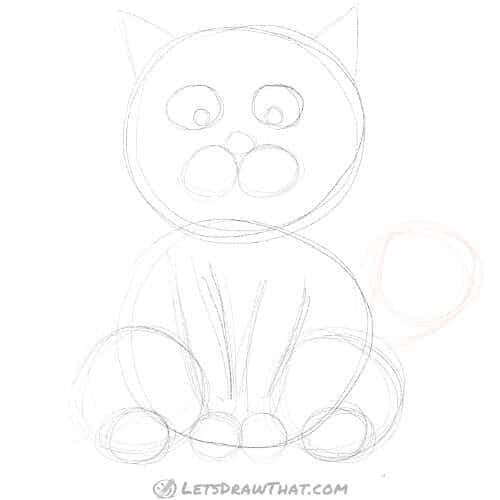
And finally a tail. Here we do one more circle sideways from the body and join it back to the body.
Hey – it is an ice cream cone cat tail!
OK, we are done with the sketching! Let’s grab a soft pencil – or a black colouring pencil – and in the next steps we will draw a cat from our sketch.
How to draw a cat using circles: outline the drawing
Step 1: Draw the whiskers

Here we start drawing the final outline of our cat from the circles we have sketched in the first panel.
We will draw thicker lines with a soft pencil – or a black colouring pencil – over the sketch.
We start with lovely long whiskers.
Now, this is really starting to look like a cat drawing!
Step 2: Draw the head and ears

Next, we outline the cat’s head.
Notice, that I have gone little fancy with the ears. Instead of just tracing the simple triangles from the sketch, I have rounded the sides of the triangles a bit and stretched them past the outline of the head.
Also, I have added a third extra slightly curved line to give the ear bit more a 3D effect.
Now that looks much nicer!
Step 3: Draw rear legs

Next, we trace rear legs. Start with the small paw circles.
Then trace the large thigh circles – but only about half way round.
Just like that is enough. You will see why shortly.
Step 4: Finish drawing the body

Keep tracing the body.
Let’s draw the sides of the body to join the head to the rear legs.
Step 5: Draw the front legs

Next, we trace front paws and legs.
Now our cat is starting to come together nicely!
Step 6: Draw the tail

It is time to outline the tail.
Next, join the lower part of the body by tracing those small bits visible between the paws.
What a chubby cat – and we are almost done!
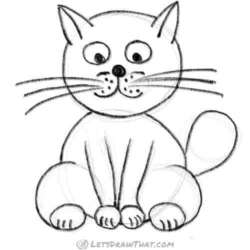
Step 7: Draw cat’s face
Now we draw the cat’s face.
Start first by tracing the eyes.
After that, draw a button-like nose.
Now for the most important part – the cat’s mouth and cheeks. Draw a bit of a straight line from the nose down. Then partially trace the circles we have sketched for the cheeks on each side. The result looks a bit like an anchor.
Finally, just a touch up on the upper cheeks on each side.
There. A happy smiling cat.
Step 8: Draw in the nice extra details
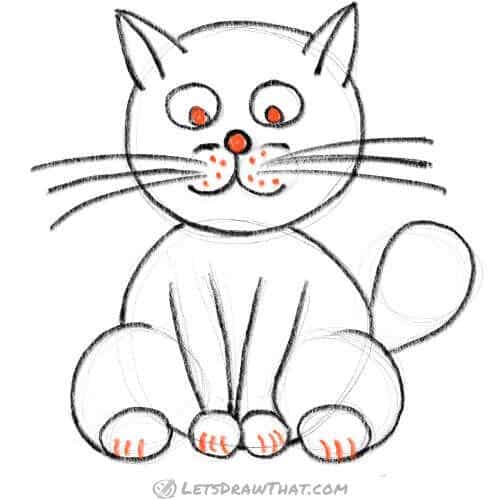
Few final touch ups and we are done:
Colour in the eyes and nose.
Add few dots on the cheeks. This is a tomcat, and he has shaved badly today.
Finally, draw the toes on the paws – and we are completely done.
Ta-da! Now you know how to draw a cat! Simple cute chubby, happy smiling cat, drawn from simple circles!

How to draw a cat using circles: finished drawing
How to draw a cat using circles: finished outline drawing

Well, this is not really a step, is it?
I just wanted to show you the whole cat drawing in one colour.
We are done, we heave learned how to draw a cat using mainly simple circles as guide lines to draw the body.
Again, you can erase the lines left over from sketching by lightly rubbing the eraser over your drawing.
If you feel like it, you can go and colour the cat in.
How to draw a cat using circles: finished coloured-in drawing
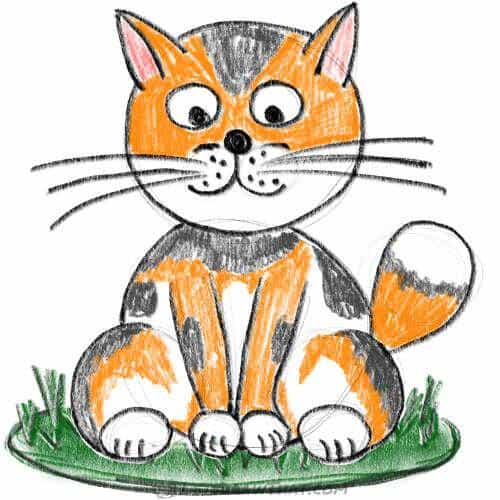
So here is your chance to colour your cat.
I have decided my cat is going to be a calico. That means having fur in three colours. My cat is also sitting on a nice patch of lovely green grass.
What colour is your cat going to be? And where does it sit?
How to draw a cat from triangles

Our next cat will be drawn from triangles, rather than circles. That will make him not a chubby, but rather a slim one. And this time, the cat will be sitting sideways.
We will also add a simple trick, which will make our drawing easier and the picture look better – scruffy fur.
Let’s learn how to draw a cat from simple triangles!
How to draw a cat from triangles: base sketch
Step 1: Sketch the body shape
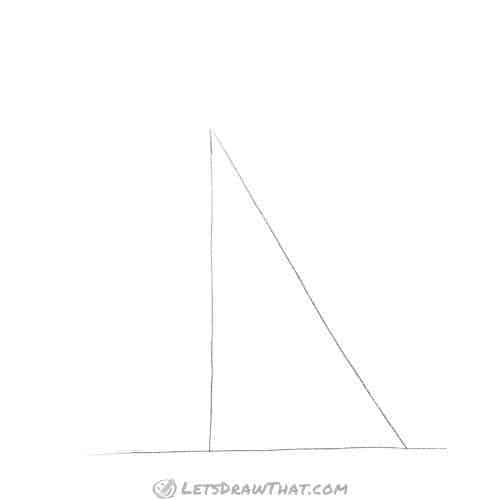
So let’s grab your pencil, and sketch the first triangle.
First, draw the floor line.
Next, stand on it a nice tall pointy triangle.
Do not worry too much about the lines being perfectly straight, as they are just a guide for sketching.
Oh, and do not push too hard on your pencil, so you can erase the guide lines later. Just nice soft doodle sketching, please…
Step 2: Sketch the head shape

Here is the second triangle for the head.
Notice that the head lines up vertically with the left side of the body, and its little bit up and over the body triangle.
But again – do not worry too much. This is not a geometry lesson, but a drawing exercise. You might want your cat to have the head sideways, or tilted. That is the beauty of drawing – you can draw whatever you want.
Step 3: Sketch the shapes for the rear leg
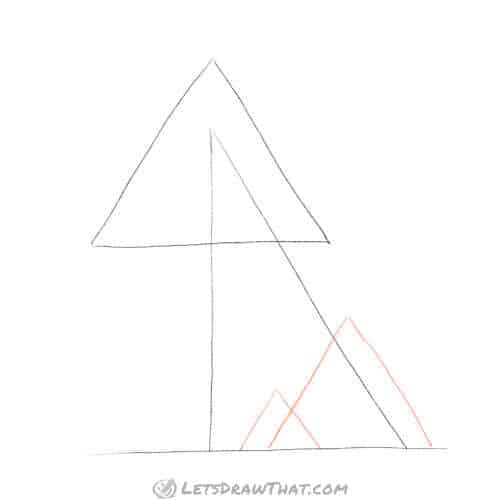
Now we will add the guiding triangles for the rear leg.
Start with the larger one. It sits a little bit back from the body, and it is about one-third of the body height. This will be the cat’s thigh.
Next the small triangle for the rear paw. It is slightly forward from the thigh.
Just like that. Nice.
Step 4: Sketch the front paws
Now two more small triangles for the front paws.
They are bit smaller than the rear paw and start at the front of the body.
Draw the paw closer to the body first, then the second paw in front, right next to it.
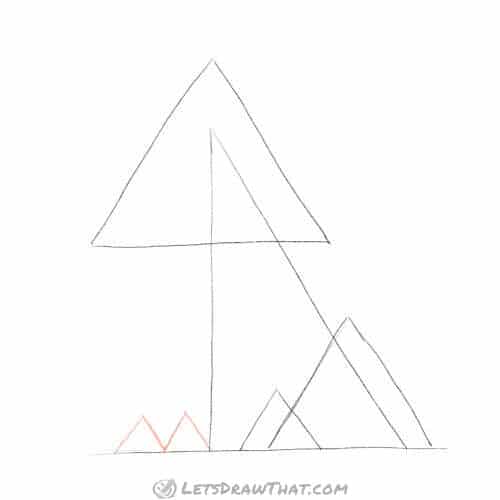
Step 5: Sketch the front legs

Next, we add front legs.
They are not complete triangles, but rather just lines. There is four of them, two per leg.
Let’s start with the middle line. It starts where the head meets the side of the body. It ends on the top of the paw closer to the body.
Next draw the line from the top of the other paw, which runs parallel (same distance from the other one) all the way to head.
Now the other two lines start on the side of the paws. They go up at a bit of an angle, slightly widening the leg at the top.
Wow, that was a long explanation for drawing four lines. I guess it is easier if you just look at the picture. See?
Step 6: Sketch the cat’s face and ears

It is time to draw our triangle cat triangles for the face.
Let’s add two tall triangles for eyes, one smaller for the nose. Then add ears on the side of the head.
Oooh, ooh, he looks like a robot cat!
Oh, you mean like that?

I thought with that triangle head he is more of a Vader cat!


Sorry, got myself side-tracked there. Let’s go back to drawing our scruffy cat.
Step 7: Sketch the tail

Last thing our triangle cat needs is a tail.
So let’s draw him a nice curly one.
That way we will start moving from square robot to a fluffy scruffy cat.
OK, that is the sketching done!
How to draw a cat from triangles: outline the drawing
Step 1: Draw the cat face – eyes, mouth and whiskers

Let’s grab our soft thick or black colouring pencil and start drawing the cat from our triangle sketch.
First, we will do the face.
For the nose, just round up the triangle a bit.
The mouth and cheeks are the same as our chubby circle cat: a short line down from the nose, and then two half circles like an anchor for the cheeks.
Add some mighty whiskers.
For the eyes, let’s stay with the triangle theme. Trace the flat bottom side of the triangle. Then draw the upper part with a nice rounded corner, more like a half ellipse, then a triangle. And add another half circle at the bottom for the eye pupil.
See the picture?
Step 2: Draw the scruffy hair
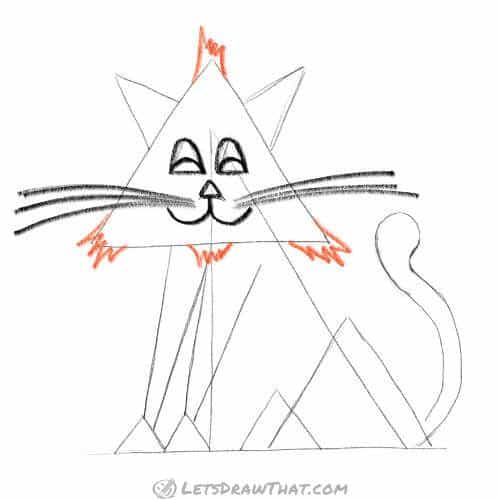
OK, this is where the fun begins. Now we will make our cat nice and scruffy.
Draw bit of scruffy fur onto each corner of the head. Add also some on the chin. Just like in the picture.
Step 3: Draw scruffy ears

Next, we draw ears. Here I am using the same ears like in our “how to draw a cat using circles” tutorial. But I have added some extra scruffy fur to the tip of the ears.
Step 4: Finish drawing the head

Time to finish drawing the head.
Just trace the sketched head triangle to join all the details we have added previously.
Step 5: Draw the rear leg and paws

It is time to draw the rear leg and paw.
Here we practice drawing our fuzzy scruffy lines bit more.
Start with the paw. Trace the flat bottom first. Then start at the top of the paw triangle and draw a zig-zag line down on both sides.
Notice I have rounded and smoothed the top of the sketched triangle. We do not want our cat to look like a square robot anymore.
Now you had some practice, do the same for the large thigh rectangle and make it nice, rounded and scruffy.
Finally, add an extra half hidden the second paw.
Step 6: Draw the front legs and paws

More zig-zag scruffy lines! Let’s draw front legs and paws.
Start with the paws. Again, round up the paw triangles, so they look more like two small buns.
You can hide one paw partially behind the other like I did. It adds a bit of depth to the drawing.
Now for our scruffy legs. Trace the sketch, and add some scruffy fur zig-zagging around where the elbows are.
Step 7: Finish drawing the body
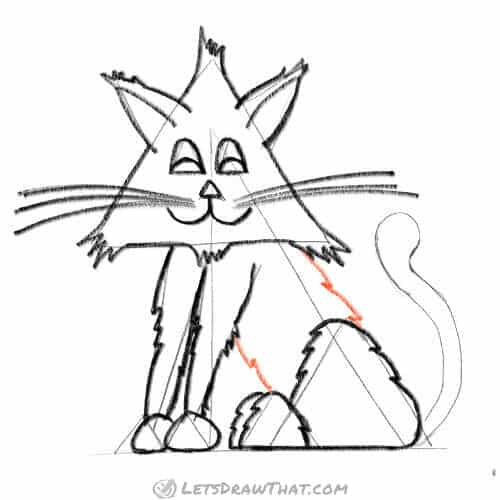
Now that we are so good at drawing the scruffy line, let’s finish the body. Add back and belly to our cat.
Step 8: Draw the scruffy tail

And a final missing piece of the body – the tail.
Again, let’s trace our sketch, adding some scruff and fur.
Step 9: Add some detail to complete the cat drawing

Let’s add few final touches and our cat drawing is done.
Fill in the eyes, leaving small dots in the middle blank.
Colour in the nose and add few dots on the cheeks.
Draw the fingers on the paws.
And give our cat nice white belly.

How to draw a cat from triangles: finished drawing
How to draw a cat from triangles: finished outline drawing

That is it! Our triangle scruffy cat is all complete.
You can go over your drawing, and with eraser gently clean up some of the sketch lines.
Now you know how to draw a cat using simple triangles as guide lines. You have also learned to draw different eyes and scruffy fur.
You might even want to go back to our simple circle cat, and try him with different eyes and some scruffiness!
How to draw a cat from triangles: finished coloured-in drawing
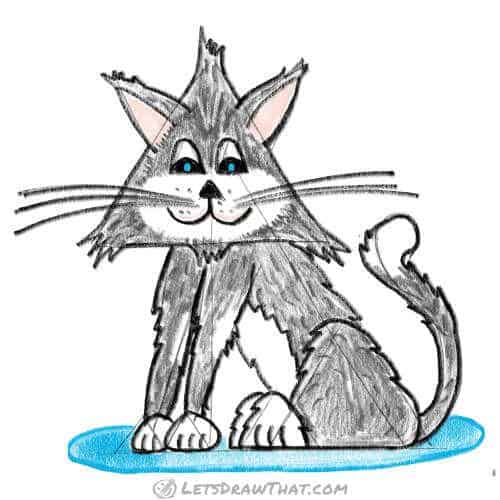
Certainly an optional step. You can colour in your cat.
Here, my Scruffy is grey, with lovely white patches.
What does your one look like?