Learn how to draw a mummy. One mean-looking cartoon mummy drawing with worn bandages flying loose all around it as it haunts the pyramids.

Today we will learn how to draw a mummy. This is one mean-looking cartoon mummy drawing with worn bandages flying loose all around it as it chases night visitors amongst the pyramids of Ghiza.
You will learn step by step how to build the base body shape from few simple rectangles. Then you will wrap the mummy in endless bandages, adding a variety of loose ends and folds to make the bandages look thousands of years old and worn. Another perfect addition to expand your Halloween drawings collection.
min
You will need: pencil, fineliner pen, colored pencils, eraser and drawing paper or sketchbook
These are the favorites we use for drawings on Let's Draw That that we love and recommend:
Disclaimer: LetsDrawThat.com participates in the Amazon Associates Program. If you purchase a product using a link on our website, we earn a small commission, at no extra cost to you. This is one way how you can support this website.
Love drawing? Never miss a tutorial!
How to draw a mummy: base sketch step by step
Step 1: Sketch the mummy's head shape

Our mummy drawing starts with a simple head shape. Draw a nice circle for the upper part of the head.
Then draw the jawline: extend the circle down with a curve on each side to form the lower head. Close the shape with another curve sloping down from the back of the head to the front to complete the jawline.
Step 2: Draw the mummy's body from simple rectangles

In this step, we will build the mummy’s body from simple rectangle shapes. The mummy is running and chasing someone, with its arms stretched out and its body leaning forward.
Draw the front arm first – one rectangle for the upper arm, and one that’s shorter and narrows down to the wrist for the lower arm, both stretched forward from just under the head. Then sketch the rear arm – just a portion of the upper arm is visible.
Draw the body as a simple rectangle slightly leaning forward – just two lines down at an angle. Then build the legs the same way as the arms, with the front leg bent up in the air in a mid-step, and the other leg bent down onto the ground.
Step 3: Add the mummy's eyes, hands and feet

With the bulk of the body done, let’s add the smaller details.
Start by drawing the “face”. Draw a small gap between the bandages where the mummy’s eyes will show. This is just two lines across the lower part of the head circle that meet at the back. Then draw the eyes. To make the mummy look mean and scary, we have drawn narrow triangular eyes sloping inward towards the nose.
Add hands at the end of the arms – for now just simple trapezoid shapes.
Then draw the mummy’s feet. The front foot in the air is a rectangle that narrows down at the tip. The rear foot on the ground is made of two parts – a rectangle for the heel that is bent above the ground, and a triangle for the fingers on the ground.
Step 4: Draw the mummy's fingers

The last missing body part is the fingers on the hands. Let’s draw them now. As you see, we are drawing just simple, cartoon, four-finger hands here.
Fingers on the front hand are drawn as three “V” bent rectangles, with another “V” line for the thumb on the back.
The forefinger and thumb on the rear hand form a big forward-facing “C”. The other two fingers are then added as the same “V” bent rectangles in between.
Step 5: Draw the mummy's bandages
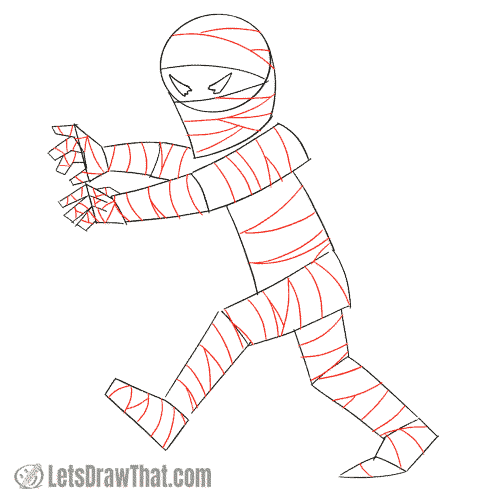
Well, the bare sketch above looks more like a scared ninja fleeing from the fight, rather than a scary mummy chasing someone. So let’s fix that and wrap the mummy in bandages.
The main bandage lines go across each body part – horizontally on the head, body and the leg on the ground, vertically on the arms and the leg that is stretched forward. Add some randomness to the wraps – draw them different widths and throw in a few narrow “V” crossovers where the bandages slipped.
Do not forget to “wrap” the fingers and feet as well.
Step 6: Add some loose bandage ends

Here comes the final improvement on the mummy drawing – adding some loose bandages flying behind the mummy.
Here we have two types – a simple “straight” loose end drawn with two “S” curves for the sides, and the fancier folded over bandages. Check out our how to draw a banner tutorial for detailed instructions on how to draw those funky folds.
Another spooky fellow:
How to Draw a Skeleton – An Easy Cartoon Skeleton Drawing
Learn how to draw a skeleton. An easy cartoon skeleton drawing leaning on a crumbling tombstone, with a bonus anatomy lesson.How to draw a mummy: outline the drawing step by step
Step 1: Draw the bandages on the arms

With the sketch complete, you pretty much know how to draw a mummy. All that is left is to arm yourself with some patience and outline all of those bandages.
While we are generally following the sketch lines, notice the few tricks that make the drawing look much more interesting compared to the sketch:
Draw each of the wraps individually to separate the shapes.
Connect the loose flapping end to the wrap around the arm – skip the arm edge line there.
Extend some of the wraps below the arm edge, looping the end back with a small “C” curve, to suggest some loose bandage wraps.
Finally, leave a narrow “V” gap here and there – we will fill those in black to add some line variety (jump ahead to step 5 to see those gaps highlighted).
Step 2: Draw the bandages around the mummy's head

Let’s finish drawing the mummy’s head next. The small improvement here is drawing out the “S” wiggle near the front eye, to suggest the eyebrow and cheek. We have also drawn the inner lines of the eye triangles as small zig-zags, to enhance the mummy’s mean look.
The rest is the same bandage drawing as above: draw each wrap individually and notice the loose end connected to the head wraps. Oh, and you can draw some zig-zag “ripped off” ends for the loose flying bandages…
Step 3: Draw the bandages on the legs

Well, what shall we say – here are more bandages for you to draw! You should be getting professional drawing them by now.
So just notice where the gaps are left, where the loose wraps are and how the two loose ends connect – same as before.
Step 4: Draw the bandages around the mummy's body and figers
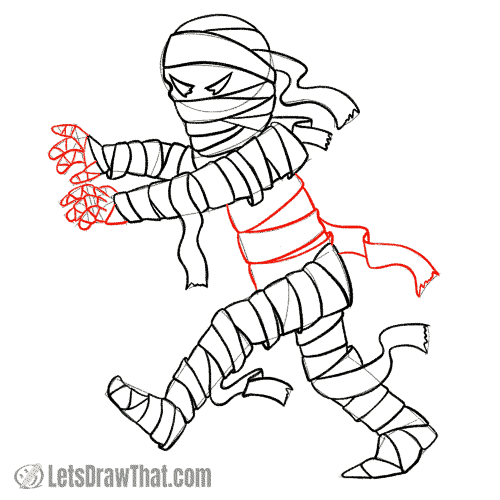
Here are the last two parts to wrap in our mummy bandaging marathon.
The large wraps around the body use the same tricks as above.
The bandage wrapping around the fingers is so small that we can cheat a bit there, and skip drawing each part of the bandage individually. Just round off the fingers a bit, and then draw the wrap lines inside them.
Step 5: Fill the gaps in black
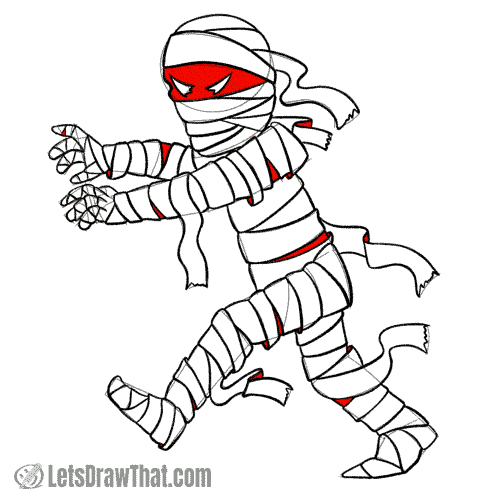
Finally, the drawing of the mummy bandages is done. All that is left is a last small improvement.
Remember we told you to leave some narrow gaps between the wraps here and there? Just fill those in black. Also, fill in the small overhanging loose wrap ends and all of the back folds on the loose ends. Finally, colour the mummy’s face in black as well.
Having some larger black areas adds a nice contrast and line variety to the bandage texture.
Let's draw the pyramid:
How to Draw a Pyramid With a Stone Pattern in 3D View
Learn how to draw a pyramid with a simple step by step tutorial. First, you will learn how to construct the 3D pyramid shape, then how to overlay a nice stone pattern to finish with a perfect, Egyptian-style pyramid.How to draw a mummy: finished drawing
How to draw a mummy: finished outline drawing
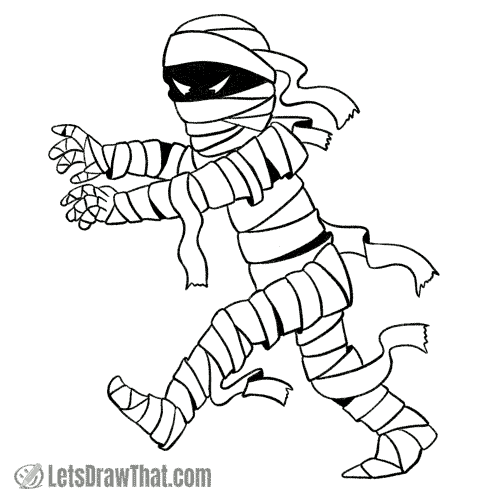
Here is the cleaned-up result of our how to draw a mummy tutorial, all in one colour and without the sketch lines. This is one mean-looking mummy with worn bandages flying loose all around it as it chases after its prey.
Woohoo, another spooky drawing to add to our Halloween drawings collection.
How to draw a mummy: finished mummy drawing coloured-in

Finally, here is the finished mummy drawing coloured in. Actually, there is not that much to colour. We are using a light beige for the bandages, with some darker shading – but you can also leave the bandages just white. We have coloured the eyes in a bright green – not only does it add some bold colour to the drawing but makes the mummy look very mean and mysterious as well.
That lovely pyramid in the background where the mummy hides during the day is taken straight from our how to draw a pyramid tutorial. Finally, we have added a bright yellow crescent moon to add another bold colour to the relatively monochromatic drawing.
And that is the very end of our tutorial – now you know how to draw a mummy!


