How to draw a star from the letter “A”

Our first star drawing is a foolproof way how to draw a star from the letter “A” shape. This is a simple trick to get a reasonably regular five-pointed star drawn by hand – just follow the easy step-by-step instructions.
How to draw a star from the letter “A”: sketching
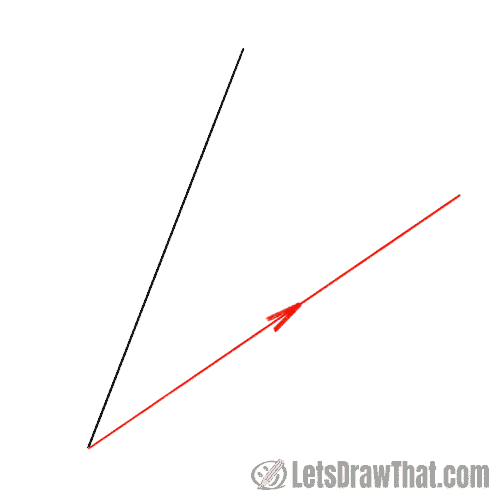
Step 1: Draw an upside-down “V”

Start your star drawing with an upside-down letter “V”. Draw two straight lines at an angle from the same point. Have a look at the picture, and try to keep the angle between the lines about the same as shown here.
For the mathematicians among us, the angle in a perfect five-pointed star is exactly 36 degrees.
Step 2: Make the “V” into an “A”

Next, draw the horizontal line across your upside-down “V” to form the letter “A”. Place the horizontal line about two-thirds up – slightly higher than where you would put it when writing the letter “A”.
The line is the same length as the other two straight lines.
Step 3: Draw the final two sides of the star

As a final step, connect both ends of the horizontal line with straight lines to the opposite bottom leg of our “A” letter to complete your five-pointed star drawing.
How to draw a star from the letter “A”: outline
Step 1: Outline the star

All that is left now is to outline the outer star-shaped figure. A perfect star would have all five points in the same shape. If your drawing is a bit wonky, you can correct the star shape as you are outlining it.

How to draw a star from the letter “A”: finished drawing
How to draw a star from the letter “A”: completed outline

To clean up the star drawing, erase the guidelines in the middle. And if you feel like it, you can give your star a nice happy face!
Star drawing coloured-in

To finish the star drawing, use colored pencils and color the star. Our pointed star is a nice dark yellow, which shines bright in a dark blue evening sky. Leave out some of the lighter white “shine” while coloring in the star.
How to draw a star with one line

Our second method how to draw a star is a lot of fun. We will learn how to draw a star in one line. The line changes directions a few times but you do not lift the pencil as you draw. This is a great way to quickly draw a number of stars where each ends up slightly different. They are great for filling up the night skies in your drawings.
Step-by-step instructions for drawing star in one line
Step 1: Start at top and go down left

Draw the first straight line, starting at the top and going down to the left at an angle. The angle is the same as our first “V” leg above.
But do not worry too much – the whole point of this method is to draw a star that is not perfect.
Step 2: Keep going from bottom to the right
The next straight line goes from the bottom up and to the right. Again, the length of the line should be about the same as the first line, and the angle is the “V” angle from the first exercise.
Step 3: Go from the right straight to the left now

Our next line is the horizontal line that goes straight from right to left and again is the same angle and length as the previous line.
Step 4: From left back down right again

Next go from the left back down to the right again, same angle, same length. You should end up level with the other star leg point.
Step 5: Close the star with a line from bottom back up

The final straight line that completes the star goes from the bottom leg back up to the top point of the star – and we are done.
Hey, now you know how to draw a star in one line. Practice the line sequence for a while, and then try to draw several stars this way, going faster and faster.

How to draw stars in the sky

For the final part of this step-by-step tutorial, we will use the star in one line technique and practice how to draw stars in the sky – drawing many wonky stars really fast.
Drawing many stars in the sky
Draw many stars in one line
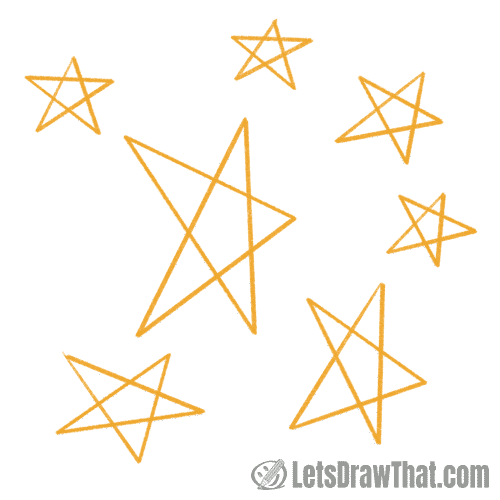
Here we are practicing our how to draw a star in one line technique. As you see, it is hard to get the stars perfect with this method – but drawing a perfect star is not really the goal.
What we really like is that once you have mastered the sequence, you can draw many stars quickly – perfect for the times when you need to fill up your evening sky with many stars. Each star will be slightly different – which is fine and adds great variety to the drawing.
So have a go and draw a few stars in different sizes to fill up your evening sky.
Color in the stars

Time to color in the stars.
Since we have drawn the star outlines in a dark yellow, we do not need to erase the lines once we color in the stars – a neat trick! See – all the lines are hidden now!
How to draw stars in the sky - finished drawing

Finish your drawing by coloring in the evening sky with a very dark midnight blue. Oh, and the largest one of our stars has again a happy smiley face. What an evening and what an easy way how to draw stars in the sky!
And where could you use such a lovely starry night sky? Well, all of our ghost, witch or UFO tutorials feature a beautiful starry sky as a background!
Good night for now!