How to draw a mouse: base sketch step by step
Step 1: Draw the mouse's head and body shapes

As usual, our mouse drawing starts with some very simple base shapes. Draw a circle for the mouse’s head. Then draw a slightly larger oval, tilted sideways and slightly overlapping the head – this will become the mouse’s body.
Step 2: Draw the mouse's nose and eyes

The shape for the mouse’s nose looks like a half of a rugby ball – two curves meeting at the pointy nose tip. Place the nose so the start is centred in the head circle and the nose tip stretches all the way out of the head shape.
Then add two eyes sitting at the upper end of the nose. These are made of simple small circles, with another tiny dot inside for the eye pupil. And since this is a cartoon mouse drawing, the eye sticking out over the head edge line is fine – just a cartoony exaggeration.
Step 3: Draw the mouse's ears and cheek
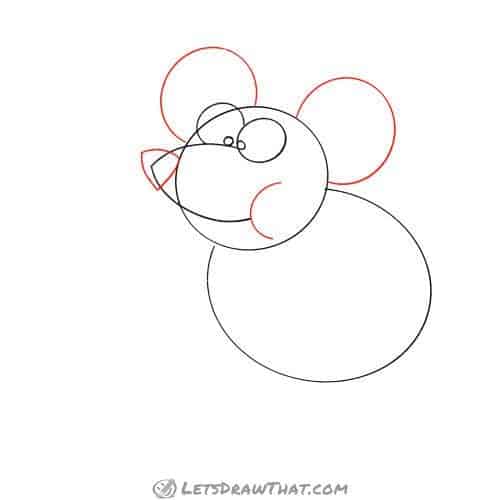
Round ears are what turns the simple drawing into a mouse. Draw the ears as two circles slightly overlapping the top of the head on each side.
Next, add another half circle at the lower end of the nose to give our mouse a nice, puffy cheek.
The final improvement to the face sketch is adding a nose tip – a triangle pointing down, with the sides slightly curving out.
Step 4: Draw the mouse's tail

Another important mouse trademark is its tail. The tail is drawn from the two parallel “S” curves that slightly widen out where they are attached to the body and narrow down to the pointy tail end at the top.
Next, draw another oval at the lower right end of the body tilted forward – this will mark the mouse’s leg or thigh.
Step 5: Draw a cheese block

Here comes another stereotype – every mouse surely loves cheese. So let’s draw a nice block of cheese for our mouse.
Draw the front wedge first – it is a triangle with two straight sides and the third edge round as it is cut out of the cheese wheel. Then extend three short lines, one from each corner, to give the cheese block some thickness. Complete the cheese by drawing the parallel sides.
Step 6: Draw the mouse's hands and feet

Now that we know where is the cheese that the mouse is holding, we can draw the arms and hands that hold the cheese.
Draw a simple “rubberhose style” arm – two parallel lines bent from the shoulder towards the cheese. Then draw a three-fingered hand at the end of the arm that holds the cheese – three small “U” shapes for fingers. The other arm that is hiding behind the body and cheese is even easier – just two small arcs are showing.
Finally, give the mouse two three-fingered feet. The fingers are again made from narrow “U” shapes, draw them slightly overlapping. Close the feet with a round heel. Again, half of the second foot is hidden behind the mouse’s body, so it is only the three fingers that stick out that you need to draw.
How to draw a mouse: outline step by step
Step 1: Draw the mouse's face

Let’s start outlining and improving on the sketch. Draw the mouse’s face first. Outline the eyes, cheek and nose straight from the sketch. Colour the nose tip in black.
Step 2: Draw the mouse's ears

Outline the mouse’s ears from the sketch. Notice we have extended the right front ear a bit over the edge of the head circle so it attaches inside the head.
Then add doubled-up lines inside the ears to suggest the thicker ear edges.
Step 3: Draw the hair, whiskers and teeth

Let’s improve the simple sketch with some more mouse trademarks. Draw two square teeth sticking down from the mouse’s mouth. Add whiskers – three bent lines on each side starting from the nose tip.
And while you are at it, add three similar hairs to the top of the head to give our mouse a simple hairdo.
Step 4: Draw the mouse's head and eyebrows
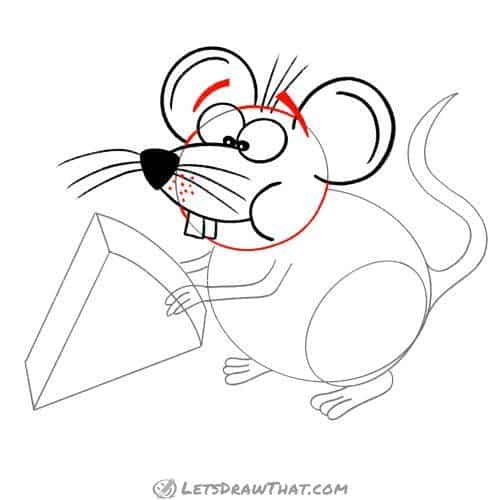
With the mouse’s facial features all in place, we can outline the head. Draw out the head circle, where it is not hidden behind the ears, nose or teeth.
Now we can add some more details to make our mouse cuter and nicer. Add few dots around the tip of the nose. Then draw two eyebrows – just thick lines above the eyes. Well, eyebrows flying unattached to the body are definitely another cartoony exaggeration – but see now how excited the mouse looks to have the cheese!
Step 5: Draw the mouse's paw
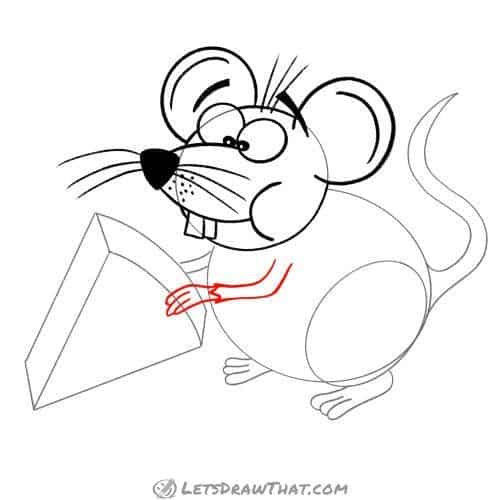
Next, draw the paw that holds the cheese. Here is another small improvement on the sketch. Add a zig-zag “sleeve” on the wrist, that will separate the mouse’s furry arm from the skinny hand.
Step 6: Draw the mouse's body

It is time to outline the mouse’s body. Start on the leg, about three quarters up on the thigh oval and join it with a smooth line to the back, all the way up to the head.
Then outline the belly line. Notice how we have curved the line in a bit more where it joins the leg, to have a more distinct separation between the belly and the leg.
Step 7: Draw the tail and feet
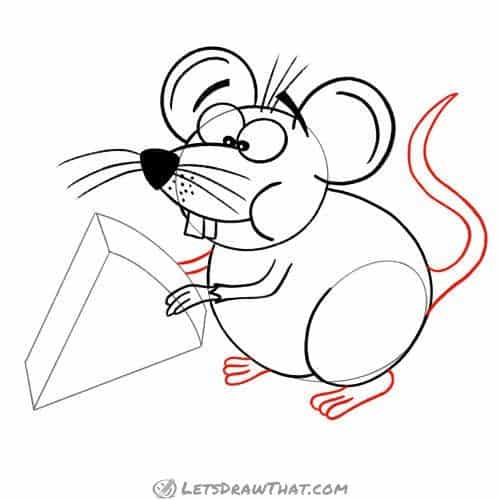
Next, outline the mouse’s tail, feet and rear arm – all of those are a direct copy of the sketch. That is pretty much the last step on how to draw a mouse since all that is left is to draw the cheese.
Step 8: Draw the cheese holes

The most recognisable cheese is the Emmental swiss cheese. With the large holes, it has a very specific look. The holes also create a nice and interesting pattern to draw. So let’s make some holes into the cheese.
As you see, there are three types of holes on the drawing: Simple ovals on the flat faces of the cheese, where you can see the entire hole. Half-ovals on the edges, where part of the hole was cut off. The third type is the holes on the edge between the front and side face of the cheese. Since we see two half-cut ovals on two different planes, these become sort of a heart shape.
Step 9: Draw the cheese block

All that is left to draw is the outline of the cheese block. Follow the sketch lines, and break them where there is a hole on the edge.
The very last small detail to complete the swiss cheese drawing is adding the double edges in a few of the larger holes to suggest some depth.

How to draw a mouse: finished drawing
How to draw a mouse: finished outline drawing

Here is the cleaned-up result of our how to draw a mouse tutorial – one nice chubby mouse that is very excited to have a lovely piece of swiss cheese to snack on.
We almost feel drawing the cheese was harder than drawing the mouse – so if you struggle with the cheese, give your mouse something easier to much on.
How to draw a mouse: finished drawing coloured-in

Finally, here is the usual coloured picture to complete our how to draw a mouse tutorial. The mouse is coloured in light grey, with some darker grey for shading. The paws and the feet are skin pink. We have also added some extra pink shading over the inner ears and on the chubby cheek.
The swiss cheese is of course yellow, with a lighter shade on the front face, and darker on the sides and for the holes to suggest some depth. And that’s it – now you know how to draw a mouse, with a swiss cheese drawing lesson thrown in as a bonus!