How to draw a hamster: base sketch step by step
Step 1: Sketch the hamster's head and body

Our hamster drawing starts with the usual simple base shapes for the head and body.
Draw a circle for the hamster’s head. Then add a pin bowl body underneath – two curved sides that start narrow from the head and widen out, curving back at the base. Close the body outline with a slightly curved flat base.
Step 2: Sketch the hamster's face

Draw the hamster’s face next. Start with two small ovals close together for the eyes. Next, add a “C” shaped nose underneath the eyes. Then draw an anchor shape down from the nose for the muzzle – just two mirrored “J” curves.
Step 3: Sketch the hamster's ears and cheeks

Keep improving on the hamster’s head. Draw two ears on the top of the head, one on each side. These are slightly “U” shaped with a pointy tip in the middle.
Next, add the two curves from the nose to the side of the head to separate the top of the face. Draw the hamster’s cheeks as two simple half circles.
Finally, add a small “C” curve for the mouth at the bottom between the two parts of the “anchor” muzzle.
Step 4: Sketch the hamster's arms and hands

Now it is time to give our hamster some arms and hands. Our hamster will be holding and chewing on a peanut that he found in the field.
Start by drawing the peanut as two slightly overlapping ovals, with the top one just touching the mouth. Then sketch in the hands – only two small squares with a line for the thumb at this stage.
Finally, sketch simple “hose” arms – those are drawn from two curves that widen out from the hand towards the shoulders.
Step 5: Sketch the hamster's legs and feet

The hamster’s legs will be drawn from simple lines similar to the arms. Draw two curves starting from each armpit going down inwards towards the lower edge of the body. Together with the arms, these will mark a kind of shield-shaped tummy.
Then draw another short curve back and add the feet at the end of it – again just simple rectangles, with a small point for the thumb at this stage.
How to draw a hamster: drawing outline step by step
Step 1: Draw the hamster's face and cheeks

With the sketch complete, let’s start outlining the hamster drawing and improving on the simple base sketch.
Start with the hamster’s face: Fill in the eyes, leaving out a small white shine. Then outline the nose, “anchor” muzzle and cheeks straight from the sketch.
Step 2: Draw the peanut and hands

Next, let’s draw the hamster’s small hands properly. Split the small rectangles into individual fingers, rounded off at the tips. Notice that we are drawing the simplified cartoony three-finger hands.
Then outline the peanut, leaving out the part where the two ovals are joined to make it a single piece.
Step 3: Draw the hamster's ears and mouth

Let’s improve on the hamster’s ears next. Draw a tear-drop shaped inner ear into the pre-sketched outer shapes. Then add the top ear edge line.
Next, draw the two front teeth in the mouth – two tiny rectangles – and close the mouth shape.
Step 4: Draw the hair and fur on the hamster's head

Now it is time to draw the “hair” and fur on the hamster’s head. We are using the same zig-zag jagged lines as we used to draw the fur for the monkey or the scruffy hair for the dog.
Start with the little hairdo on the top of the head. Then draw the jagged lines that follow the outline of the head sketch up to the ears. Draw similar zig-zags for the split lines over the face.
Step 5: Draw the hamster's arms and legs

Now that you had some practice drawing the fur on the head, let’s outline the arms and legs with the same jagged lines.
The trick to a nice scruffy fur is to draw the fur pointy tips a bit irregular – some smaller and some larger, some longer and some shorter patches.
Outline the outer body shape, rounding off the inner pointy edge on the legs and the sharp corners where the body transforms into the feet.
Step 6: Draw the hamster's feet
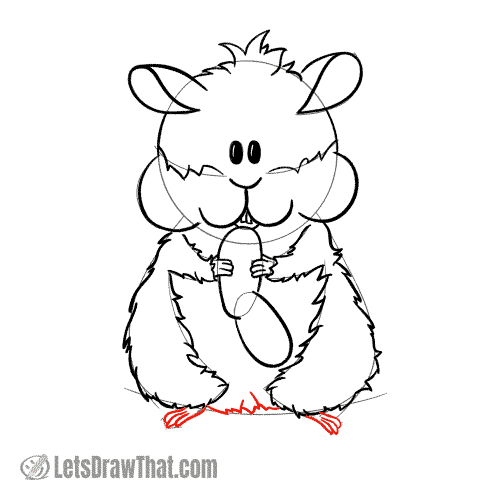
Now we can finish drawing the hamster’s feet. Similar to the hands, split the simple foot shape into three individual fingers – only the fingers on the feet are longer than on the hands.
Then complete the body outline by drawing the jagged fur line between the legs.
Step 7: Add the final details and textures
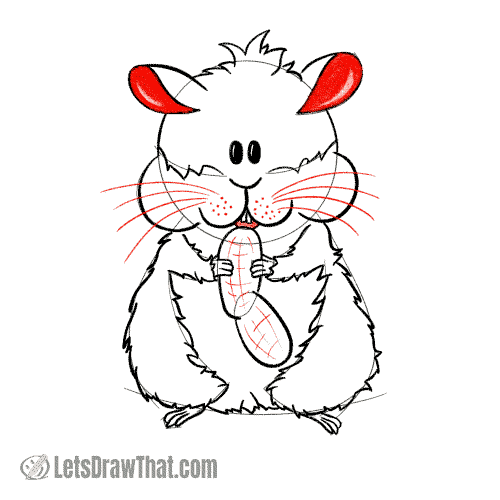
Our hamster drawing is almost done – all that is left is to add a few final small but important details.
Colour in the inner ears and the mouth. Draw some whiskers and add few dots on the muzzle to suggest the short hair there. Finally, add some texture lines to the peanut.
Do you see how a few simple details and textures improve the drawing?
How to draw a hamster: finished drawing
How to draw a hamster: finished outline drawing

Here is the result of our how to draw a hamster tutorial – the completed hamster drawing once we have cleaned up the sketch lines with an eraser.
This is one nice, cute and chubby hamster drawn in a few simple and easy steps. With his cheeks full of food, he is happily snacking on a peanut found somewhere in the fields.
How to draw a hamster: finished drawing coloured-in

The final step of our how to draw a hamster tutorial is to colour in the hamster drawing. We are using a light brown to colour the fur on the top of the hamster’s head and the back, including the arms and legs.
We have left the lower half of the head – the mouth and cheeks – as well as the belly just a simple white, only adding a few light grey hairs for some texture on the hamster’s belly.
The nose, hands and feet are a nice pink colour and the peanut is peanutty beige.
And that is it – now you know how to draw a hamster!