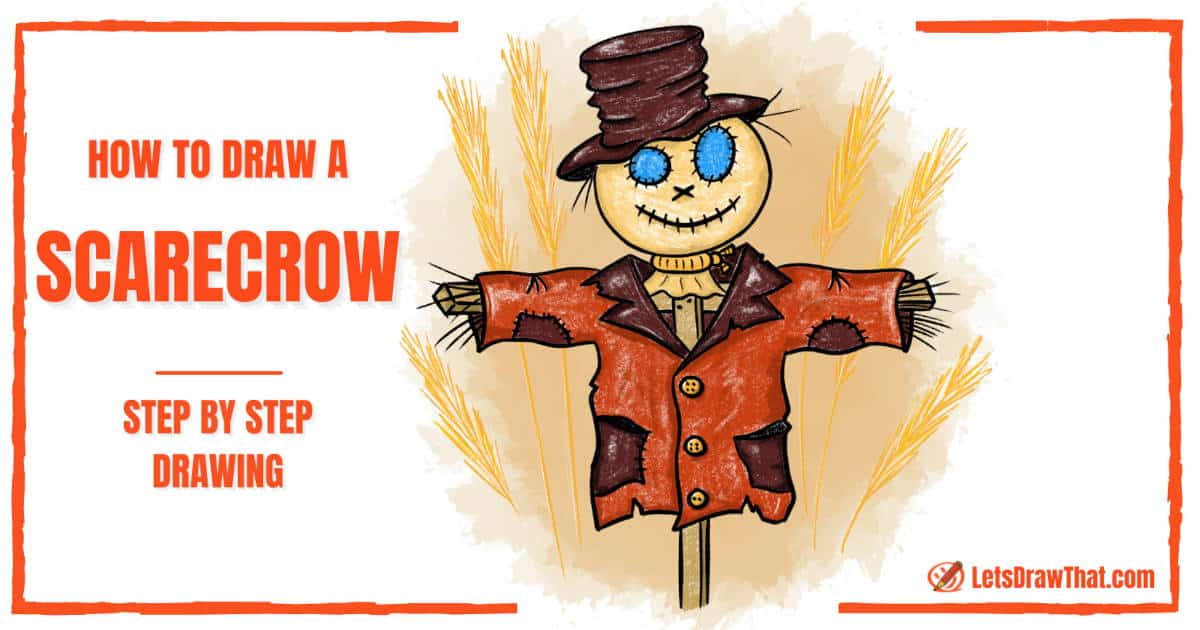
How to draw a scarecrow: base sketch step by step
Step 1: Draw the scarecrow's head and frame

The base body shapes for the scarecrow are indeed very simple. Draw a circle for the scarecrow’s head.
Then draw two straight lines down – this is the pole that the scarecrow is standing on. Next, draw another two straight lines across at a right angle for the second piece of wood that is the scarecrow’s arms.
Step 2: Draw the scarecrow's face and coat

Let’s draw the scarecrow’s face next. Here we are going for a friendly, playful scarecrow look, with each eye a different size. Draw a small circle for one eye and a slightly larger oval for the other.
Draw a simple cross for the nose – this would just be a cross-stitch on the sack that makes the scarecrow’s head. Finally, add a big wide smile.
Then draw the coat that makes the scarecrow’s body. At this stage, it is just a simple rectangle for the body, with two more rectangles for the arms, nicely stretched at a right angle along the wooden frame cross.
Step 3: Draw the hat

Every self-respecting scarecrow wears a nice hat. Let’s draw that one next.
Start with a flat, narrow oval for the crown of the hat, about half the width of the head circle. Then draw the two sides of the hat – mostly straight lines that are just slightly curved in. Close the hat at the forehead with a half-oval of the same narrow shape as the top of the hat.
Finally, draw the brim of the hat. This is another narrow, err, almost an oval with pointy ends. The lower half is slightly flatter, while the upper edge follows the shape of the crown.
Step 4: Draw the scarecrow's neck and the coat

Next, draw the scarecrow’s “neck”. Here we are suggesting the edge of the sack that makes the scarecrow’s head, which is tied with a piece of rope at the bottom. Draw a rectangle with round sides for the neck just under the head – this will be the rope. Then draw the wavy edge of the sack, same as we did for Santa’s bag – two straight lines opening up in a “V” shape and wavy curves for the lower edge.
Now it is time to improve the coat and draw the coat lapels. Start with the inner “V” shape. Then add the notched sides – mirrored “Z” lines at the top, with another wider “V” to close the lapels at the bottom.
Now our scarecrow is smartly dressed for any occasion and the sketch is done.

How to draw a scarecrow: outline the drawing step by step
Step 1: Draw a worn out hat

Well, while our sketched scarecrow is dressed to the nines, the real scarecrows are usually made from old, worn and torn clothes. So let’s “improve” on the sketch and turn those straight lines into some shabby and worn folds, starting with the hat.
As you can see, the top crown oval and the rear edge of the brim are direct outlines of the straight lines in the sketch. Then draw the front edge of the brim as a nice wavy line.
The trickiest part is the outline for the sides of the hat. Draw some round and some sharper folds. Every now and then, extend the fold line halfway into the hat. Notice that the fold line follows the shape of the crown oval to suggest the cylindrical hat shape.
Step 2: Draw the scarecrow's head and neck

Next, let’s improve on the scarecrow’s head. First, outline the eyes, nose, mouth, and neck rope from the sketch. Then add the stitches around the eyes and across the mouth.
Next, add some short cross lines to suggest the rope texture to the neck. Draw a small bowtie knot on the side – just a circle with two short rectangles sticking out.
Step 3: Draw the coat collar and lapels

Now let’s scruff the pretty coat. Outline the collar and the lapels of the coat, as they are drawn in the sketch but add some “tear” lines here and there. Those are just simple “V” cutouts or fancier “W” rips.
Then draw the visible edge of the head bag, adding a few cross lines to suggest the texture of the folds.
Step 4: Draw the rest of the scarecrow's coat

Let’s “ruin” the rest of the pretty and straight coat. Draw the coat outline in wavy lines, instead of the straight lines in the sketch. Add some sharper folds to the coat sides, same as on the hat, and a few rips and tears at the bottom – the same “V” and “W” shapes from the lapel.
There, we are getting pretty good at drawing scruffy clothes.
Step 5: Draw the wooden frame

Finish the scarecrow drawing by outlining the wooden frame. Now, you can just simply close the horizontal “arms” with a straight down line.
But here we go fancy, by suggesting the 3D sides by including a small diamond shape and doubling up the edges. Do not miss the small detail – the two dots for the nails that hold the frame together!
Step 6: Draw the pockets and buttons for the coat

While our scarecrow drawing is almost done, there is still room for a few final details and improvements. Our coat is missing buttons – so draw three small circles with four dots as buttons along the edge of the coat.
Then add some pockets – those would be just squares on a straight coat, but on our old rugged coat they end up being all wavy lines again. Add some stitching to suggest rough mending of the ripped pocket.
Another small detail: add the elbow folds to the sleeves – just three short lines opening up in the “V” shape.
Step 7: Add some patches and straw
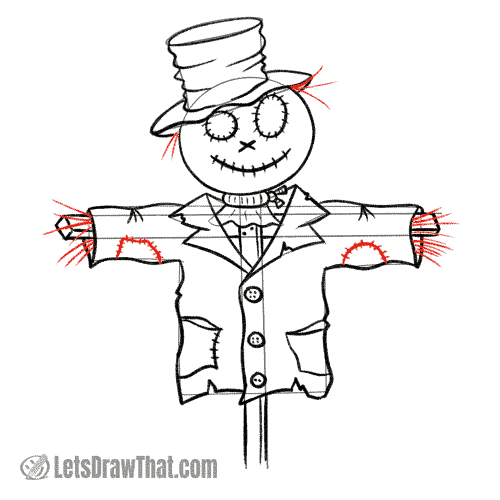
Here are the very last details before we finish our “How to draw a scarecrow” tutorial: Draw some patches on the elbows – just for fun, we are making one a square and one a half-circle. “Sew” them in with some rough stitches.
And finally, since scarecrows are usually filled with straw, let’s add a few short “straws” poking out from the coat sleeves and from under the hat – those give our scarecrow drawing some “fingers” and “hair”.
How to draw a scarecrow: finished drawing
How to draw a scarecrow: finished outline drawing

And here is the final result of our “how to draw a scarecrow” tutorial, once we have erased the sketch lines: one happy and cute scarecrow made from an old coat hanging on a simple wooden frame. The wacky old fella has a straw-filled bag for the head, flat patches for the eyes, and wears a fashionable crumpled tall hat.
How to draw a scarecrow: finished colour drawing

The usual final step is to colour in the scarecrow drawing. Here we have chosen some muted matching colours – a light brown coat, with dark brown pockets, lapels and elbow patches and a matching dark brown hat.
The “hessian” head bag and neck rope are coloured in beige (or a darker yellow). Only patches for the eyes are bright blue to stand out.
But of course, feel free to go crazy and colour every one of the patches in a different colour. After all, the real scarecrow standing in the fields would be built from any leftover clothes and rugs. Have fun!
Pumpkinhead scarecrow for Halloween

Here is another variation on the scarecrow drawing: If you swap the scarecrow’s head for the simple pumpkin with a happy pumpkin face, you will get this jolly fellow that is a perfect addition to the Halloween drawings collection.
And for those paying attention to detail – we used the spider web to add more character to our Halloween scarecrow.