How to draw a turkey: base sketch step by step
Step 1: Sketch the body circle and neckline

As usual, our how to draw a turkey tutorial starts with a very simple circle for the turkey’s body. Do not worry too much if it is not perfect, as most of it will be covered by other body parts.
Then add a nice curved line to one side – this will be the neckline, which will guide us in the next step.
Step 2: Sketch the head and chest ovals
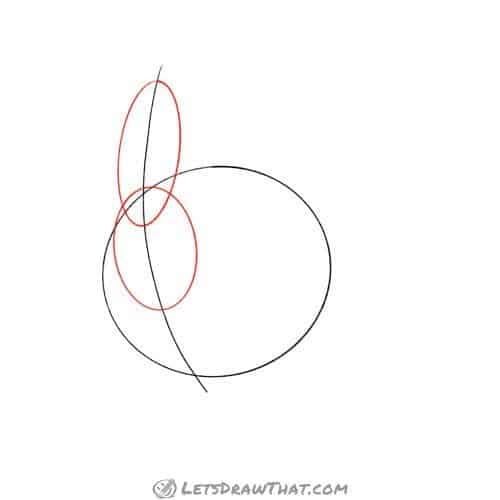
Place two more ovals centred on the neckline you have sketched. The upper one is for the head – make it tall and narrow. The one underneath is a bit wider – that will be the chest guideline. The chest sticks out of the body outline by just a touch, and the head then overlaps the chest oval.
Step 3: Sketch the turkey's wings

Next, let’s give our turkey some wings. Start with the large one on the front. It starts at the “shoulder”, near the top of the body, and is drawn from two curves – a flat one at the top, and a more pronounced one at the bottom. Close the wing with another slightly curved line.
The far wing is even easier – just two curves meeting at the wingtip. Start the upper line in the top middle of the chest oval, and draw down to the same length as the other wing. Then draw up from the wingtip to the body outline.
Step 4: Sketch the turkey's tail
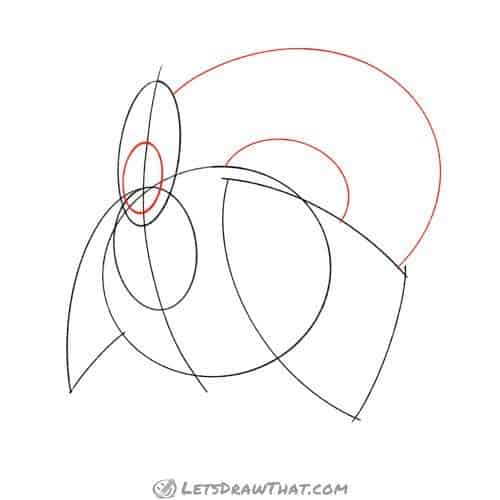
Since you are getting really good at drawing nice smooth curves, let’s do a few more! Draw two semi-circles on the back of the body for the turkey’s tail. The small one will be for the inner row of feathers, the large one for the full tail fan.
Next, draw another small oval inside the head, kind of like a clown nose. This will help us place the turkey’s face features.
Step 5: Sketch the beak, eyes and caruncles

Sketch two oval eyes, sitting right on the top of the small “clown nose” oval we have just drawn.
Then draw a long beak – it is a long smooth curve that starts in the top centre of the “clown nose” and swings down almost halfway to chest oval. The right side is an “S” curve back up.
Just to be precise – the turkey’s beak is fairly standard and short – the long part hanging down is another fleshy bit called “snood“.
Finally, add two caruncles – two long fleshy “bags” hanging on each side of the beak.
Step 6: Sketch the legs and feet

It is about the time to give our turkey some legs. Draw two curved “V” shapes to mark the feathery top of the leg. Then draw two sticks – double straight lines for the leg – one going down, the other one going forward.
Finish the feet with three toes going forward and one going back. On the leg that is lifted all toes hang down. Draw the toes as just simple lines for now.
Step 7: Mark out some feathers
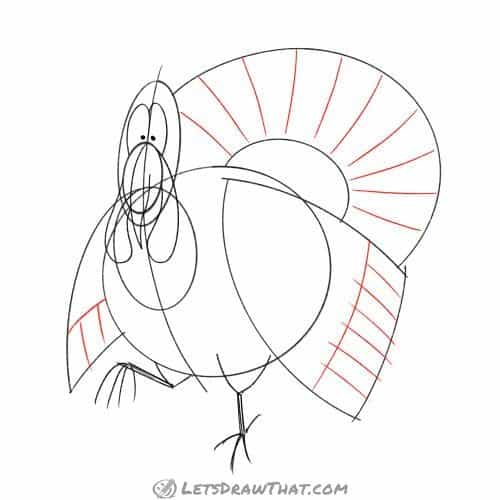
Our turkey sketch is almost done. The final detail is to split the ends of the wings and the tail into separate, roughly equal sections – those lines will guide us drawing the feathers later.

How to draw a turkey: outline the drawing step by step
Step 1: Draw the turkey's face

Let’s outline the turkey, starting with the face. The eyes and beak are a direct outline of the sketch. For the caruncles, outline the sides with a wobbly line to add some character.
Step 2: Draw the turkey's head and wing

Next, outline the head. The top of the head is a straightforward outline of the sketch. As you are coming down past the beak, join it in a smooth line to the chest oval. Draw the lower part of the chest with small scallops to suggest the feathers.
Draw the turkey’s wing next. Round of the sharp corner at the shoulder, and outline the upper and lower edge. Then draw the feathers at the end of the wing that overlap each other. Draw them as a series of rounded “L” shapes – or backwards “J” shapes.
Step 3: Draw the turkey's legs and feet

Now it is time to draw out the turkey’s feet. The upper “U” shapes are a simple outline of the sketch. For the feet, double up the line for all toes, and round them off at the end.
Step 4: Finish drawing the other wing and body

Draw out the visible parts of the body outline.
Next, draw the rear wing. The feathers at the end are again made with “J” shaped lines, to suggest the overlapping feathers.
Step 5: Draw the first row of tail feathers

With the turkey almost complete, all that is left is to flesh out the turkey’s tail. Let’s start with the smaller fan of feathers. These are drawn as a series of upside-down “L” shapes, similar to the overlapping wing feathers. Then add a short line into each feather for some extra texture.
Step 6: Draw the second row of tail feathers

Well, you should be an expert at drawing simple overlapping feathers by now. The second row is drawn exactly the same as the inner feathers – it is just much bigger. And since we have more space, we add one horizontal line along with the vertical line into each feather to add some variety.
How to draw a turkey: finished drawing
How to draw a turkey: finished outline drawing

That is it – here is our completed turkey drawing after we have erased the sketch lines. Now you know how to draw a turkey. This one turned out to be a bit of a confused cartoony fella, proudly showing off its fancy feathers.
How to draw a turkey: finished drawing coloured-in

Our usual final step is to colour in the drawing. Turkeys can be surprisingly colourful birds when their feathers shine in the sun. So we have decided not to be shy and gave our turkey a nice turquoise blue head, with red caruncles and pink snood.
For the body, we have gone for a nice brown, with black and beige markings at the end of the feathers.