How to draw a butterfly
In the first part of our how to draw a butterfly tutorial we will learn how to draw an easy, but fairly realistic butterfly. While butterflies come in endless variety of wing shapes and patterns, we start with common and easy to draw round butterfly wings. And as a bonus, you will get a short botanical lesson, learning names for all the butterfly body parts. Let’s get drawing…
How to draw a butterfly: base sketch step by step
Step 1: Draw the butterfly body

We start drawing our butterfly with a simple, but fairly realistic body outline.
Draw a small flat oval for the head. Then add a wider barrel shaped part of the body – this is called a “thorax”. Oh, here we have an awesome bowling pin!
Let’s add another part, to make a butterfly body out of the bowling pin. Draw a narrow pill shape down from the pin bottom. This part of the butterfly’s body is called the “abdomen”.
Step 2: Sketch the edge lines for wings
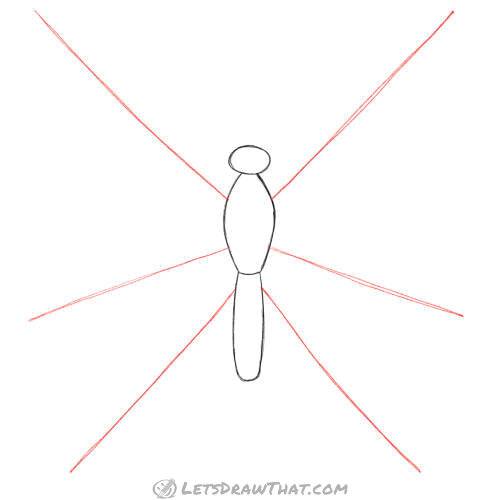
The next step is very simple – just six straight lines. These will mark the edges of the butterfly’s wings.
We have two lines going up from around where our bowling pin would have shoulders.
Two more lines, slightly tilted down from the lower part of the thorax (remember that word?) – the barrel part of the body.
Finally, we add two more lines pointing down for the lower edge of wings starting at the upper part of the abdomen – that is the pill-shaped part of the butterfly body.
Step 3: Sketch the wing outlines

Another easy step – draw four vertical lines to complete the butterfly wings.
Join the two ends of the two upper lines on each side – these are the larger wings. They are called “fore wings” – they are forward when the butterfly flies.
The lines for the smaller lower wings go from the end of the bottom lines to about the middle of the large wings. And to continue our biology lesson, the smaller wings are called “hind wings”.
Step 4: Round off the wings

Now the butterfly wings start to take shape. If you have a look at the butterfly pictures, wings can have many different shapes. So feel free to make your butterfly’s wings taller or wider, or a more exciting shape altogether.
However, since this is meant to be an easy drawing tutorial, here we aim for simple rounded wings.
Step 5: Complete the butterfly wings

Time to shape out the wings completely. Here we rounded off the sides of the wings. As you see, we draw curved lines between the ends of our square wings and the rounded-off corners.
The only part that is left straight is the middle split between the fore and hind wings. (See, I still remember what those wings are called. Do you?)
How to draw a butterfly: outline the drawing
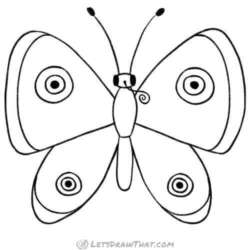
Step 1: Outline the butterfly

Now that we have our butterfly completely sketched, it is time to take your soft pencil and outline the body and wings properly.
Once you have the outline in place, take your eraser, and clean up the sketch lines – we will not need them any more.
Step 2: Add simple wing decorations
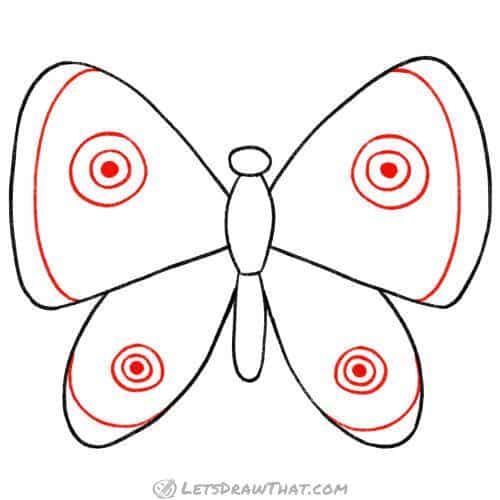
With our base butterfly drawn, it is time to dress it up a bit. Butterflies have some very colourful patterns on their wings. Here we again go for one of the simple decorations – circles in the middle of each wing, and a bit of wing edge outline.
Step 3: Draw butterfly’s “face”

The final step to complete our easy butterfly drawing is to add some “face”. Butterflies have large eyes on the side of the head – let’s add those first.
They suck flower nectar with a long “proboscis” – kind of a tiny elephant trunk, which can be rolled out and used like you use a straw to suck your drink.
The final all-important instrument on the butterfly’s head is two antennae – used to feel and navigate.
How to draw a butterfly: finished drawing
How to draw a butterfly: finished outline drawing

And here is the complete butterfly drawing. While this is a fairly simple way how to draw a butterfly, it is not far from what real butterflies look like.
How to draw a butterfly: finished drawing coloured-in

As usual, let’s finish our drawing by colouring it in. There are some really colourful butterflies – so feel free to choose any colours you like.
Here we have decided to continue with the simple theme, and coloured our butterfly in a nice soft pink, with purple and red accents and a simple grey for the body.
How to draw a butterfly: drawing butterfly wings patterns
The fascinating part of drawing butterflies is the number of colours and patterns butterflies can have on their wings. Let’s see how can we improve on our simple butterfly drawing by adding some pattern to the wings. The butterfly wing drawing pattern here is inspired by the complex real butterfly wing structure but is simplified into easy to draw oval shapes.
Drawing butterfly wing patterns: step by step
Step 1: How to draw a butterfly wing patterns

Let’s improve our easy butterfly drawing. Start by drawing the base pattern on the larger fore wings. First, draw the prolonged oval at the top of the wing – that will be our base wing cell.
Then add few cells coming down off the main cell – in our drawing, we fitted three on each side. You might draw more or less, depending on the size of your butterfly’s wings and the size of the cells you draw.
Step 2: Add the base cell pattern to the hind wings

Now we draw similar prolonged tear-shaped cells on the lower small wings – the hind wings. We have fitted three to the size of our wing. They all touch the spot in the middle of the wing.
Step 3: Fill in the small cells
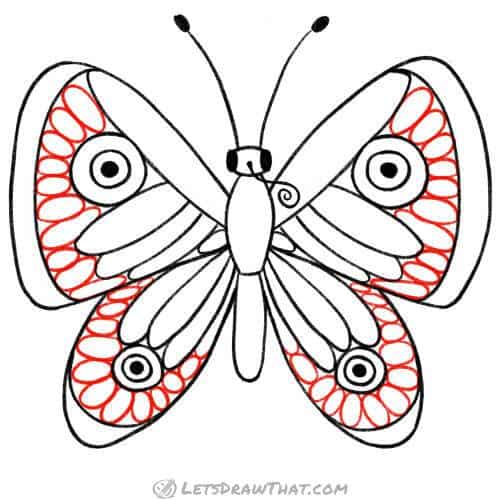
In this step, we fill the remaining blank space on the wing with small ovals. Notice they are all following the outer shape of the wings – and we draw as many as we can fit in.

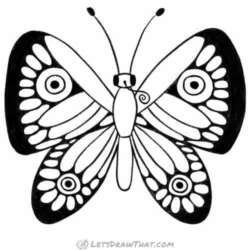
How to draw a butterfly wing patterns: finished drawing
How to draw a butterfly wing patterns: finished outline drawing

And here is the completed butterfly wing pattern. We have filled the wing edges and all the gaps in black – that way we get a beautiful looking pattern even in a black and white drawing.
How to draw a butterfly wing patterns: finished drawing coloured-in

But of course, butterflies, particularly the tropical varieties, are full of colour. We have decided to give our butterfly a nice combination of orange and dark yellow for the inner wing cells, and a matching bright sky blue for the outer cells.
That is one good looking butterfly here. What colours did you use on yours?