How to draw a ladybug: base sketch step by step
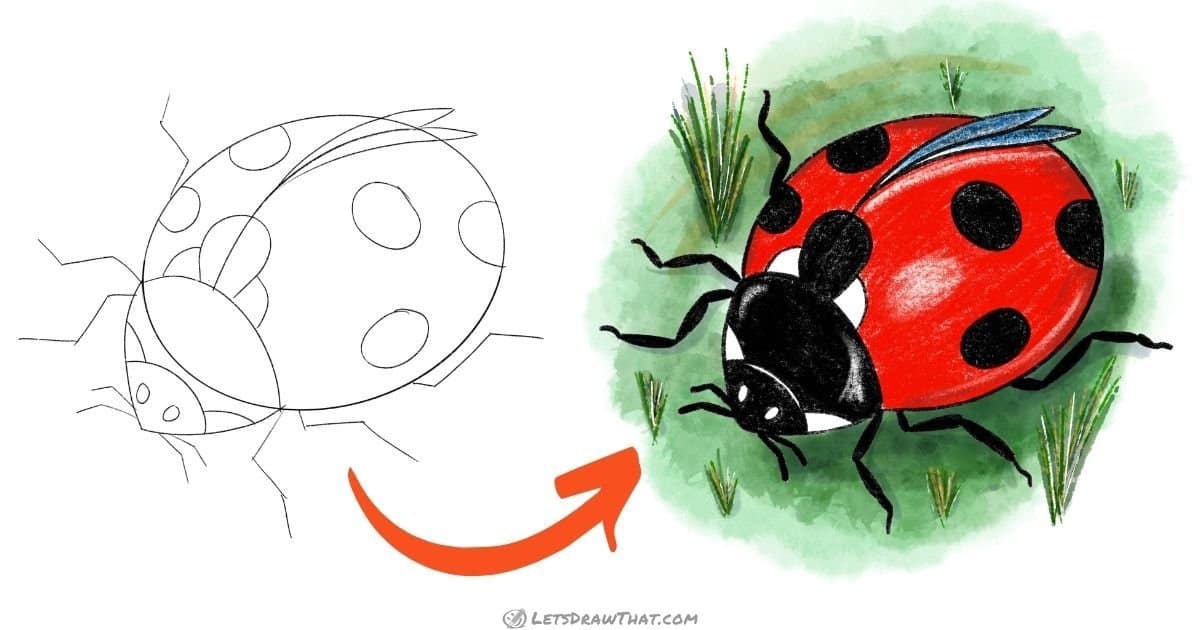
Step 1: Draw oval body

Start the ladybug drawing with a simple oval – nice and round, almost a circle.
Then split the oval with two curves. First, the small curve in the bottom left which will mark the ladybug’s head. Then draw the long curve that splits the body – this will mark the split between the wings.
Step 2: Sketch the ladybug's head

Now let’s add the rest of the ladybug’s head. With the already marked “neckline”, the head is a rounded triangle. Draw the other two sides of the head from the “neckline”, meeting at a point in the middle.
Then carve off a small “face” at the tip of the head with another arc. Finally, add two small ovals for the eyes.
Step 3: Sketch the dots
One of the main features of any self-respecting ladybug is its black spots. The common red ladybugs have seven spots: three spots on each side and one in the middle. Here we mark six spots – the seventh one, on the far side, is hidden in this side view.
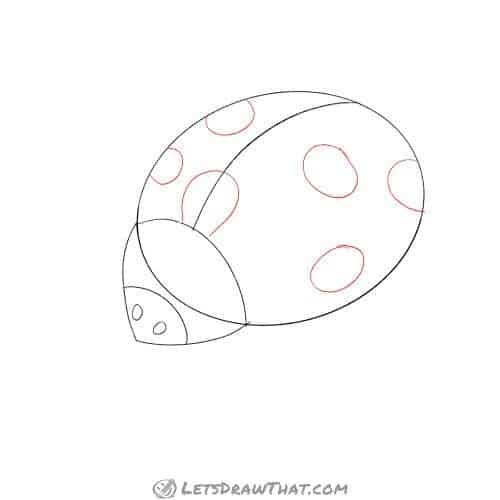
Step 4: Sketch the legs and antennae

Time to sketch some legs for the ladybug. Ladybugs have six legs – and we simplify them here as triple zig-zag lines. The front two pairs start near the “neckline”. Then the last pair is a bit further down the body.
Then add two pairs of antennae coming out from the head, a bit like bent whiskers.
Step 5: Add final details

Our ladybug sketch is almost done – let’s improve it with a few final details.
Mark of two rounded corners behind the “face” and two more on the side of the central spot, where the wings meet the “head”. These will be left white when we colour in the ladybug later.
Then draw two narrow wing edges sticking out from the split between the “elytra” – those are the hardened forewings that protect the fragile wings.
How to draw a ladybug: outline the drawing step by step
Step 1: Draw the ladybug's head and wings
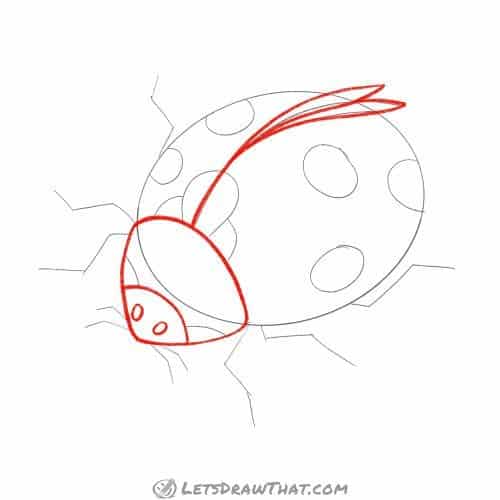
Now it is time to outline our ladybug. Outline the “head” and “face”, and the small protruding wings.
And since we have started with the biology lesson: the ladybug’s head is actually only the “face” part on our picture. The larger part that we have called the “head” should correctly be called the “pronotum” – it is the plate that covers the thorax. Do you remember what the thorax is from our how to draw a bee tutorial?
Step 2: Outline the spots and wings

In our next step, we outline all the spots and the overall body outline of the ladybug.
Step 3: Draw the ladybug's legs
Here is a small trick: when outlining the legs and antennae, draw each section as a thicker line, for the legs almost a narrow filled-in oval. The ends of the legs are just narrower “hooks”.
Step 4: Fill in the spots

Here is a confusing step: colour in the spots, head and “pronotum” in black.
We are not colour blind but, as you have noticed, we highlight each new step in the drawing in red. So the red is black. Got it?
How to draw a ladybug: finished drawing
How to draw a ladybug: finished outline drawing

And here is the completed ladybug drawing outline – with the spots correctly coloured in black – after we have erased the sketch lines.
How to draw a ladybug: finished drawing coloured-in

Now that you know how to draw a ladybug, our usual final step is to colour in the drawing.
Well, we are already half done with all the black parts coloured in. So let’s just colour the “elytra” – the fore-wings – in a nice bright red. And the small wings squeezing out in the split in a nice blue-grey (that is a one layer light blue with another layer of grey on top with my coloured pencils).
Finally, add some green grass for some colour contrast. That is the completed ladybug drawing.


