How to draw a bird: base sketch step by step
Step 1: Sketch the head and body shapes

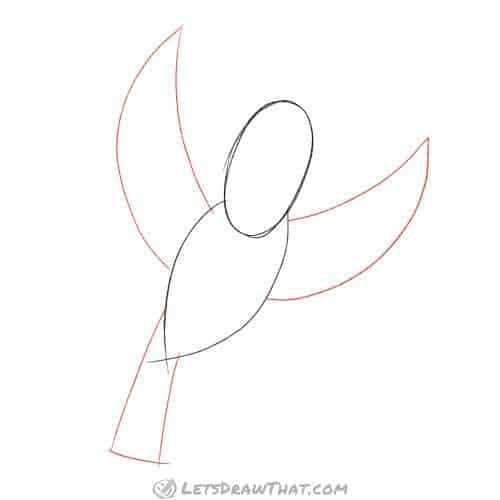
Start the bird drawing by sketching a prolonged oval for the head. Then add two curves, one from each side, to draw another oval-like shape with a sharp point. This looks very much like our basic fish body.
As we will see in the second part of this tutorial, you can draw very different birds by simply changing the proportions of these two shapes. For our parrot, these are both fairly slim and elongated ovals.
Step 2: Sketch the bird's wings and tail
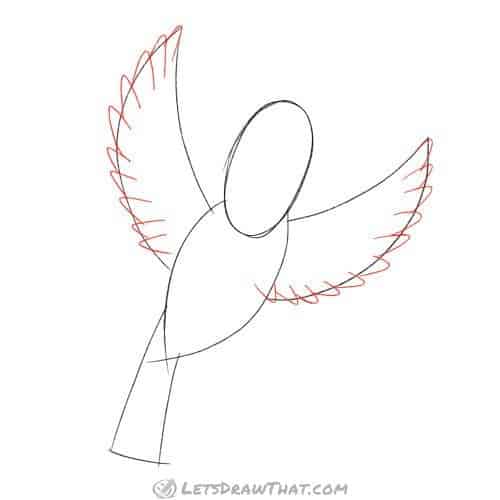
In this step, we add the bird’s wings: these are drawn as two curves meeting at the wing tip on each side. We end up with a shape that looks like a crescent moon, partially hidden behind the bird’s body.
Next, draw a simple rectangle for the bird’s tail. We will improve on both the wings and tail sketches shortly.
Step 3: Draw the feathers on the wings
Let’s add some nice feathers to the wings. Start drawing near the body, and overlap one feather over the next. Draw the wing feathers as a curved line for the bottom, and a blunt and rounded off feather tip that folds back with a flat line on the top.
Step 4: Draw the bird's beak and feet
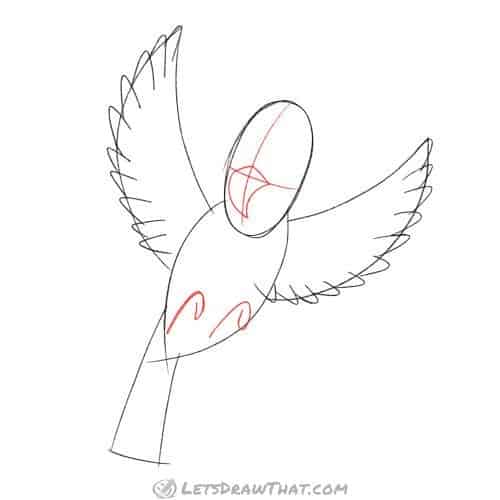
Let’s keep adding more details. Draw a face cross on the head, which will help us place the beak. Draw the upper part of the parrot’s beak as a triangle, centred on the face cross. Then draw two curves for the lower curved part of the beak. These again meet at the centreline.
For the feet, start with two simple curls with a long straight line at the bottom. We will complete the feet in the next step.
Step 5: Finish the bird's beak and feet, add eyes
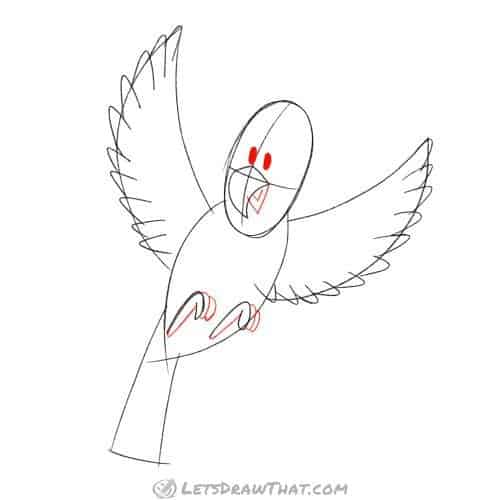
Now it is time to finish drawing both the beak and feet. Add two small triangles, one inside the other, for the lower “jaw” of the beak.
Close the two curls for the feet, so you get a nice rounded hook for the first finger. Then add two more ovals to suggest the other fingers on the feet.
Finally, finish the bird’s face with two simple small ovals – fill them in for the eyes.
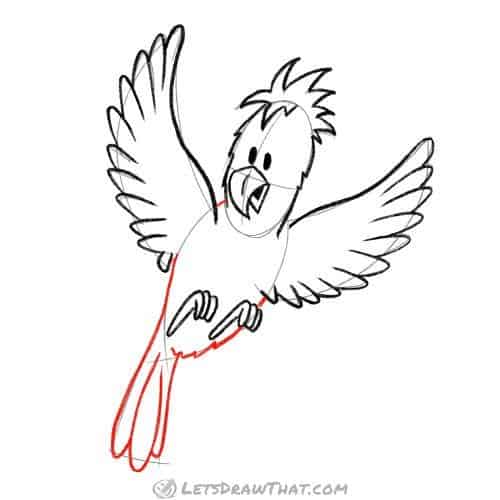
Step 6: Draw the parrots tail feathers and "hairdo"
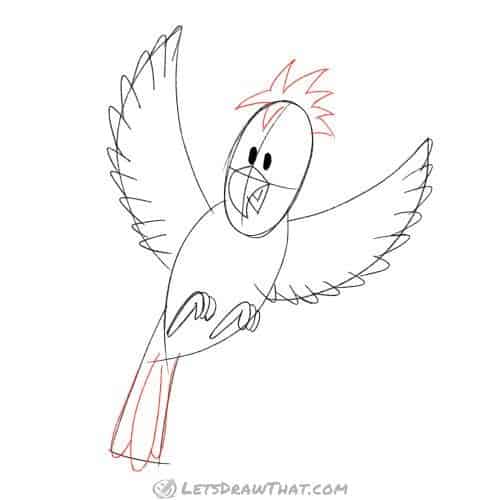
As the final step of sketching our bird, draw the “hair” feathers on the top of parrot’s head – some zig-zag lines to suggest mohawk-like feathers.
Next, draw the three feathers for the tail. Start with the middle one, a very long oval open at the top. Then add slightly shorter side feathers.
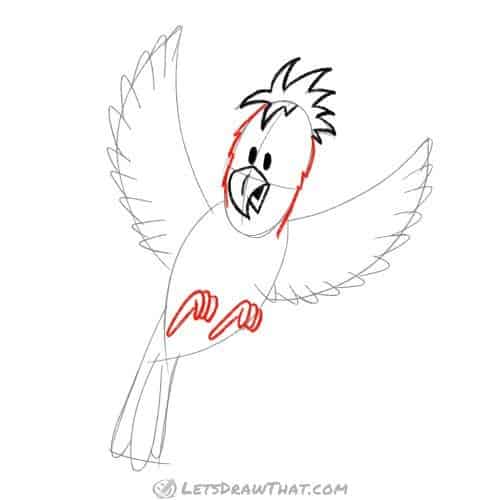
Step 1: Draw the bird's face and hair

Let’s start outlining our sketch: Draw out the “hair” first, then draw the face. Notice we have a added a short middle line to the top of the beak and filled in the tongue, that small triangle, in the lower part of the beak.
Step 3: Draw the bird's feathered wings
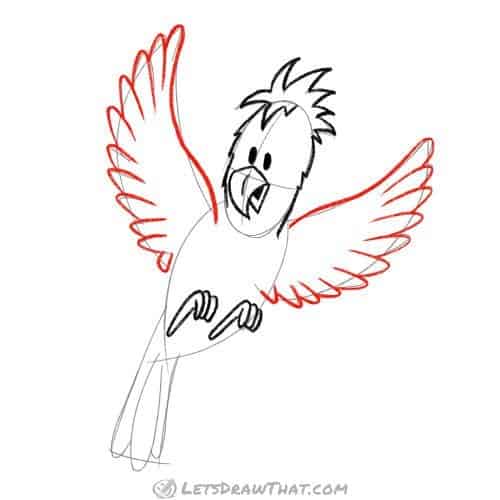
Now it is time to draw the feathers on the wings. Again, start from the bottom near the body, and build up and layer the feathers all the way up to the wingtips.
When outlining the top wing line, notice we have drawn it with a slight “S” curve, compared to the original sketch, to better suggest the stronger shoulder muscles that move the bird’s wings.
Step 4: Draw the bird's tail
The final step to complete our bird drawing is to outline the tail feathers and finish the body outline. Again, use some zig-zag lines to draw the lower part of the body under the bird’s feet, to suggest some short feathers.
Step 5: Add a few final details

While the bird drawing is complete now, we can, as usual, improve it with a few extra details. Here we are adding two “S” curves to the wings, to suggest the strong upper wing muscle. Finally, draw a few small “V” lines to suggest the feathers on the parrot’s chest.

How to draw a bird: finished parrot drawing
How to draw a bird: finished parrot outline drawing

Here is the completed pencil outline of our parrot bird drawing, after we clean up the sketch lines with an eraser.
How to draw a bird: finished parrot drawing coloured-in as macaw

As usual, we like to finish our drawing in colour. The first colour variant is inspired by the scarlet macaw parrot, living in the tropical rainforests of Amazon basin in South America. These colourful birds have a bright red body, with blue, yellow and green feathers on the wings.
Strictly speaking, macaws do not have that “hairdo” on the top of their head – so leave that out, if you want a more believable macaw. But this is a cartoon style bird – we can have anything that we like.
How to draw a bird: finished parrot drawing coloured-in as sulphur-crested cockatoo

For our second variant, we have used a much simpler colour scheme – just a bit of yellow for the “hairdo” and middle of the wings, with some light blue to shade otherwise white feathers.
Just by changing the colours, we have a very different parrot from a very different part of the world – this is an Australian sulphur-crested cockatoo.
How to draw a bird: modify the sketch to draw a very different bird
Step 1: Sketch a wider body and head

We are now going to use the same shapes, just with different proportions, to draw a very different type of bird. We will move at a faster pace – go back to the tutorial above if you need to brush up on the details.
Here are both base body sketches overlayed, so you can see the differences: To draw a wren, the head is almost a circle, and the body, while using the same two curves, is also much wider. The wings are shorter, and again wider, almost quarter circles. Finally, the tail, while again the same rectangular shape, is smaller and shorter.
Step 2: Sketch the wren's body

Here is the updated bird’s body sketch on its own, to which we have added the bird’s face and feet. As you see, the feet are again the same, just a touch smaller. The top part of the beak is straight, not bent, but apart from that, it’s the same as the parrot.
Now, this is a very different bird to a parrot already – we are drawing a small wren!
How to draw a bird: finished wren drawing
How to draw a bird: finished outline wren drawing

Moving fast: here is the completely outlined wren. We have again used the same tricks as for drawing the parrot above, including the zig-zag lines for feathers.
How to draw a bird: finished wren drawing coloured-in

And finally, a completed, coloured in wren. Even the colours are very different from the parrot – just simple hues of brown, with a dark yellow beak and feet to bring in some contrast.