How to draw an elephant: base sketch step by step
Step 1: Draw the base head and body shapes

Our elephant drawing starts, as usual, with two simple shapes. Draw an oval for the elephant’s body – notice it tilts slightly to the left. Then add a circle for the head, partially overlapping the body.
Step 2: Sketch the "nose" and legs

Next, add another circle onto the head, a big round nose pointed down. This will be the base of the elephant’s trunk.
Then draw the elephant’s legs – at this stage, we are just marking the leg positions with simple straight lines. The two legs facing us will overlap the body. The other two legs are hidden behind the body.
If the lines look bit confusing, check a couple of steps down, where we add the feet – it is more obvious which line makes up which leg once you add the feet.
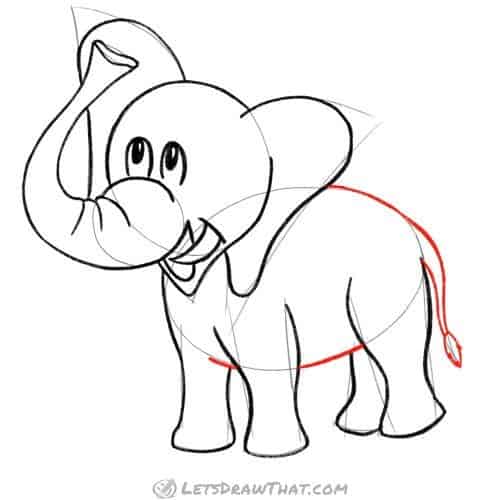
Step 3: Draw the elephant's trunk and tail
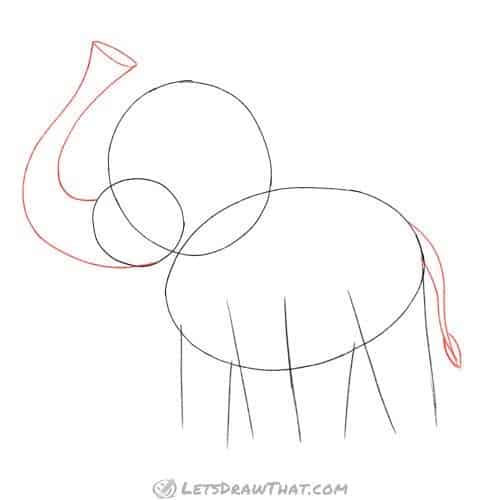
Probably the most prominent feature of an elephant is its trunk. Draw a small flat oval where you want the trunk to finish. Then join the sides of the oval to the “nose” circle we have drawn with two smooth curves.
Similar to the trunk, draw the elephant’s tail as two “S” curves joining at the point. Then add a small tail end – a kind of eye-shaped oval.
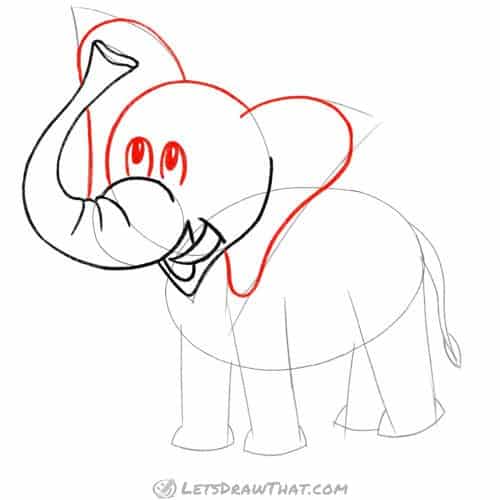
Step 4: Sketch the elephant's ears, mouth and feet

In this step, we are adding another important elephant feature – its large ears. These are two large prolonged triangles, with slightly curved sides – similar in shape to our simple butterfly hind wings.
Next, add another small triangle at the bottom of the head – this will be the chin or the elephant’s mouth.
Finally, sketch the elephant’s feet – these are a bit like an upside-down bowl, made of two short curves on each side, and a long curve at the bottom to join the sides and close the feet.
Step 5: Round off the ears, and sketch the eyes, mouth and tusk

In this step, we are making some final improvements to our elephant sketch. First, round off the elephant’s ears with a wide curve at the top, and a narrow one at the bottom.
Draw two simple oval eyes, with small ovals inside for the pupils.
Next, draw another elephant trademark feature – its tusks. We can see only one from this view, and it is drawn from two simple curves meeting at the point. Close the tusk with another curve for the “cheek”.
Finally, draw a simple smiling mouth for our elephant.
How to draw an elephant: step by step drawing the outline
Step 1: Start outlining the elephant's face

Start outlining the elephant’s head from about halfway up, and down to the chin. Round off the tip of the chin. Then outline the tusk.
Next, we start improving on our simple trunk sketch. Outline only the top portion of the “nose” circle. Then draw three more “folds” – simple curves – at the start of the trunk.
Step 2: Finish drawing the trunk and mouth

Draw small curves at the top to finish the trunk folds, where it is wrinkled from being bent up.
Then outline the rest of the trunk and the mouth. Notice we have added a slight bend to the small oval at the end of the trunk.
Step 3: Draw the elephant's head
Now it is time to outline the rest of the elephant’s head and ears. Once you have done that, draw the eyes and fill in the pupils.
Step 4: Draw the elephant's legs

In this step, we are outlining the elephant’s legs. If you want a simple drawing, you can draw the legs straight, the same as they are in the sketch, but they will look much better if instead of the straight lines you use smooth “S” curves. Do not forget to widen out your legs at the feet.
Step 5: Finish drawing the elephant's body and tail
This is a simple step, just outline the visible parts of the body oval – and notice we are not closing it completely. Then draw the elephant’s tail and the little hairy tip.
Step 6: Add final details
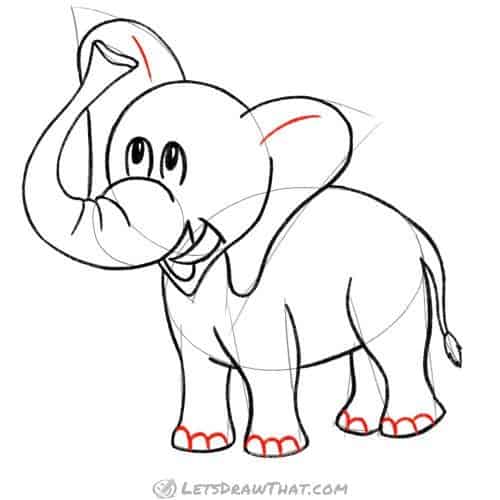
Our elephant drawing is almost complete – here are the final details. Add two curves to mark the top of the ears.
Then draw some toes on elephant’s feet – just simple upside-down “U” shapes.
How to draw an elephant: finished drawing
How to draw an elephant: finished outline drawing

Here is the completed elephant pencil outline drawing, after we have erased the sketch lines with an eraser.
How to draw an elephant: finished drawing coloured-in

And as usual, we like our drawings completed in colour. Elephants are just a simple grey in colour. The trick is to use different shades of grey to shade the elephant’s body. We left the tusk and toenails white and added a pink mouth for contrast.
That is the end of our how to draw an elephant tutorial – this one turned out to be a happy, cute young elephant. And judging by the size of the ears, this is an African elephant. The Asian variety has much smaller ears.