How to draw a sunflower: base sketch step by step
Step 1: Draw two circles for the flower head

Our “how to draw a sunflower” tutorial starts with just two simple circles. Draw one large circle, and then another smaller one, about half the diameter of the large one inside.
Now, you can use a compass or something round, such as a glass or mug edge to draw perfect circles as we did. But do not worry too much if you do not have anything handy – these are just guidelines to size the sunflower petals. There is no harm if the circles end up a bit wobbly.
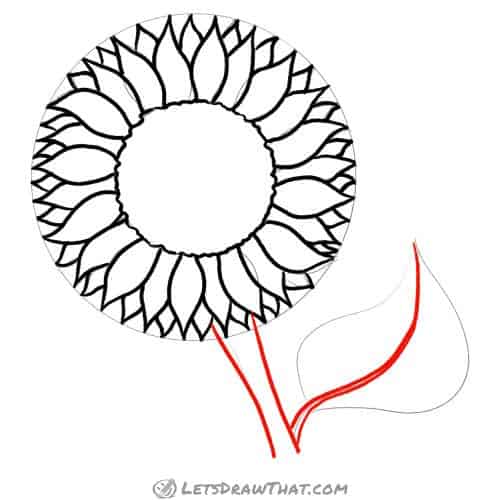
Step 2: Sketch the sunflower stem and leaf
Next, sketch a simple stem for your sunflower – just two parallel lines.
Then add a simple leaf to one side, the same as we used in our cherries tutorial. First, draw the middle “S” curve for the midrib. Then add two more curves for the leaf edges – another “S” for the upper edge, and almost a “C” curve for the lower edge.
Step 3: Draw the first layer of sunflower petals

With the basic sunflower shape completed, it is time to draw the first layer of the flower petals. The basic petal shape is made of two flat “C” curves, that are joined into a tip at the outer edge and attach slightly apart to the central sunflower seed disc. Once you have the base shape nailed, add some variety to your petals by twisting the pointed ends sideways.
Notice we are drawing the first layer with some gap between the petals – you need to leave some space for the next layer.
Step 4: Draw the second layer of petals

Time to fill those gaps with some more petals. Again, the basic shape is the same. Play around to add more variety with some petals nicely centred in the gap, and some drawn closer to either side of the gap.
The secret to a nice looking sunflower is to draw an intricate, slightly irregular pattern of the petals.
Step 5: Draw the final layer of petal tips

If you are running out of patience drawing the many petals, you can skip this step – the sunflower above already looks pretty good.
But for a more interesting and layered look, we are adding a final row of petals. Draw these just as small “V” shaped tips hidden behind the previous two layers – one into each gap. Again, do not draw them all the same, add some variety with the tips twisting and leaning either side.
How to draw a sunflower: outline the drawing step by step
Step 1: Draw out the seed disk and sunflower petals

With the awesome sunflower sketch done, let’s start outlining the picture. Start with drawing out the central seed disk – the small middle circle.
Here is the reason we told you not to worry too much about the circle being perfect – we are outlining it with a wobbly jagged line, which will hide any irregularities.
Next, outline the first two layers of the full-size petals. If you have a keen eye, you will notice we are still playing and adding more irregularities to the pattern by swapping how some of the petals overlap.
Step 2: Draw the outer petals

Here is a simple step – just outline all of the small petal tips.
Step 3: Draw the sunflower stem and leaf midrib
Another fast and easy step after drawing all those petals: Outline the stem. Notice we made it a touch wider at the top where it joins the flower.
Next, draw the stalk and midrib for the leaf. We are doubling up on the simple sketch with two “S” curves slightly apart for the thicker stalk, coming into a single tip line as we get closer through the leaf midrib to the tip of the leaf.
Step 4: Draw the leaf

The sunflower leaf has jagged edges and is usually slightly wrinkled. So let’s improve on our sketch and draw the leaf edges with a nice wobbly line. Then add the leaf ribs on each side – these are just simple curves.
Step 5: Add some texture to the sunflower

The very last step and a final improvement to the sunflower drawing is to add some textures. Again, this is a step only for the patient ones amongst us.
Let’s start by drawing the seeds onto the middle seed disk – these are small circles, or tiny “C” shapes if you do not close the shape completely.
Next, add some wrinkle lines to each of the petals – here we are doing two to three per petal – again, strive for some variety in the line shapes.
Finally, add some texture lines to the stem.

How to draw a sunflower: finished drawing
How to draw a sunflower: finished outline drawing

And here is the completed sunflower drawing once we have erased the sketch guides.
Congratulations! If you have followed the tutorial step by step, not only you have learnt how to draw a sunflower but also shown incredible patience in drawing an amazing 48 sunflower petals one by one! (Yep, we did count them.)
How to draw a sunflower: finished drawing coloured-in

With all the texture lines, the sunflower drawing looks pretty awesome in black and white. But as usual, we like to show the final drawing coloured in.
The sunflower petals are yellow. The trick that adds some depth is colouring the small tips in the third layer a bit darker than the front two layers.
Similarly, we use a light green to colour the stem and leaf with a darker green for shading.
The central seed pod is dark brown, with some almost black shading. Leave small white spots as light reflections in the middle of the small seed circles – or add them back with some white.
And that is the end of today’s “how to draw a sunflower” tutorial.