How to draw a penguin chick
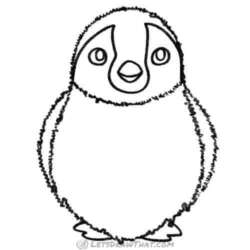
Our first penguin is just a young chick. He is fluffy and cute, with nice round body and head. That makes him an easy first penguin to draw from a very simple oval shape.
Despite being cute, our drawing is a semi-realistic emperor penguin chick. What makes him cartoon looking is the exaggerated size of the eyes and a simplified body shape.
How to draw a penguin chick: base sketch step by step
Step 1: Draw an egg for the body size

Baby penguins hatch out of eggs, so let’s draw one as our basic body shape.
This helps us see roughly what size and shape our penguin will be. If you want to draw a penguin that takes up most of your page, make your egg about the size of the page too. If, on the other hand, you want a small penguin, make sure your egg is small!
Step 2: Define the body shape

A baby penguin isn’t quite the shape of an egg, so let’s add a few lines to define the body a bit more.
We split our egg shape about one third from the top by a curved line – this marks the split between the body and the head of the penguin chick.
Then we tighten the half-circle that is the head a bit, as well as the bottom larger oval for the body, to define the split between the head and body – the shoulders, if you will.
Step 3: Sketch in guidelines for details

Start sketching in some of the details. Here, we add wings, feet, and the markings for the head.
Baby penguins are very round and squishy. We show this by using soft curves for a lot of the drawing. This is why curves make up all the shapes we add.
The wings are like extra bumps on the body, and the feet are half-circles added at the bottom of the body.
Penguin chicks’ bodies are mostly made up of fluffy grey feathers, but their heads already have the distinctive black and white markings of their parents. This is what we are going for with the curves on the head. We add one curve for the “hairline”. Then we draw two lines to form sort of a nose in the middle.
How to draw a penguin chick: outline the drawing step by step
Step 1: Draw penguin’s face

Our next step in how to draw a penguin is to add the face.
We use two ovals for each eye. Here we start to make our drawing a cartoon penguin, as the eyes are a much larger size than a real penguin’s.
We add two squished triangles in a diamond shape for the beak.
Our penguin is starting to look very cute!
Step 2: Draw the penguin’s face markings

Now we use the sketch lines on the face to guide us in making the markings on the face. We trace the inside of the head, and then we follow the guidelines past the eyes, before breaking away from them and circling the beak.
When we add colour, this will be the part that will end up coloured in black.
Step 3: Trace the body shape

In this step, we trace the outside of the body, as well as the line that separates the head from the body.
Notice how we don’t use normal lines for this outline, but slightly jagged ones. This is, again, to suggest the short fluffy feathers and to show that our penguin is very fuzzy!
Step 4: Add wings and feet

Draw the wings in with the same fuzzy lines that are used for the body.
Add in the feet. Draw in an extra bump in the feet to show the baby penguin’s toes.
How to draw a penguin chick: finished drawing
How to draw a penguin chick: finished outline drawing

Finish the penguin drawing by erasing the sketch lines with a soft eraser.
What a cute penguin we have drawn!
How to draw a penguin chick: finished drawing coloured-in
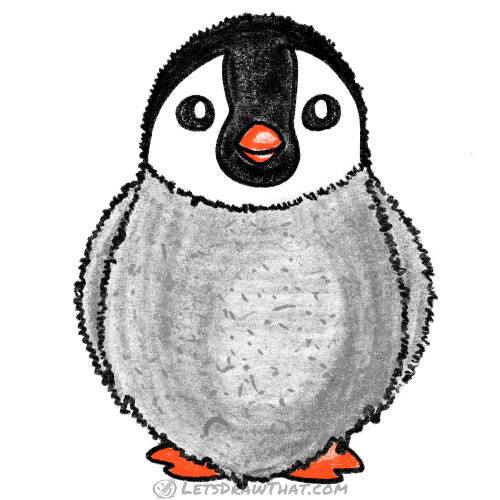
Colouring in is optional, but it will really make your drawing stand out if you do!
As we have said before, the chick’s head already has the black and white markings of an adult penguin, so make sure to include those!
The penguin’s body is covered in soft, downy grey feathers. Notice how we leave a bit of a lighter patch on the belly, and add in some squiggles to show how fluffy the feathers are. It is the little details that make a drawing special!
Finally, we colour the beak and feet are orange. Real penguins’ beaks and feet are black or grey, but using warm contrast colours makes them much more visible and adds interest to our drawing! Yet another cartoon style deviation.
How to draw an adult penguin
Now that we have learned how to draw a penguin chick, let’s draw a fully grown adult penguin next. The body of an adult penguin is more streamlined and his feathers have the familiar “tuxedo” pattern – a white belly with a black back, outer feathers on the wings and the all-important black tail.
We draw the penguin in a more dynamic pose. This is how the penguins stand and waddle while drying out their feathers. That said, the pose is so funny that it almost looks like our penguin is ready for a dance. Well – we can add few extras to make his next performance easier. But first let’s learn how to draw an adult penguin.
How to draw an adult penguin: base sketch step by step
Step 1: Sketch the adult penguin body outline

We start the drawing by sketching the head. We draw the head with a simple small circle.
After we draw the head, we draw the body. The shape looks a bit like a bowling pin or a bottle.
First draw the left line – it starts with a straight neckline, and then it bulges out a bit for the belly. Then it turns sharply back towards the back of the body.
The pin shape is completed by the back line – again, starts reasonably flat for the neckline, but then it curves only a little to meet with the front line.
Step 2: Sketch penguin’s wings, feet and beak

Next we add in some rough guidelines for the details.
Add in two ovals onto the head, one in front for the beak and the other one inside the head circle for the eye.
For the wings, draw in one lightly curved line for the top of the wing. Then, add in the bottom half of the wings as an “S” curved line. Close the wing by joining the lines with a sharp smooth curve for the wing tip. Notice how the part of the wing farthest from the body is much thinner than the part closest to the body.
Finally, add the legs. Draw two soft triangles or rectangles for the legs, then add two ovals where the feet will be.
How to draw an adult penguin: outline step by step
Step 1: Outline the body and head

Using our guidelines, let’s start drawing the outline of the penguin’s body.
Make sure to define the head by putting a slight bump where the head ends and neck begins. As you outline the feet, make sure to extend the line either side of the legs to define them a bit.
As you draw the beak, be sure to give your penguin a nice smile!
Step 2: Outline the wings
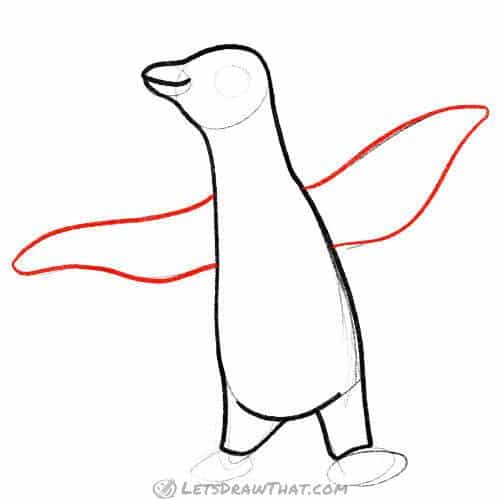
The next step in drawing a penguin is to outline the wings.
If you don’t quite like the shape you made them in the sketch, now is the time to adjust them.
Step 3: Add the penguin’s ‘tuxedo’

One of the most recognizable features of a penguin is its tuxedo.
Use curvy lines to define where the penguin’s markings will be. This one will have a black head and a white belly and feet, with a little bit of black on the top of the wings as well.
Remember that different species of penguin will have different markings, so don’t be afraid to experiment!
Step 4: Draw in details – eye, beak, feet and tail

Complete the penguin drawing by adding the final details.
Draw in the eye as two concentric circles. That is how a real penguin’s eyes look, and it is a part of what makes them so funny looking. In our drawing, the size of the eye is exaggerated, to make the penguin look even cuter.
Next finish off the beak with a simple outline.
Use the guidelines for the size and draw a clawed penguin feet.
Finally, don’t forget to add a tail too!
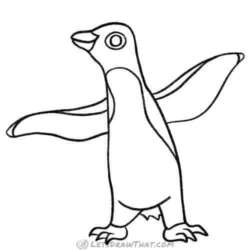
How to draw an adult penguin: finished drawing
How to draw an adult penguin: finished outline drawing

Use a soft eraser to erase your guidelines.
This penguin has spread his wings to dry out their feathers. But with that cheeky smile we have drawn him, the pose is so funny that it almost looks like our penguin is about to dance off!
How to draw an adult penguin: finished drawing coloured-in

Colouring in your drawing is always optional, but a penguin is very easy to colour. Use the same black pencil you have used to draw it for the markings and you’re halfway there!
Apart from filling the markings in with black, try adding orange to the feet and beak.
If you want to make your drawing extra good-looking, try leaving some black parts of the penguin white! This can show both highlights and softer markings – see how we have done some of this for the chin, to better define the round head shape.
That is our drawing complete – now you know how to draw a penguin, both an adult and a young chick.
How to draw an adult penguin: finished drawing coloured-in plus some fun

Oh, wait, one more step! (Sorry, could not resist this one.)
Since our penguin looks like it is going to burst into a song and dance number, why not try adding a hat and cane?
Now he is ready for his tap dance in the evening cabaret show!