Hot air balloon sketch step by step
Step 1: Sketch a circle for the balloon and a small oval underneath
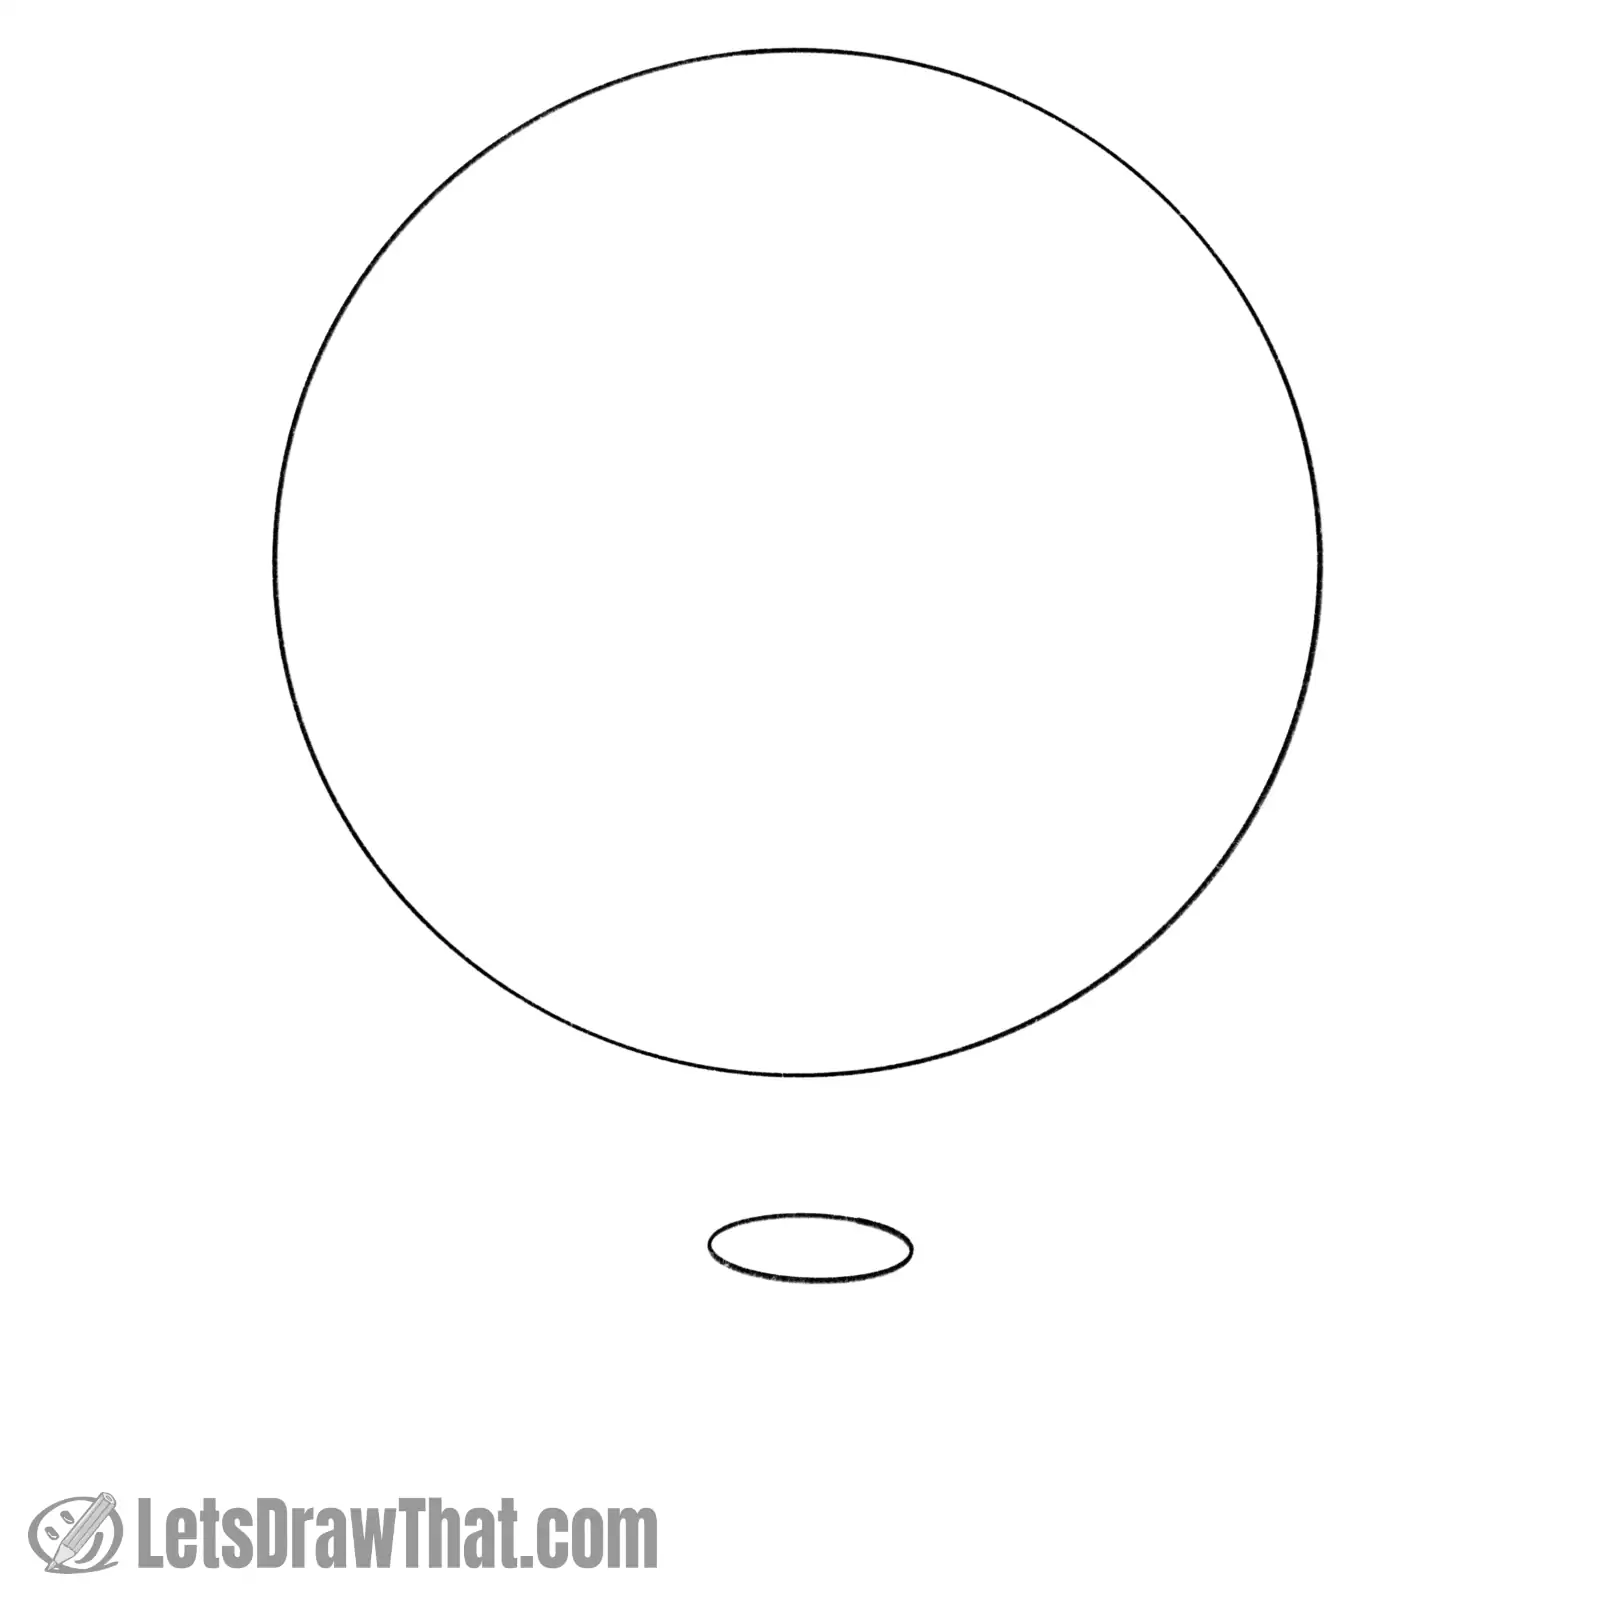
As usual, we start our hot air balloon drawing by laying out a few basic shapes.
Sketch a circle for the balloon. You can use a compass or trace a mug, or something round, if you want a perfect circle, but it is not necessary.
Then draw a small oval underneath the circle – this will be the mouth, or bottom opening of the balloon envelope.
Step 2: Finish sketching the balloon envelope

A simple step here – connect the balloon mouth oval to the big circle with two slightly curved lines to complete the balloon envelope sketch.
The result looks a little bit like a light bulb top.
Step 3: Sketch the horizontal stripes on the balloon
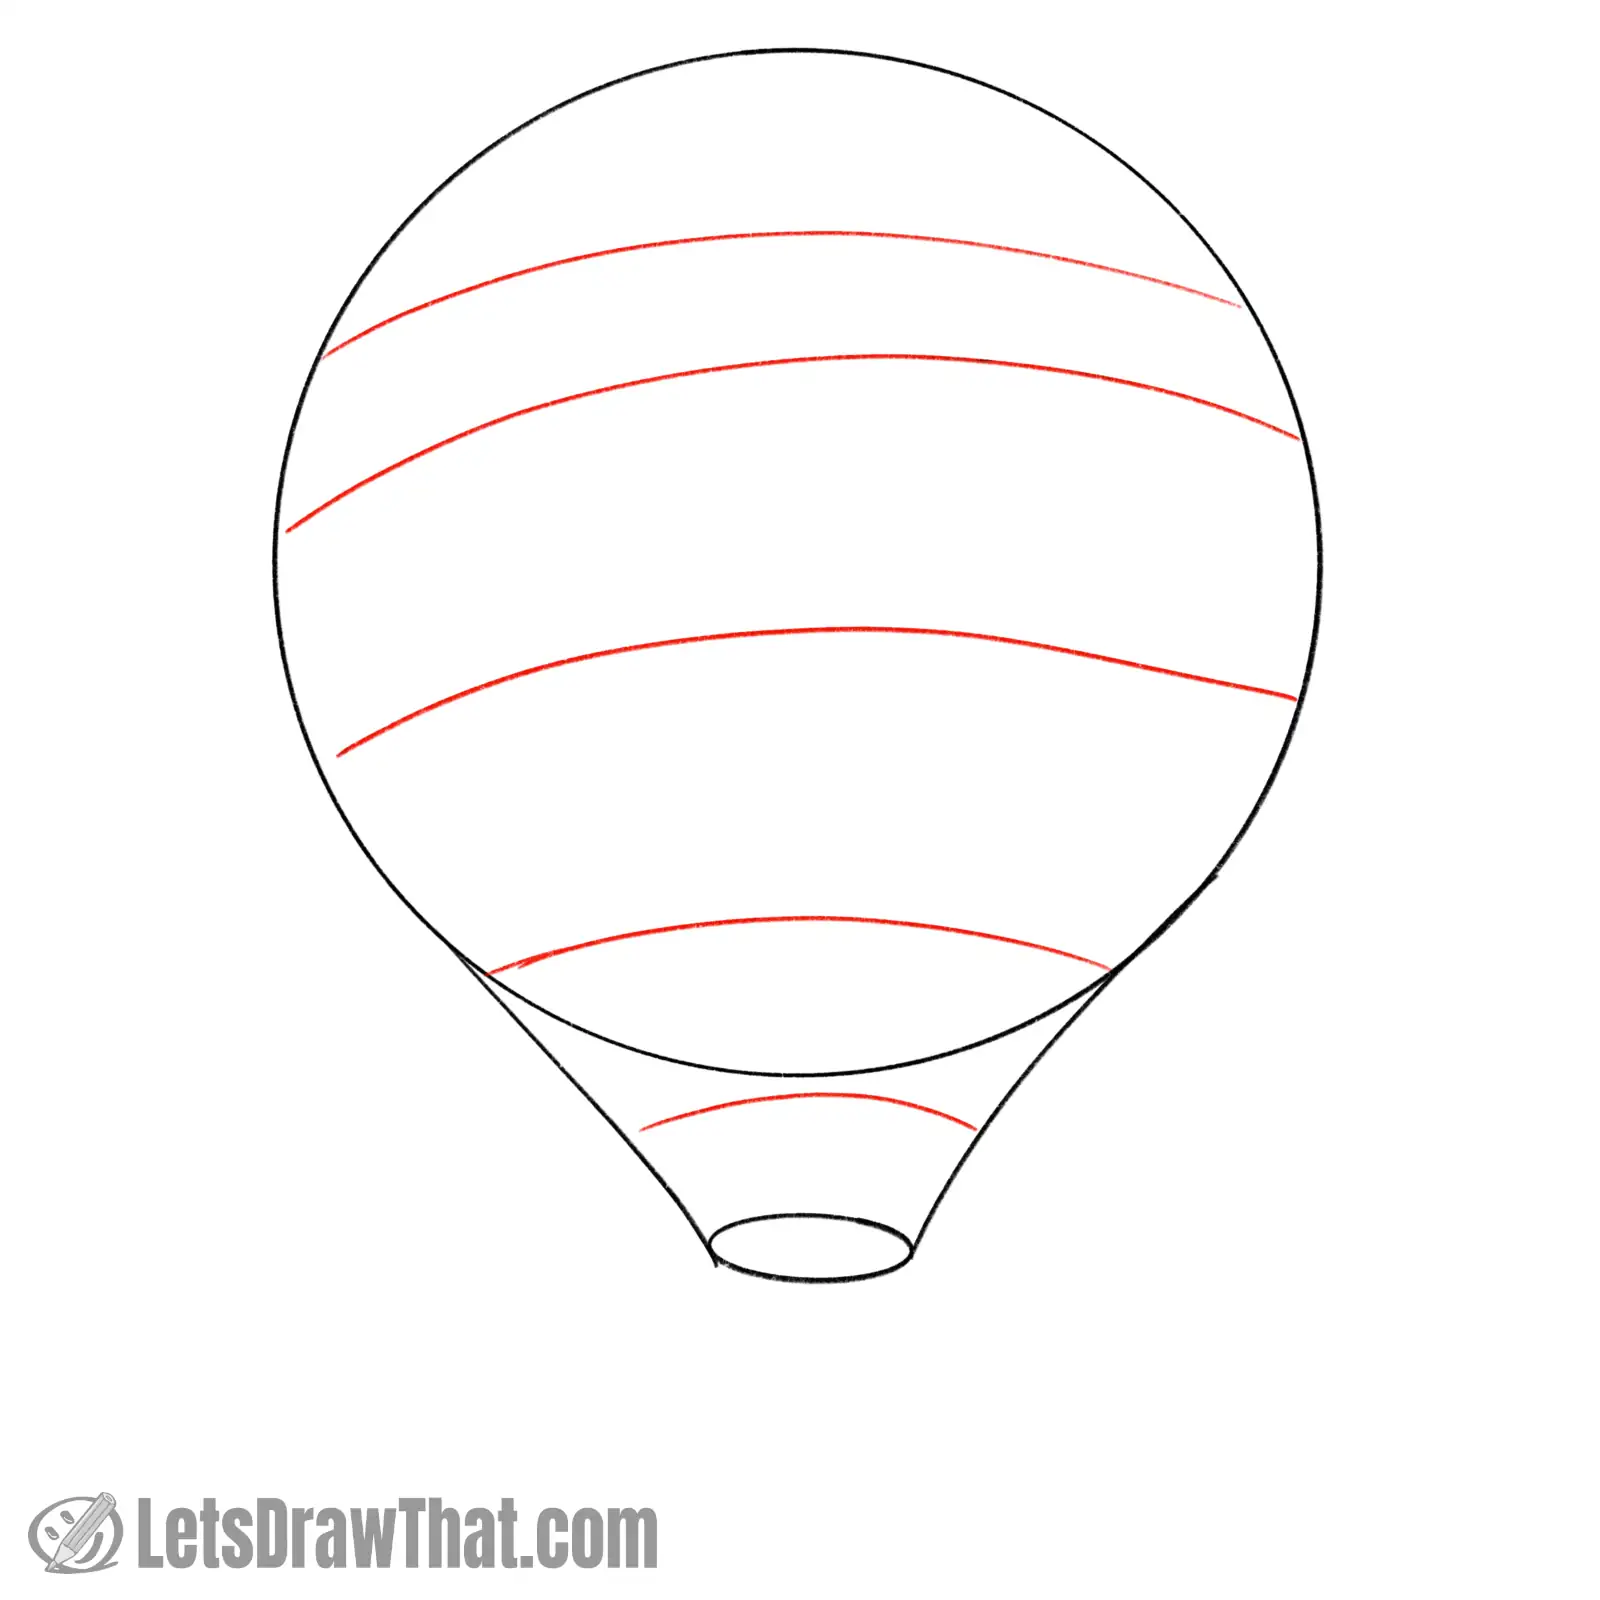
Next, we will sketch some horizontal stripes to start on our balloon pattern.
Here we are going for five lines, which split the balloon into six sections. Notice that the second section from the top is a touch narrower.
The lines are curved up, and as you can see, we did not manage to draw them perfectly straight or symmetrical. That is OK, as we will use these just as rough guidelines for the final balloon drawing.
Feel free to create your own balloon envelope pattern, adding more or fewer stripes of different widths.
Step 4: Sketch the vertical stripes on the balloon
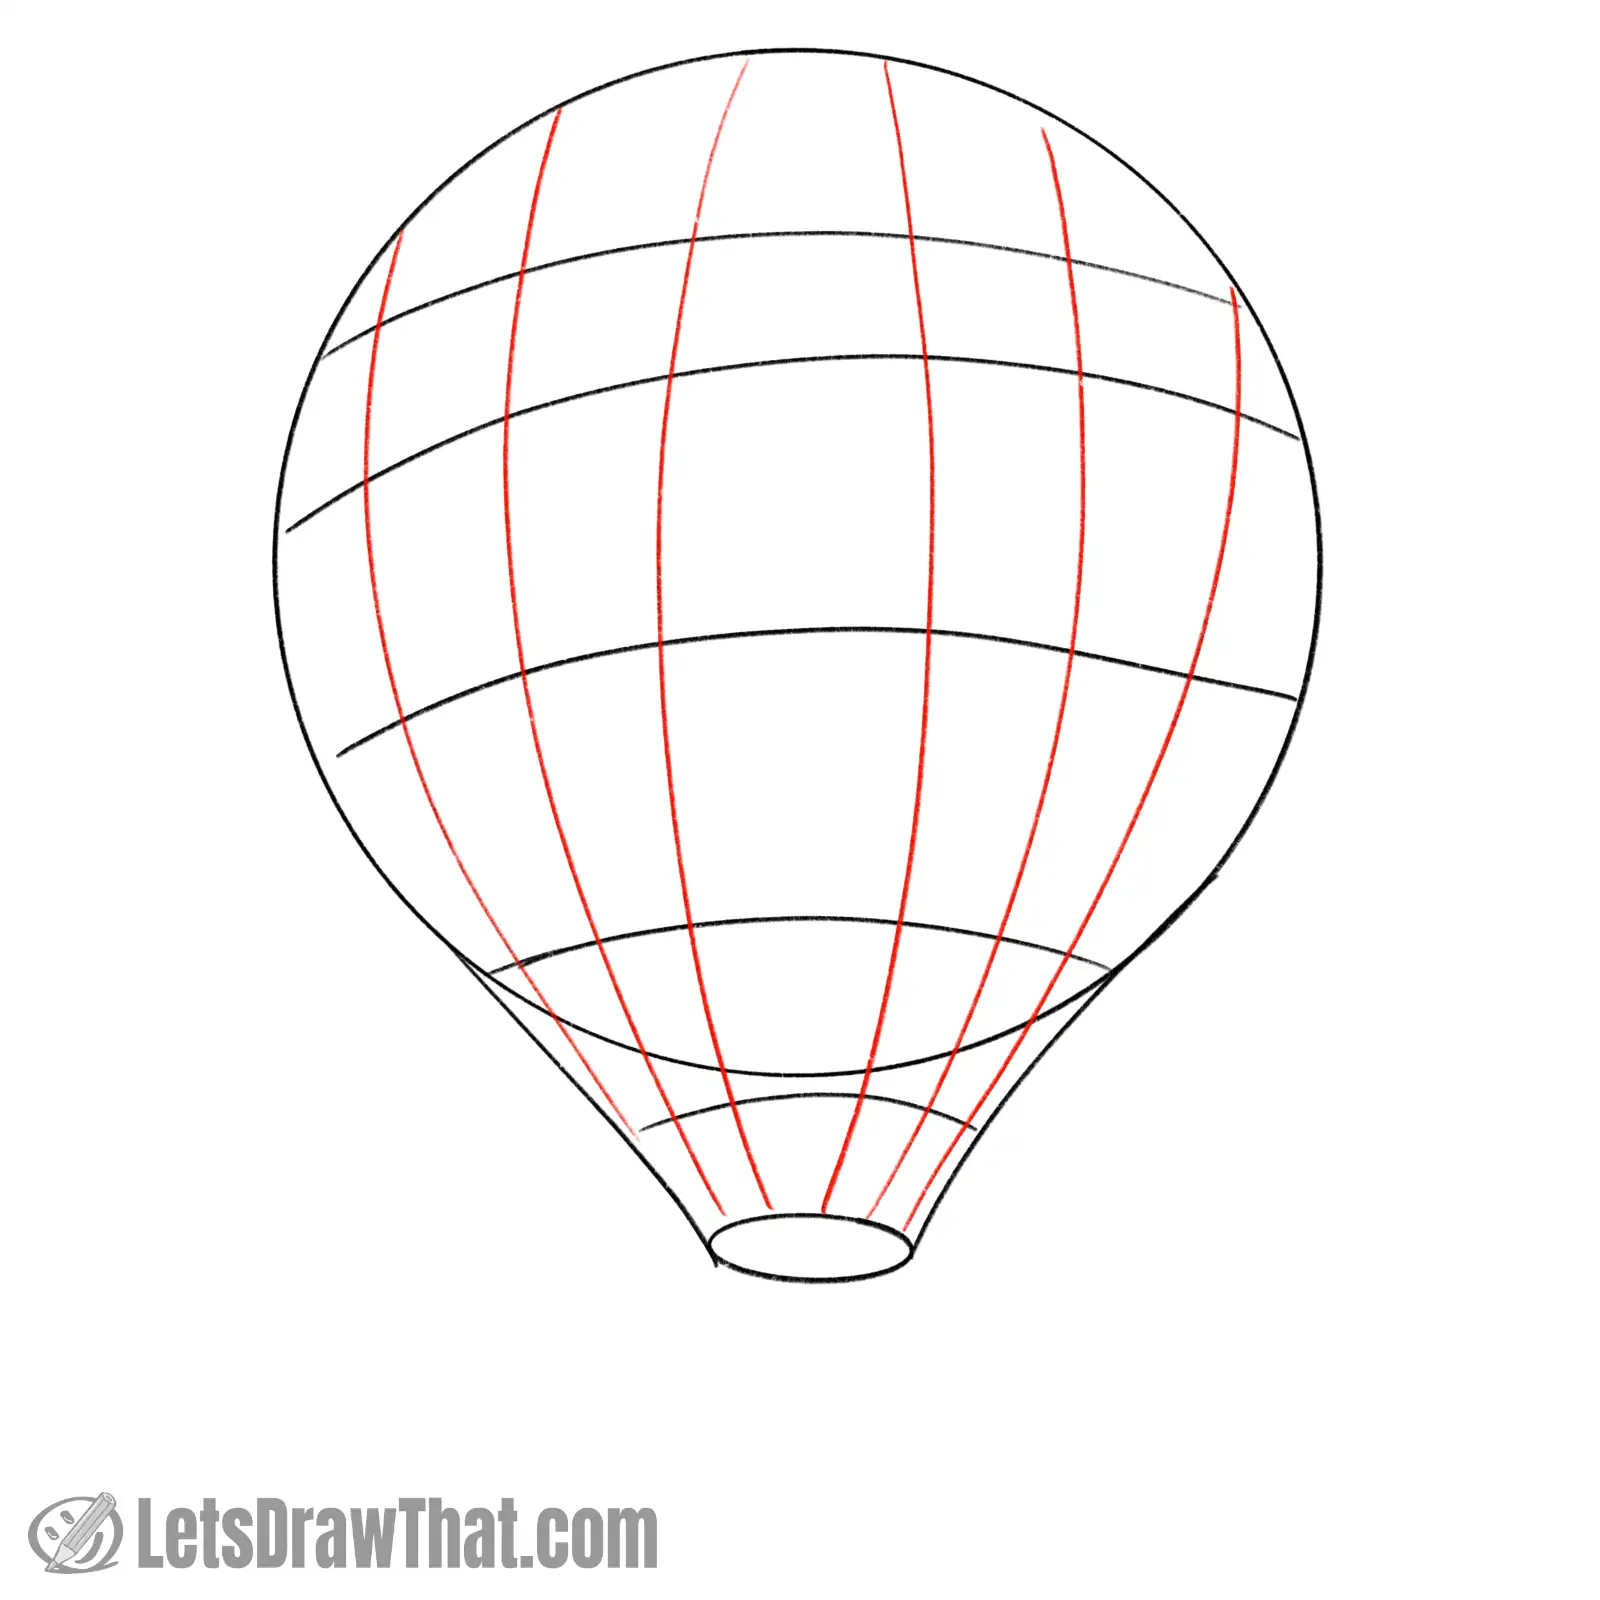
Let’s keep going with the balloon envelope pattern and sketch the vertical stripes.
Start with the two lines in the middle – those are simply bent lines from the top to the bottom of the balloon, slightly apart from each other.
Then add the outer lines, splitting the balloon sides into roughly equal stripes. They are wider apart at the top and squeezed in closer at the bottom.
Notice they are again not particularly regular, and that we ran out of space for the left outermost line on the narrow bottom – and that’s okay too.
Step 5: Sketch the hot air balloon basket
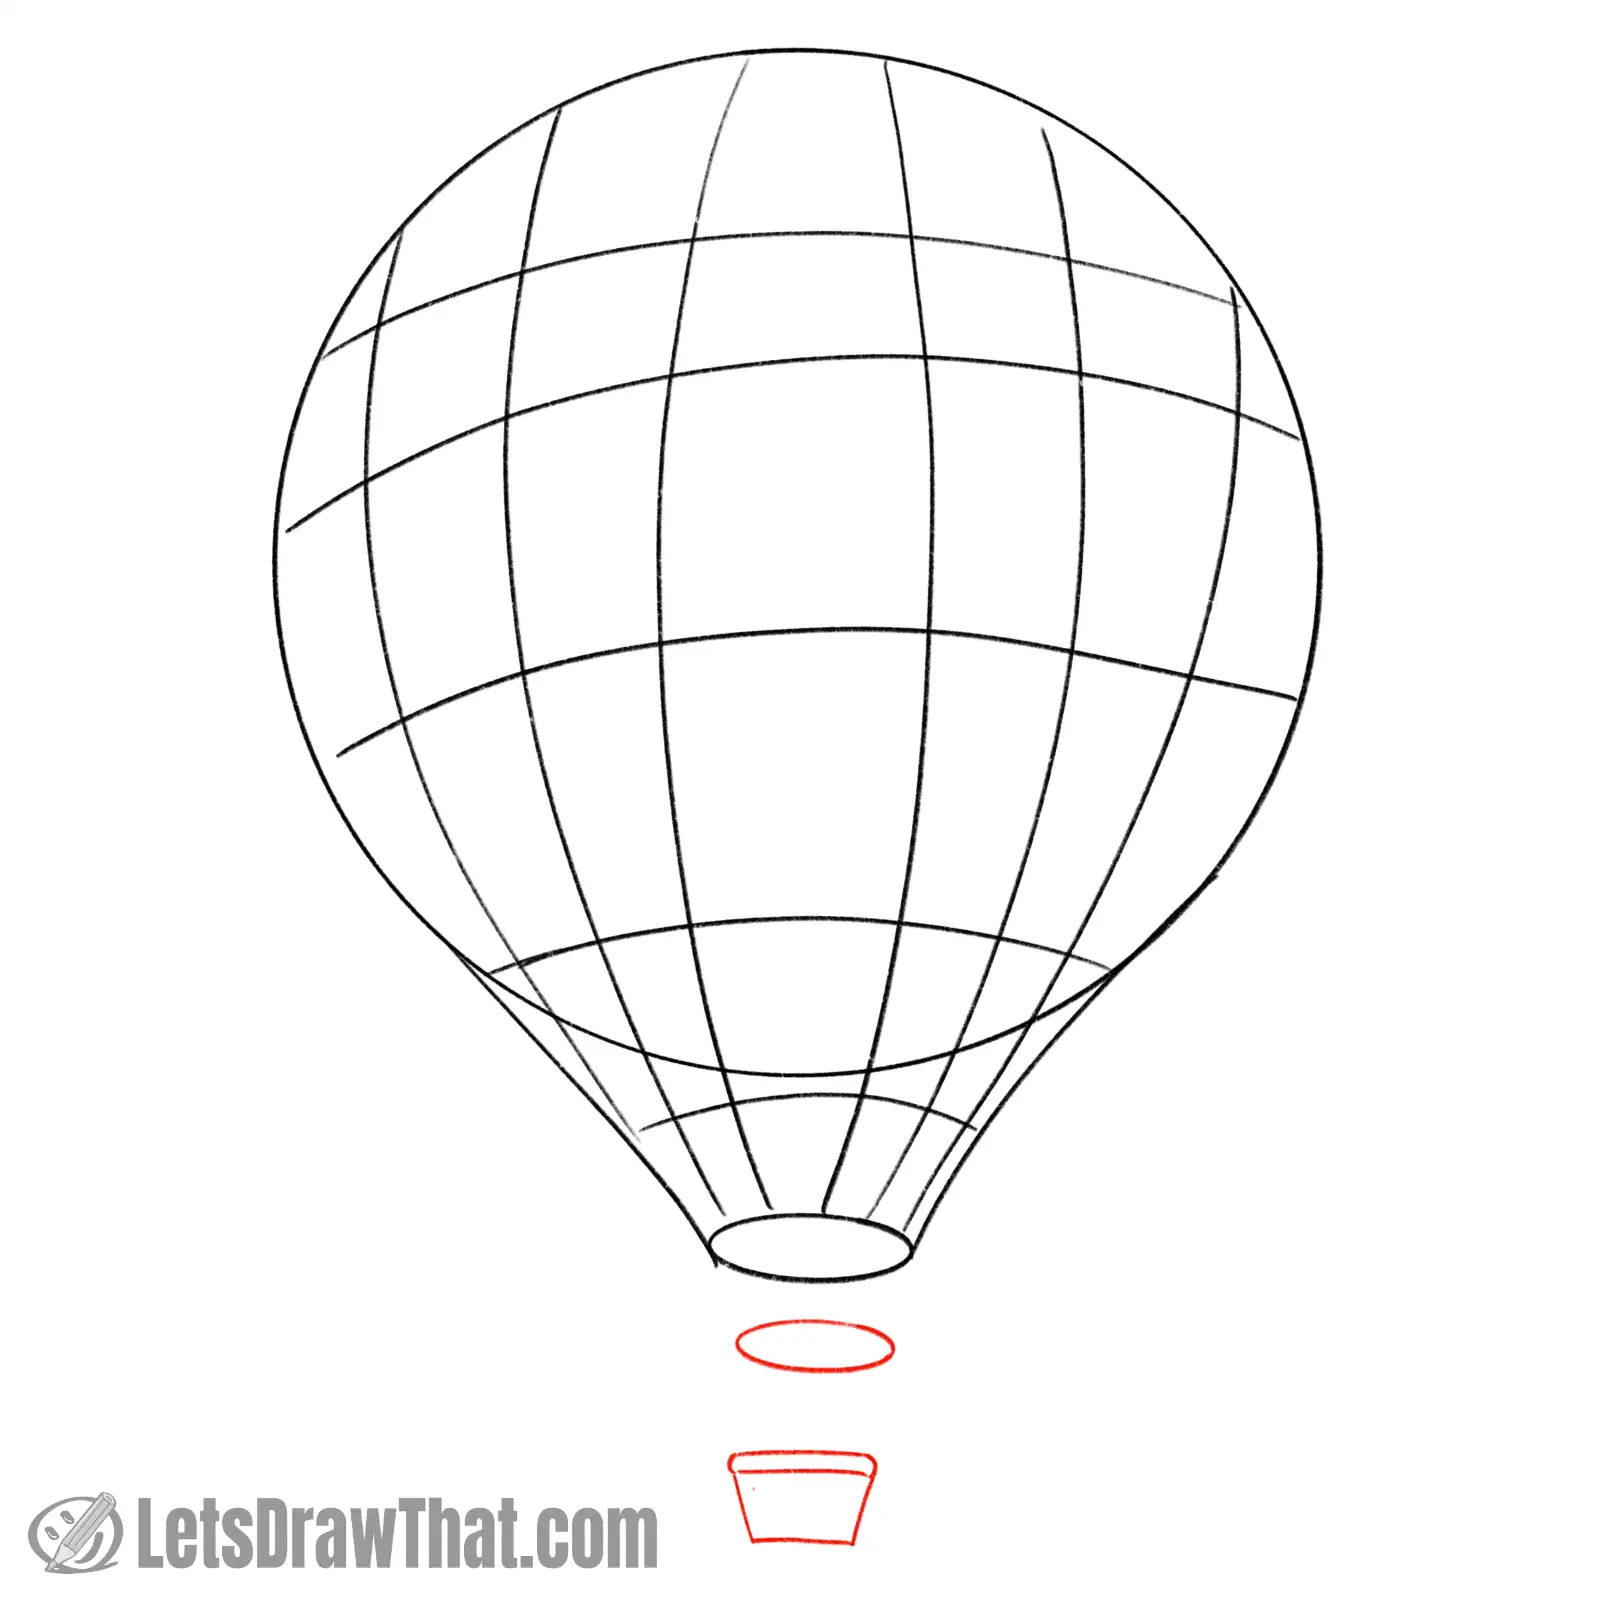
Let’s sketch the hot air balloon basket next.
First, add another slightly smaller oval under the balloon’s mouth – this will be the ring that holds the basket.
Then, draw the balloon basket – a small trapezoid (a rectangle with the bottom line shorter) with the top edge doubled up – that is the top rail of the balloon basket.
Notice that we drew the basket slightly off-centre to the left, as we will add the side next.
Step 6: Draw the hot air balloon basket completely
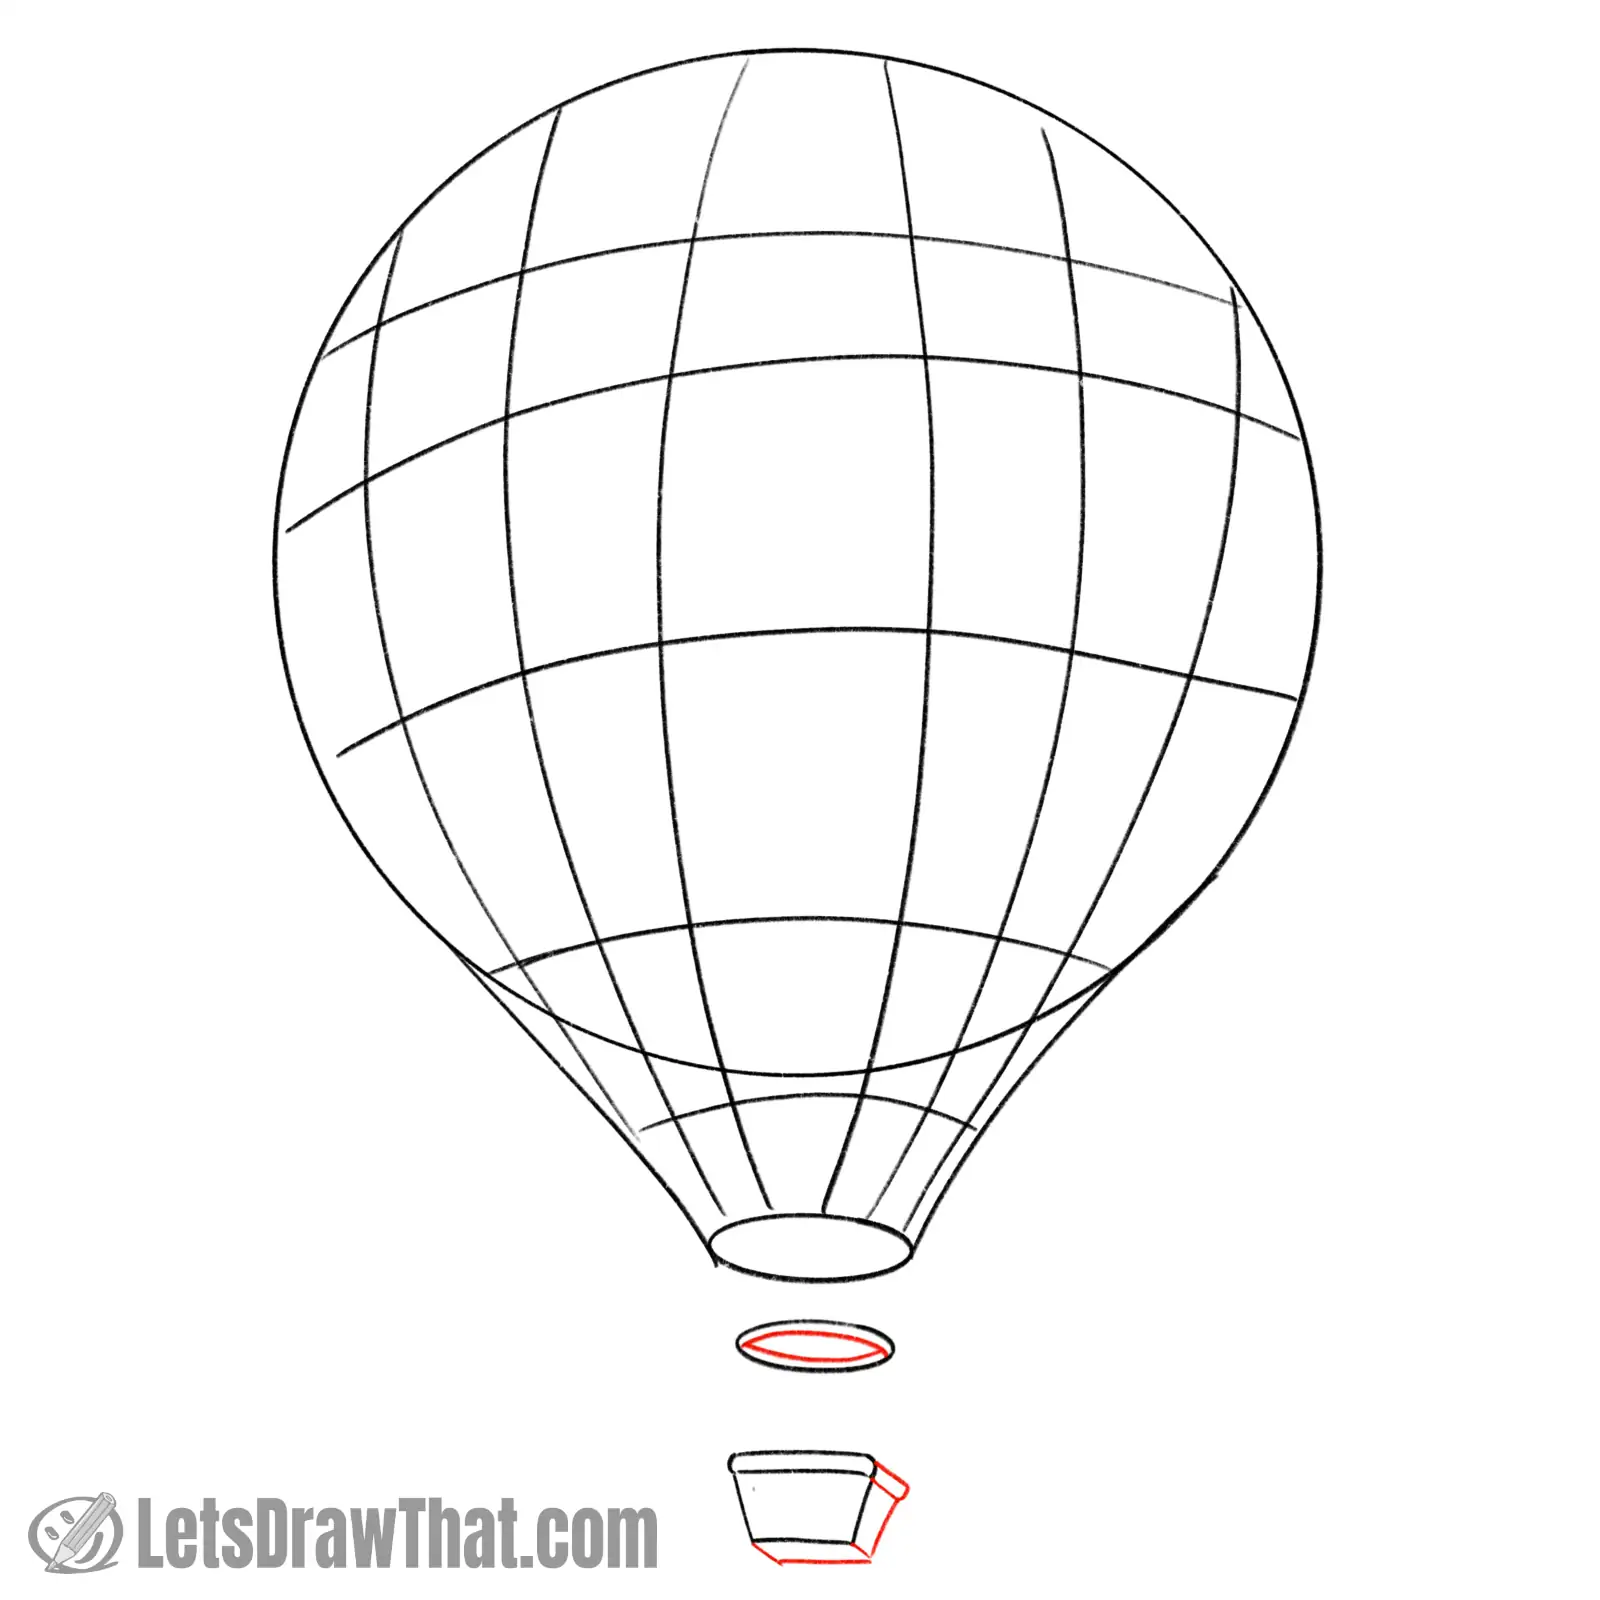
Let’s draw the balloon basket sides next, to finish it. Draw short side lines from each corner of the basket, tilted down. Then connect them with the outer edges that follow the outline of the basket front. See our 3D cube drawing in cabinet view for more help if needed.
Finally, double the inside of the ring that holds the balloon basket. It is a bit hard to see, but that is not an inner oval. Rather, it is a top curve from edge to edge, with a shorter lower curve ending on the upper curve, to suggest the inner and outer edges of a flat circle in 3D.
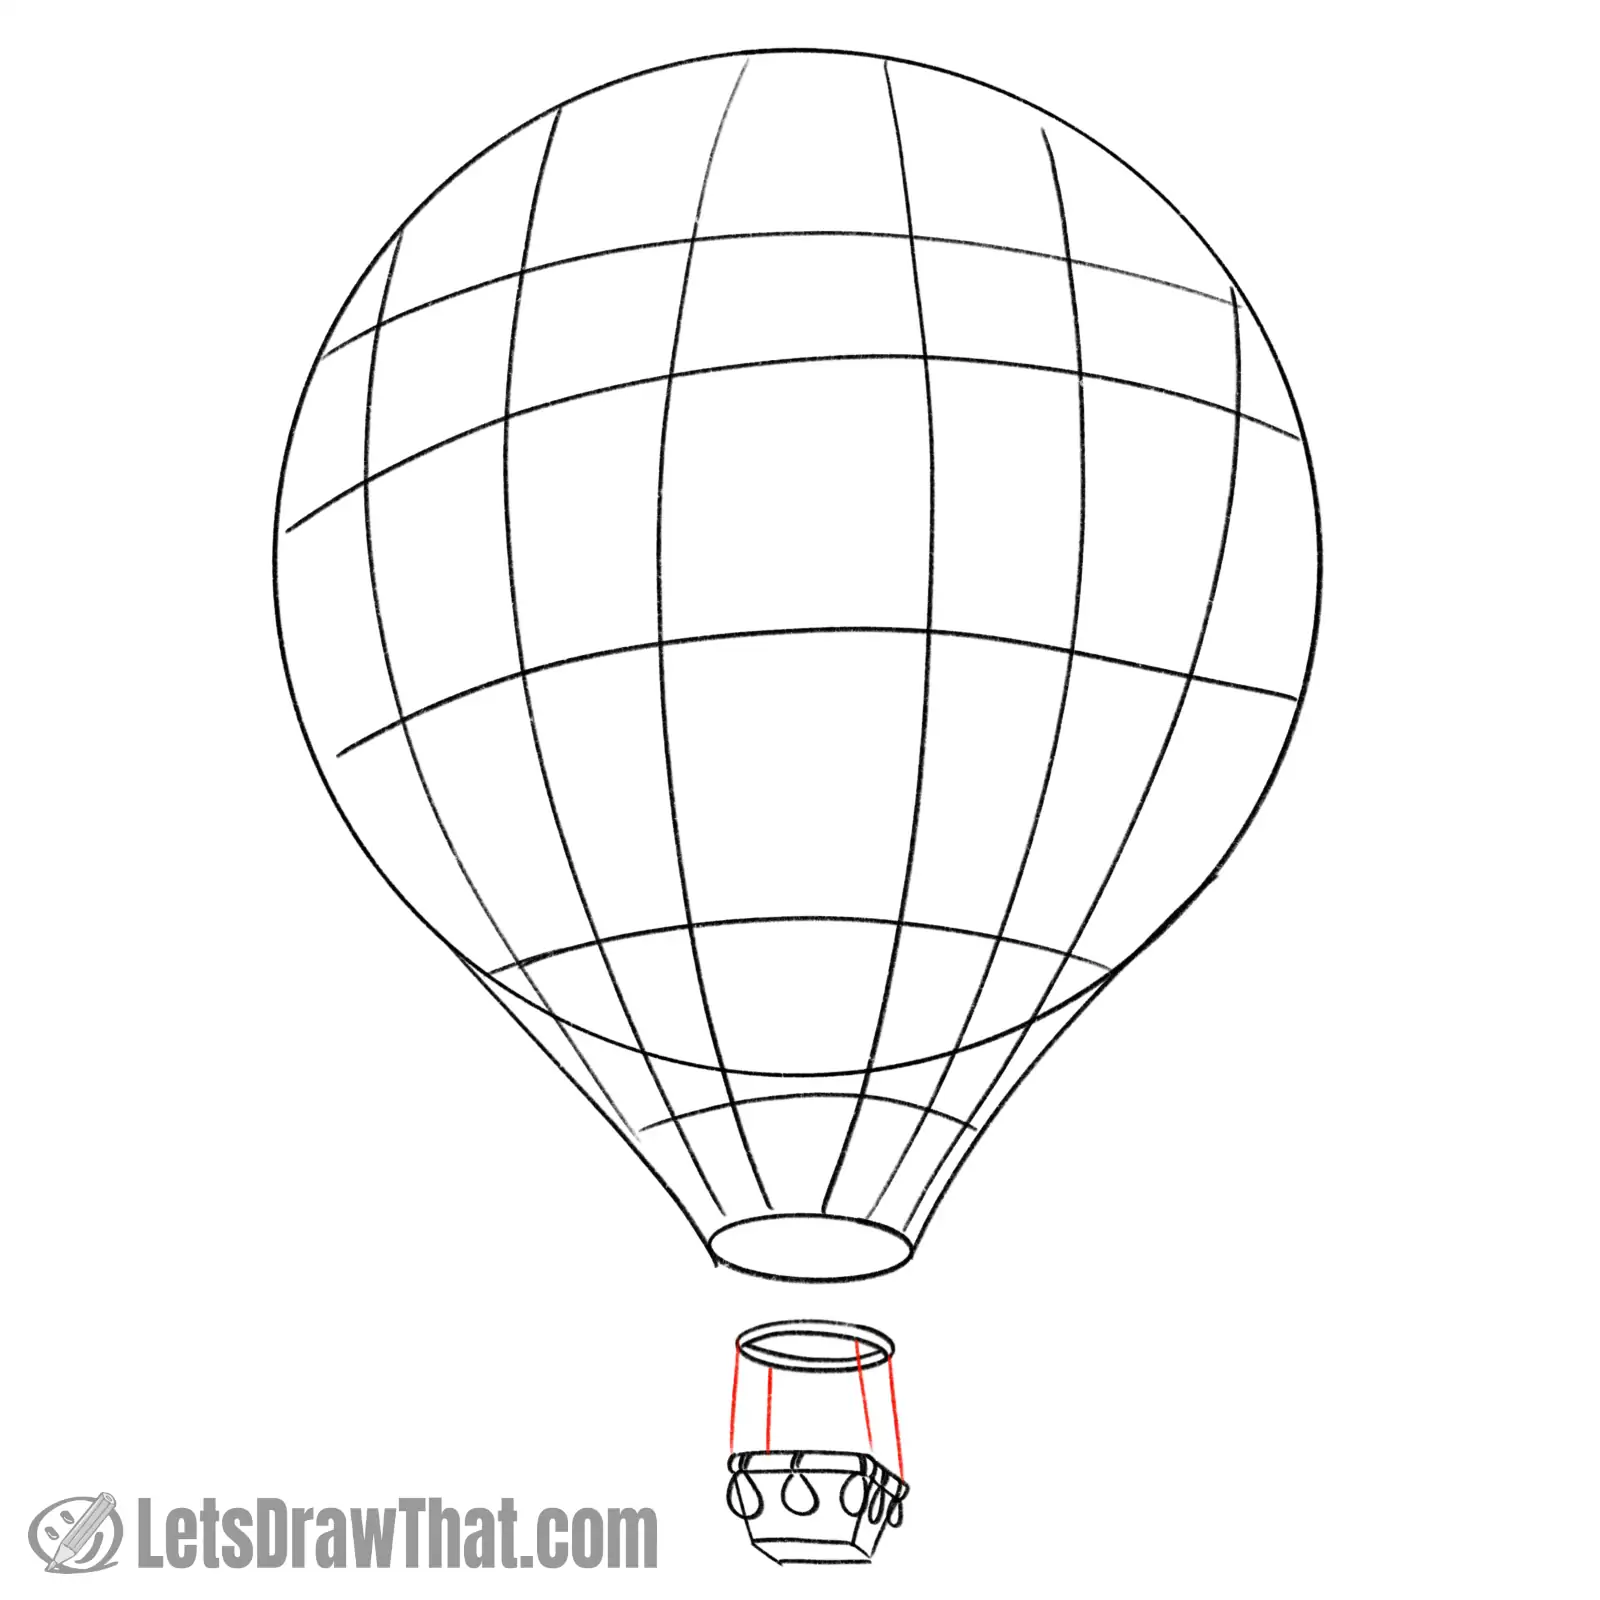
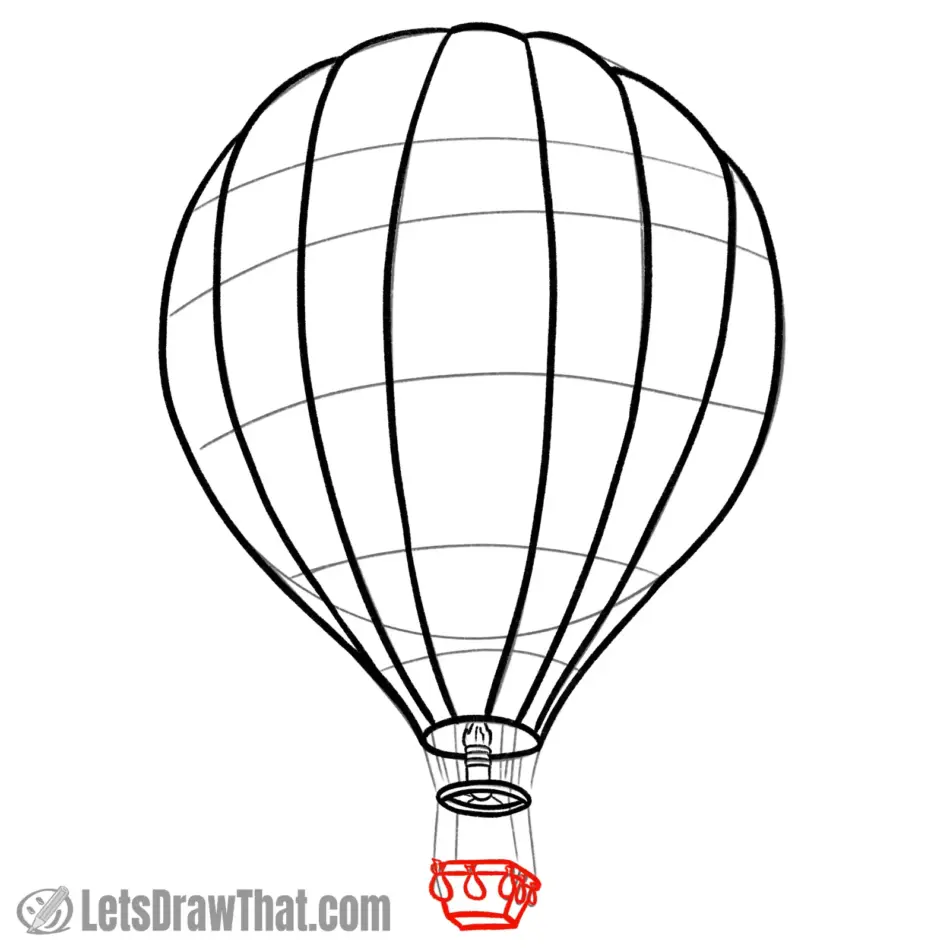
Step 7: Sketch the sandbags on the balloon basket

Now, we are getting to the finishing details on our balloon drawing.
Let’s add some sandbags to the upper edge of the balloon basket. Those are just small raindrop shapes, or “U” lines with the top squeezed together, hanging from the upper rail of the balloon basket.
We have three sandbags on the front, and two more showing on the side edge.
Step 8: Sketch the lines attaching the basket to the ring
Another small but important detail. Let’s sketch the four lines attaching the basket to the ring.
Those are simple straight lines from the ring to each corner of the basket – even to the one in the back that we cannot see in this view.
Step 9: Sketch the baloon burner

Let’s keep adding those details – that is what makes the simple drawing interesting. Let’s suggest the burner that heats the air in the hot air balloon with a few simple shapes.
Draw a rectangle sitting on top of the attachment ring. Add a few crosslines at the top to suggest the burner ribs.
Then sketch the outer edges of the flame on top of our burner.
Step 10: Sketch the lines attaching the balloon envelope to the ring
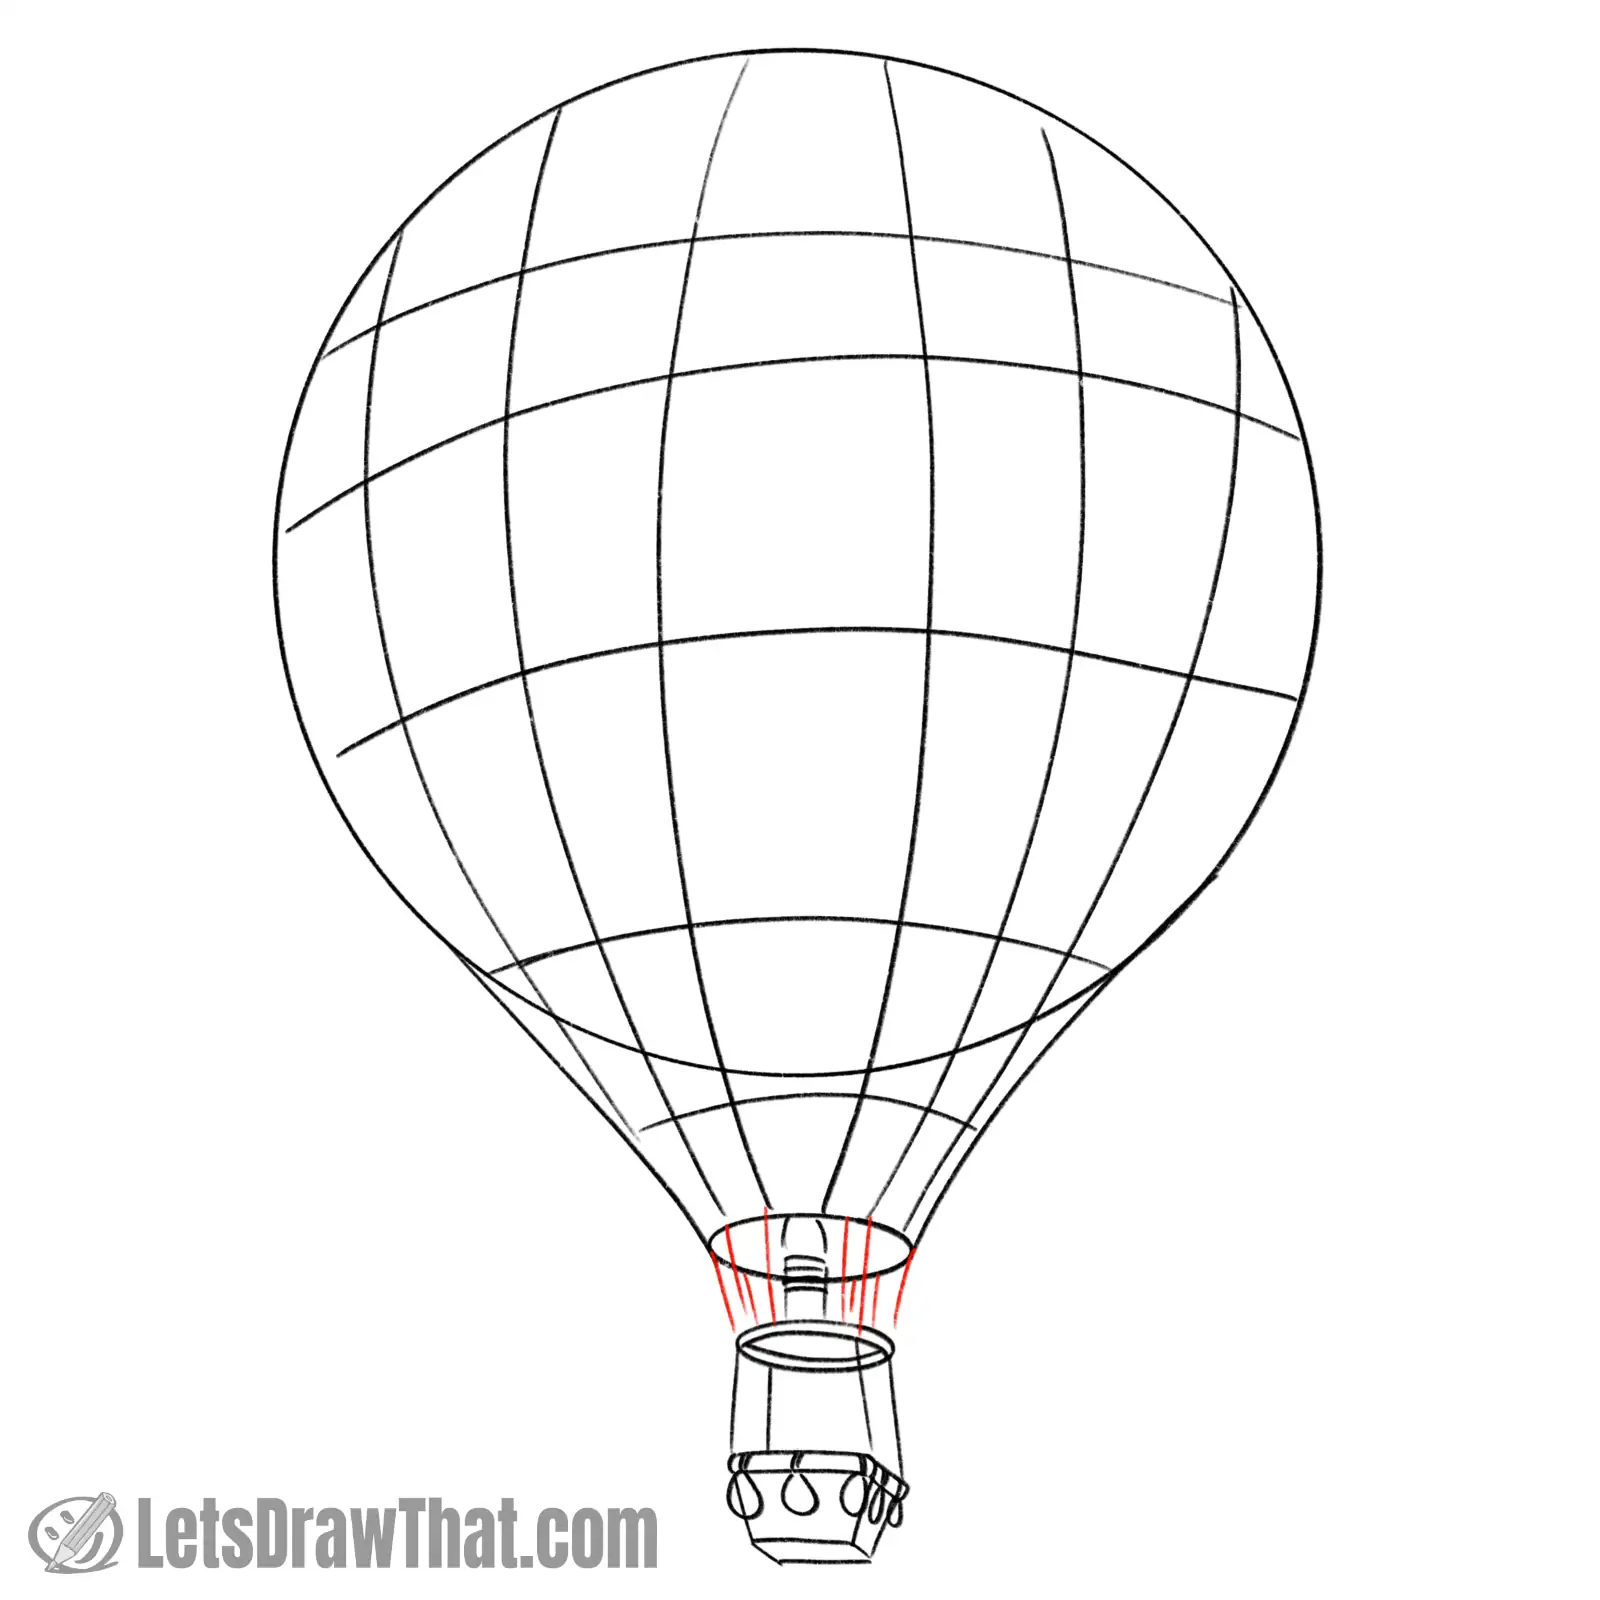
The very last bit to finish our hot air balloon sketch is to attach the balloon envelope to the ring that holds the basket.
Generally, there will be one line from each of the segments going down between the balloon’s mouth and the ring, so let’s suggest a few of those. We have four on each side, roughly starting where the vertical lines on the balloon end.
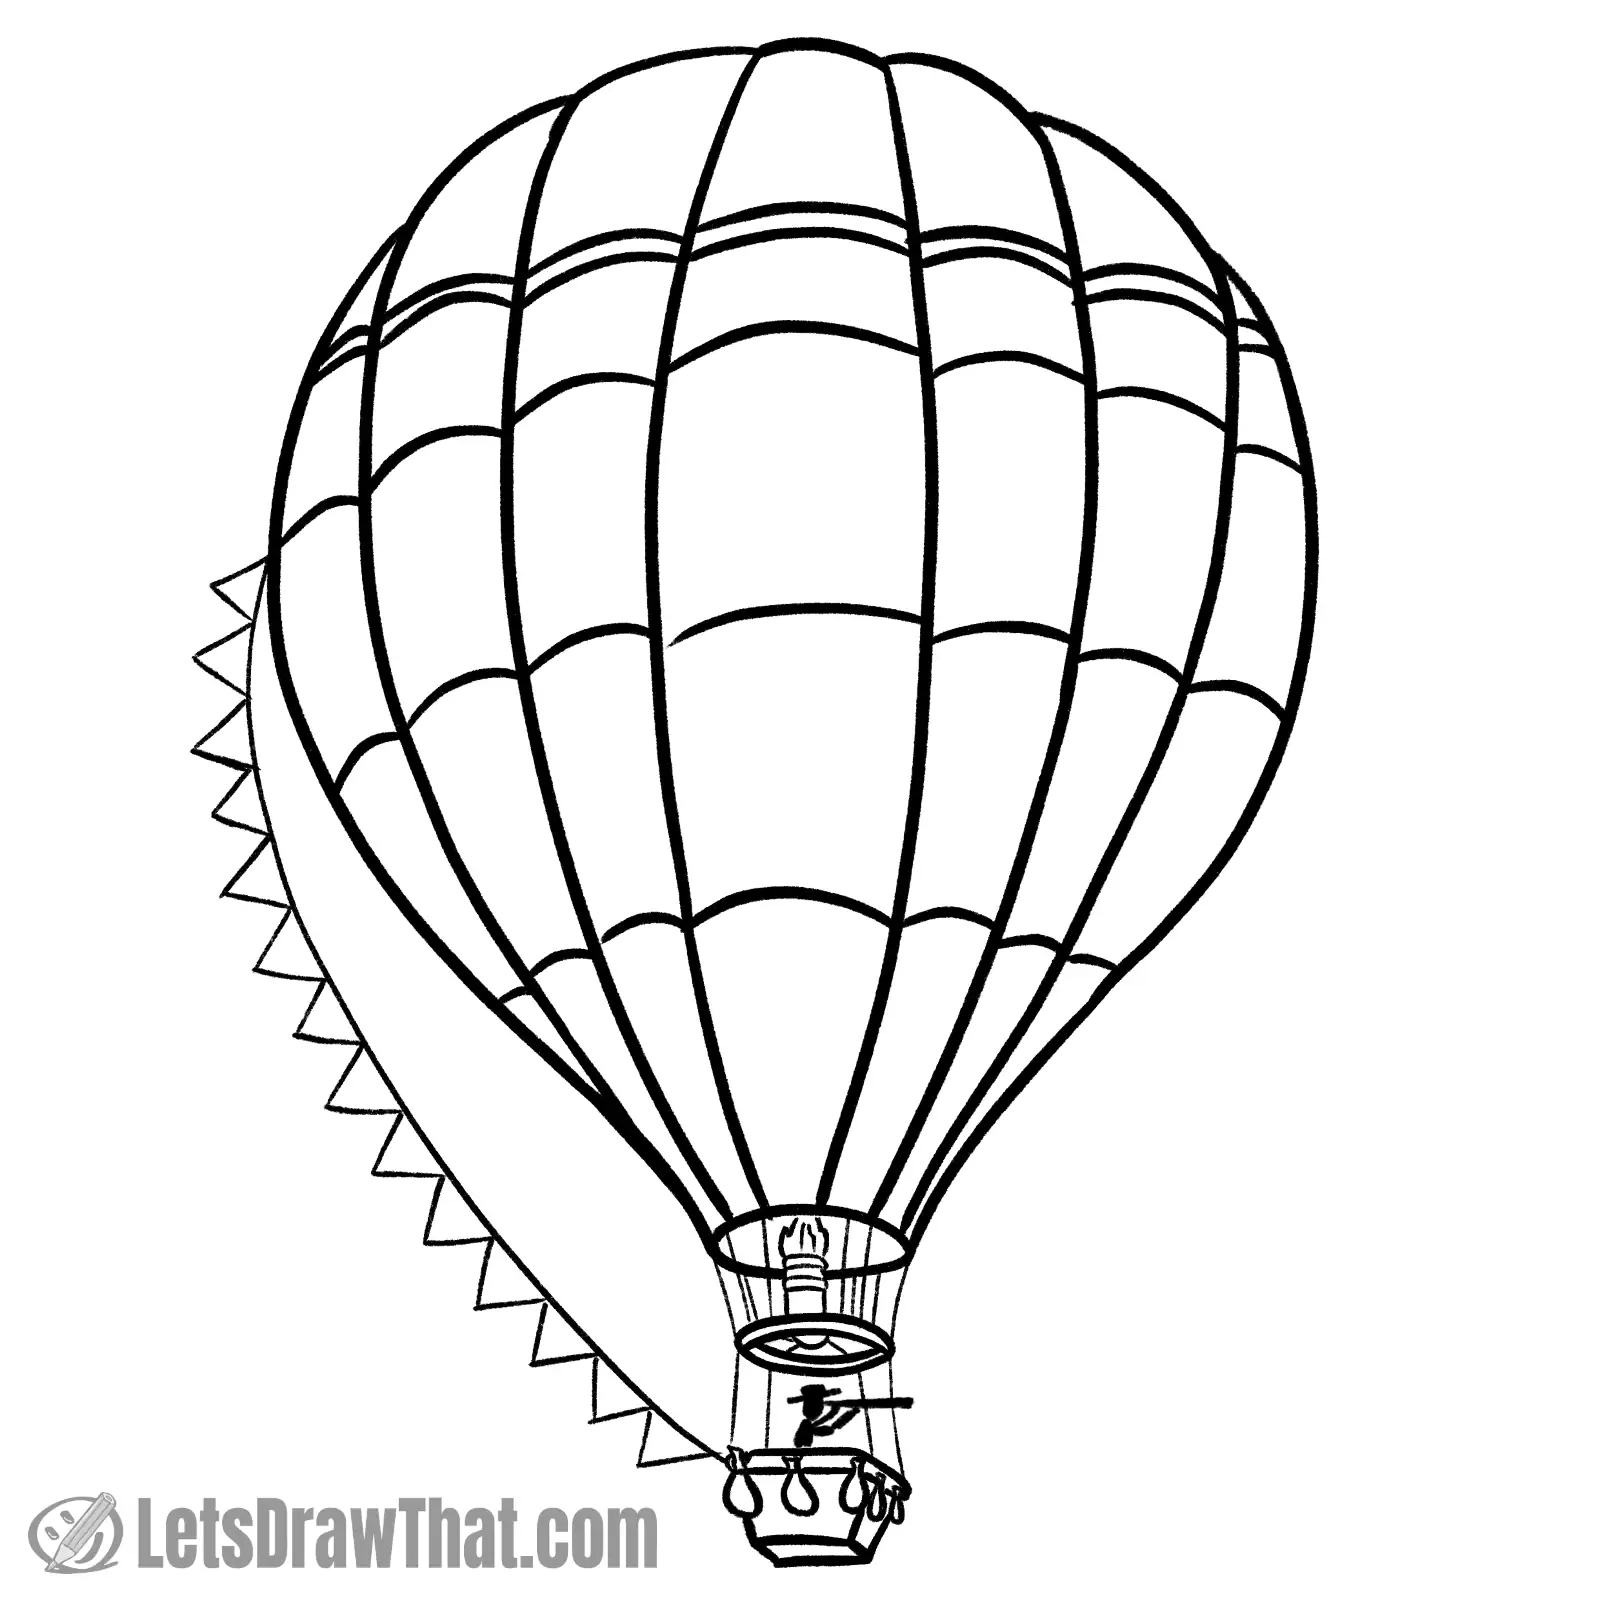
Step 11: Hot air balloon sketch finished

Well, here is our hot air balloon sketch in its full glory.
Now, this would be a pretty good hot air balloon drawing on its own, but let’s outline the sketch and add a few more details – you’ll see how much better the hot air balloon sketch can still get!
Hot air balloon drawing step by step
Step 1: Draw the vertical segments on the balloon envelope

Let’s start outlining our hot air balloon drawing, adding a few more improvements along the way.
Start by drawing out the vertical segments of the balloon envelope. The small improvement here is drawing the curves at the top as individual, slightly separated segments.
Step 2: Draw the burner and the attachment ring

Next, draw the burner and the attachment ring. It is a bit small in here, so you may want to open the full picture to see the details.
The top rings of the burner are drawn as separate layered ovals. There is a small bottom curve of the burner poking through the ring, and the burner is attached to the ring with two lines.
We have drawn the flame outline with zig-zagged lines and added a few more lines to the flame for the structure.
Finally, outline the attachment ring from the sketch. Notice how those inner lines overlap to create the illusion of depth and perspective, giving the sense of front and back.
Step 3: Draw the hot air balloon basket
Next up, draw the hot air balloon basket.
First, draw the sandbags. Then fill in the lines for the basket edges, following the sketch. Depending on the size of your balloon basket, you might want to round off the edges along the top handrail.
Step 4: Draw the balloon pilot explorer

Well, any good hot air balloon carries an adventurous explorer who pilots the balloon. Let’s add him here.
Our explorer is a beanie man: oval for the head, with a cross line to suggest the hat. Another oval for the upper part of the body. Then, draw a slightly widening line for the telescope, and two bent lines for the hands holding the telescope. Easy, hey?
Step 5: Draw the ropes connecting the balloon to the basket

The final of the fiddly details are the ropes that attach the balloon to the ring, which in turn is attached to the balloon basket.
We have done the hard work in the sketch, so just trace those four lines between the basket and the ring, and the eight lines between the ring and the balloon envelope.
Step 6: Draw the horizontal pattern on the balloon envelope
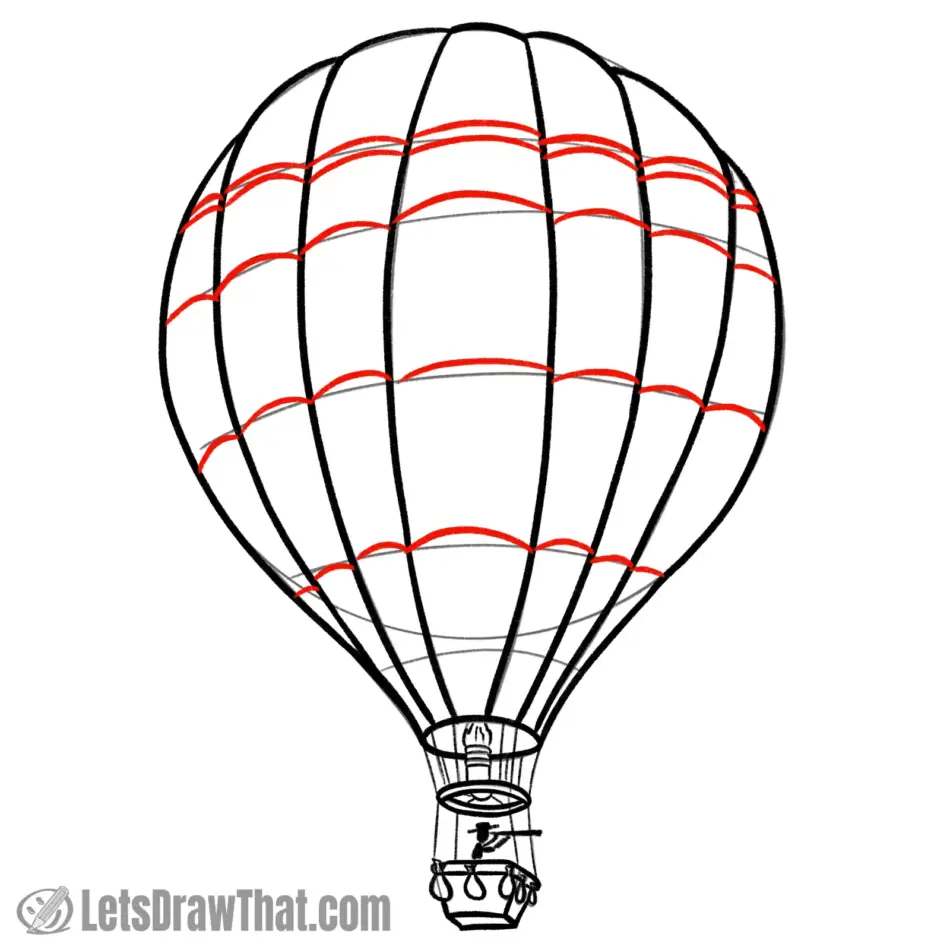
Here comes another improvement. Draw the horizontal pattern on the balloon envelope, roughly following the horizontal sketch lines. But notice the changes:
The top line is doubled up into a narrow stripe. And all the lines are not drawn as a single wide swooping arc, but rather as individual small bends with a smaller radius. Not only that, the individual “humps” do not necessarily join at the ends, but are disconnected and stepped a touch higher or lower than their neighbour.
This creates a sense of the individual balloon segments popping out at the centre and tied in by the ropes in the seams.
Step 7: Draw the flag line
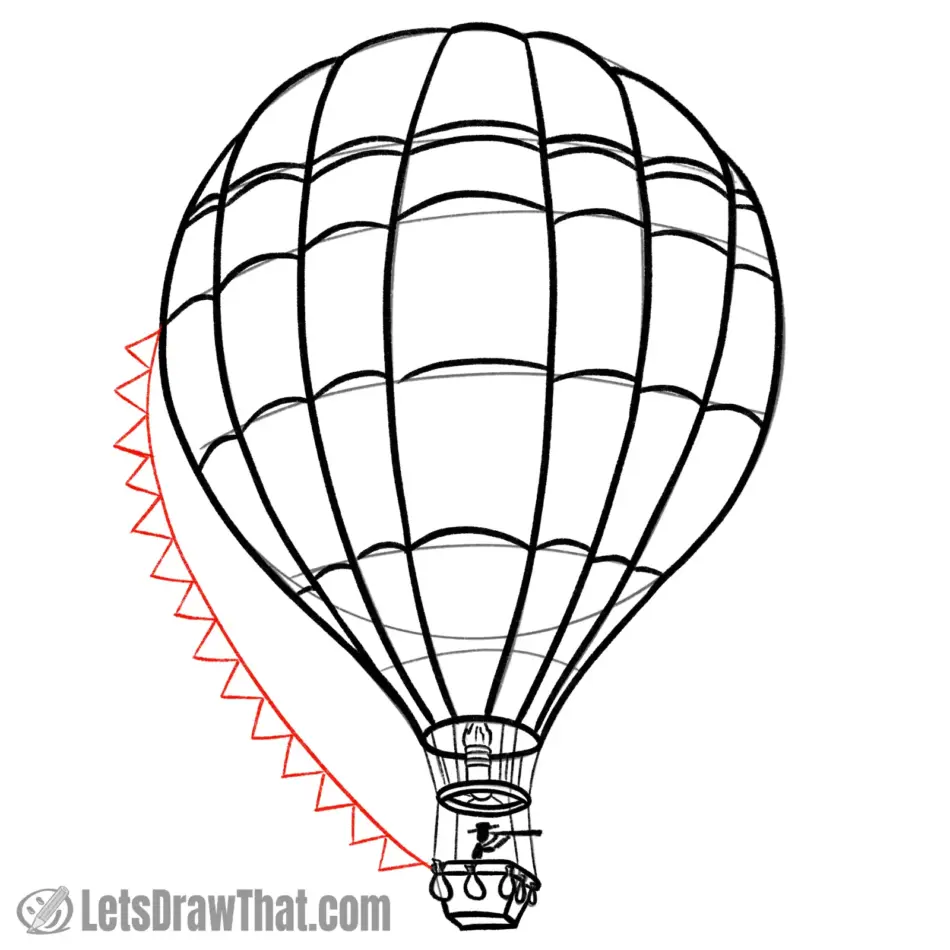
Well, we could not resist adding another fun detail – a flag line attached to the balloon envelope. Those are often used to show the wind direction to the balloon pilot.
Draw a simple arc line between the balloon and the basket. Then draw the flags – those are simple “V” zig-zags all the way along the line.
Hot air balloon drawing finished
Hot air balloon outline
And here is the cleaned-up hot air balloon outline drawing, after we have erased all the sketch lines.
Compared to the simple sketch, this is a much nicer hot air balloon drawing. And all we have done is we defined better the folds between the balloon envelope segments, plus added many small fun details.
Hot air balloon drawing colored-in

And here is the final hot air balloon drawing colored in.
We have decided to use a simple chequered pattern for the top of our balloon, alternating between red and yellow squares. We have kept the narrow stripe white for some added contrast, and colored the bottom segment of the balloon in blue.
The balloon basket is brown, suggesting it is the traditional old-fashioned wicked basket. The attachment ring and the burner are left white, suggesting they are from polished metal.
We have kept all the flags blue, too, not to distract too much from the main hot air balloon drawing.
Finally, notice the darkened edges and the left-out highlights in each of the balloon segments – these add a bit more form and a 3D effect to your hot air balloon drawing.