Learn how to draw an owl. A step by step tutorial to draw a cute and great looking owl from a few basic shapes using a simple jagged line trick.
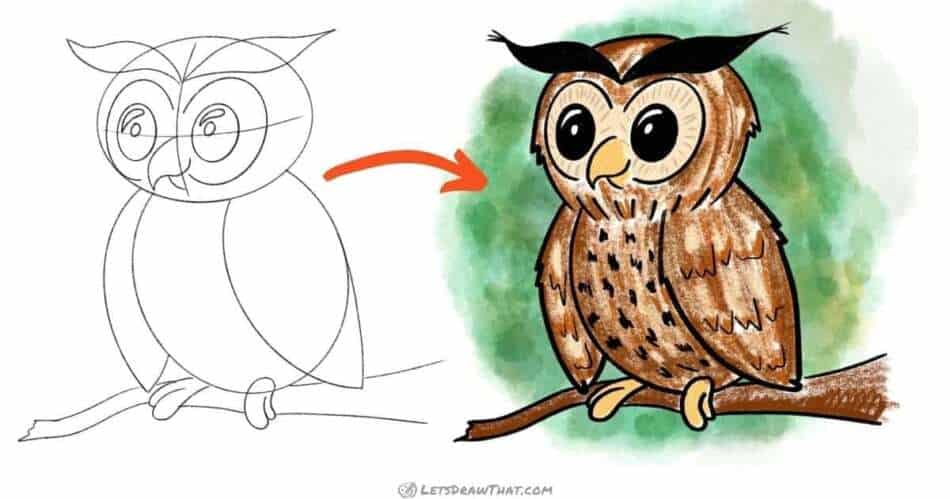
Today we will learn an easy way how to draw an owl. The owl’s body and head are made from two simple ovals, with leaf shapes for the wings. The trick to making the simple drawing look good is to add some zig-zag lines and texture to suggest the feathers.
The large eyes and a beak curved into a smile that make the owl look so cute are certainly cartoony additions.
min
You will need: pencil, fineliner pen, colored pencils, eraser and drawing paper or sketchbook
These are the favorites we use for drawings on Let's Draw That that we love and recommend:


Disclaimer: LetsDrawThat.com participates in the Amazon Associates Program. If you purchase a product using a link on our website, we earn a small commission, at no extra cost to you. This is one way how you can support this website.
Love drawing? Never miss a tutorial!

How to draw an owl: base sketch step by step
Step 1: Draw the base ovals for the owl's head and body

As usual, our how to draw an owl tutorial starts with very simple shapes to set the base body proportions.
Draw one flat laying oval for the owl’s head. Then attach an overlapped larger oval at a slight angle for the owl’s body.
Step 2: Sketch the wings and mark the face
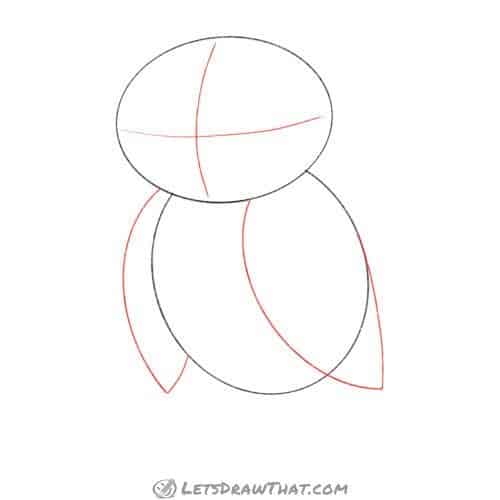
Mark the face cross on the owl’s face that will help us place the facial features. Our owl is looking slightly to the left and down – so the vertical line is curved to the left and the horizontal line is curved down.
Then sketch the base wing shapes. These are leaf-shapes made from two curves, starting at the shoulder and meeting at the wingtip. The left wing is partially hidden behind the body – so we only draw one long side and finish with a short line coming back up to meet with the body outline.
Step 3: Sketch the owl's face

Let’s use our facial cross to place the owl’s beak first. Start the upper beak curve right in the middle, where the lines cross and draw a nice, sharply bent beak, similar to our parrot drawing. Draw the middle line as a simple S-curve to give the owl a nice smile. Then draw a simple curve for the lower beak portion.
Finally, add two large ovals for the eyes – these are again centred around the horizontal face line, spaced equal distances from the vertical face line.
Step 4: Sketch the mask, ears and feet
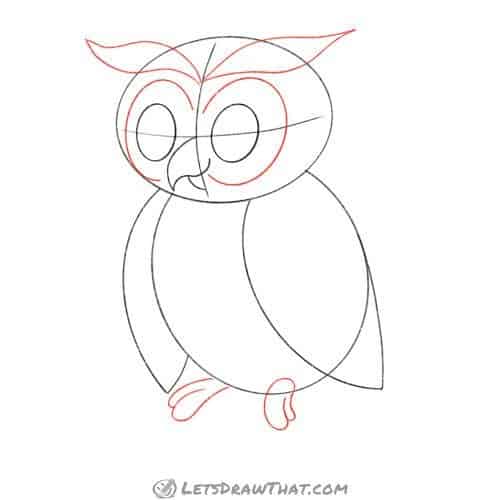
Let’s add a few final details to complete our owl drawing sketch. First, double up the eye outline to sketch the feathery mask around the owl’s eyes.
Then add two “eyebrows” made from”S” curves that stick halfway out from the head as the owl’s ears.
Finally, draw the owl’s feet – we sketch these as simplified bean-shaped fingers, two for each foot.
Step 5: Add final details

The owl drawing is done – all that is left is to give our owl a tree branch to sit on.
As a very last detail, let’s mark out the two small circles for the pupils and two drop-shapes for shine in the eyes – these areas will be left white when we colour in the owl’s eyes.
How to draw an owl: outline the drawing step by step
Step 1: Draw the owl's face
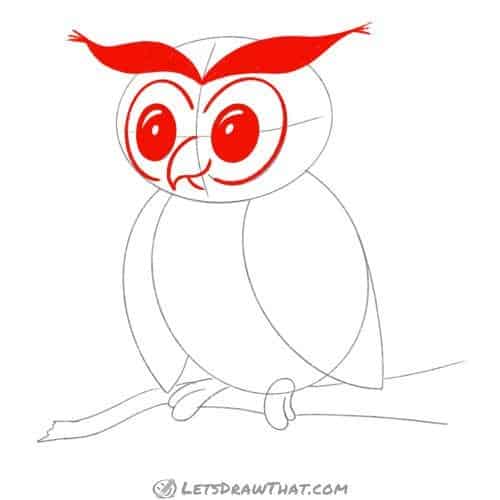
Let’s start outlining the owl by drawing its face.
Fill in the eyes, leaving the marked out areas for pupils and eye-shine white. Then fill in the eyebrow-ears. Add a few short lines to make small tassels at each end.
Finally, outline the face mask and beak directly from the sketch.
Step 2: Draw the owl's head

Here comes the fun part – improving on our simple sketch. Outline the top and the sides of the head down to the vertical face-line with just a simple line following the sketch.
Then add some scruffy “Z” shaped zig-zag feathers on each side of the head.
Instead of drawing the chin outline, add a series of short down lines that follow the head oval to simply suggest the row of feathers on the owl’s neck.
Step 3: Draw the owl's wings and feet

When outlining the owl’s wings, let’s use the same jagged line trick. Add a few zig-zags on each side of the wing outline, and a small double up for the feathers at the wingtip.
Then outline the feet as sketched.
Step 4: Finish drawing the owl's body and the tree

The last few lines to draw are completing the body outline and drawing out the tree branch that our owl is sitting on.
Step 5: Draw some feathers

Here comes the small but important final detail: suggest some feathery texture on the wings and owl’s body. If you look closely, these are rows of “V” and “W” shapes. They are larger and drawn lightly on the wings, and smaller and thicker on the body to suggest the darker feathers on the chest.
How to draw an owl: finished drawing
How to draw an owl: finished outline drawing

Here is the completed outline, after we have cleaned up the sketch lines with an eraser. It is a fairly simple way how to draw an owl – and now you can do it too.
How to draw an owl: finished drawing coloured-in

And here is the usual final coloured-in drawing. Our owl is coloured in with a texture made from three shades of brown to suggest the feathers. A light brown has been used for the face mask and body and wing highlights, dark brown for the outline and the texture on the wings – all those “V” and”W” feathers, and a mid-brown to add some more interest. Finally, the beak and the feet are coloured in dark yellow.