Learn how to draw a snowman. Turn three circles into an awesome snowman drawing by adding details step-by-step: coal face, carrot nose, saucepan hat and broom.

Learning how to draw a snowman is as simple as learning to draw three circles, one on top of each other. But it is the extra details that make all the difference to how awesome a snowman looks – whether a real one or one drawn on paper.
Our snowman’s body, arms, and head are made of simple snowballs – drawn as circles on flat paper. We build his face from coal stones with a carrot nose – hexagons and triangle on the paper. Then we dress up our snowman in a lovely saucepan hat and arm him with a broom!
This tutorial is part of the “Christmas drawings” collection.
min
You will need: pencil, fineliner pen, colored pencils, eraser and drawing paper or sketchbook
These are the favorites we use for drawings on Let's Draw That that we love and recommend:


Disclaimer: LetsDrawThat.com participates in the Amazon Associates Program. If you purchase a product using a link on our website, we earn a small commission, at no extra cost to you. This is one way how you can support this website.
Love drawing? Never miss a tutorial!

How to draw a snowman: base sketch step by step
Step 1: Draw three circles

We start our snowman drawing by sketching three circles – a small, medium, and a large one – one on the top of the other.
When you are building a real snowman, your snowballs will need to flatten to sit one on top of each other and to hold together. So draw your circles overlapping slightly.
Step 2: Add extra details
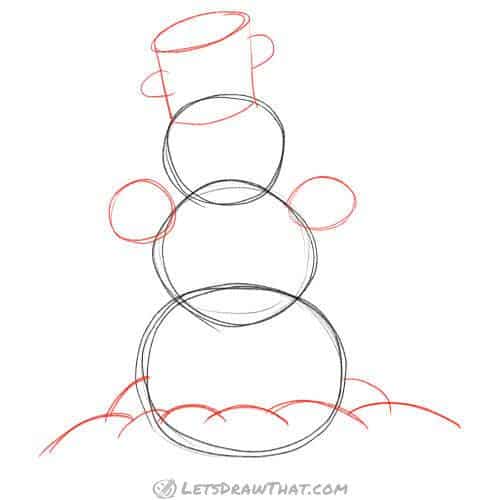
Let’s dress up our snowman. This step might look like we’re adding a lot at once, but that’s because it’s all fairly simple.
First, we give our snowman a saucepan-hat. The hat is made of a cylinder – one oval, two straight lines for sides and a half oval at the bottom. Then we add two half-circles for the saucepan handles.
Next, we add two arms. These are just two more small circles attached to the middle body snowball.
And finally, we shall sit our snowman on the ground – that is all the random lines at the bottom. These will become lumps of snow around our snowman.
How to draw a snowman: outline the drawing step by step
Step 1: Draw the snowman’s face
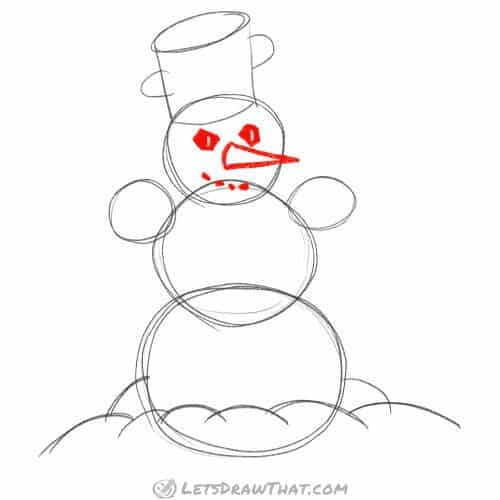
Here comes the magic part: let’s learn how to draw a snowman from the simple sketch by adding the details.
We begin with the snowman’s face. The snowman has a carrot nose – that is the long triangle, closed with a curved line. The eyes and mouth are made of black coal or stone lumps. Draw two larger hexagons for the eyes. Then add a row of small irregular shapes for a smiley mouth.
Step 2: Draw the snowman's hat and head
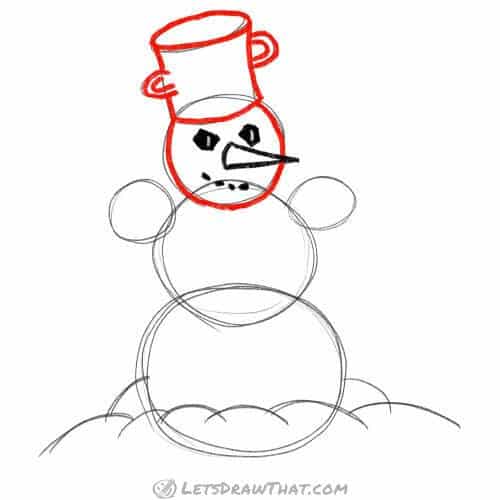
Now it is time to outline the hat and head.
Start with the left saucepan handle, since that one covers the side of the saucepan hat. Notice that we have doubled our sketch lines for the handle to draw it properly.
After that, you can draw the rest of the saucepan hat. Finally, outline the snowman’s head with a small break where the nose sticks out from the face.
Step 3: Draw the snowman’s arms and body

In this step, we draw the snowman’s arms and body.
Start with the left arm – that is the nice full circle one. Then draw the body around it. Notice how the bottom of our body snowball is flattened out? Remember what we said about pushing the snowballs together when building a real snowman, so they would stick together? This is it.
Finally, add the right arm. It is only part of a circle – it is slightly hiding behind the snowman’s body. With the left arm in front, and right in the back, our snowman is drawn viewed from an angle. That makes the drawing more realistic and interesting.
Step 4: Draw the snow lumps on the ground

Before we finish drawing the snowman’s body, we trace the ground and the lumps, because as we can see, part of the body will be hidden behind it.
Step 5: Finish off drawing the snowman’s body

Well, this is a simple step. Complete the snowman’s body by drawing the two curves we can see from the bottom snowball.
Easy and done!
Step 6: Erase the sketch lines
Now it is time to use an eraser and clean up all the guidelines you don’t need anymore.
Well, you have learned how to draw a pretty good snowman right here – you can stop now if you wish. But we thought that our snowman drawing is a bit bare and have decided to add some extra details to make the snowman more interesting.
Step 7: Give our snowman a broom

One thing that every snowman needs to look more awesome is a stick or broom in hand.
It just happens to be easy to draw. Draw two parallel straight lines for the handle, breaking them where the snowman’s arm is. Next, add the bristles.
Step 8: Add extra shading lines

What we are doing here is suggesting the shaded areas on our snowman with a few thicker hatch lines. Notice that the lines are curved to follow the contours of whichever shape we are shading. OK, let’s start:
Some shading on the hat – shorter lines up the top, longer at the bottom. Next shading on all the snowballs – the snowman’s body and arms.
And finally, a few really tiny lines on the carrot nose. These are not as much shading lines, rather they suggest some structure on the carrot.
Look at that – a bit of simple hatching, and our snowman drawing looks so much better!
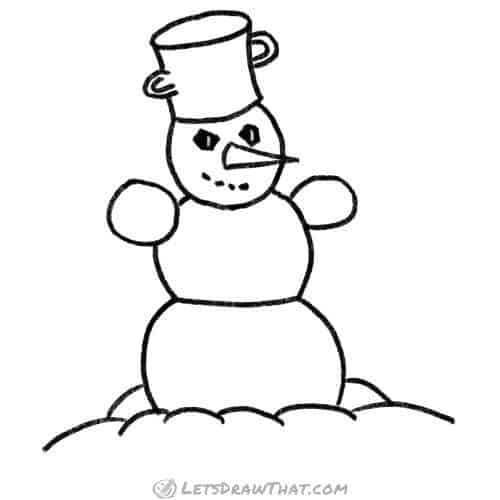
How to draw a snowman: finished drawing
How to draw a snowman: finished outline drawing

Here is the result of our how to draw a snowman tutorial: a completed snowman drawing, as real and awesome as the best snowman you would build in the winter.
How to draw a snowman: finished drawing coloured-in
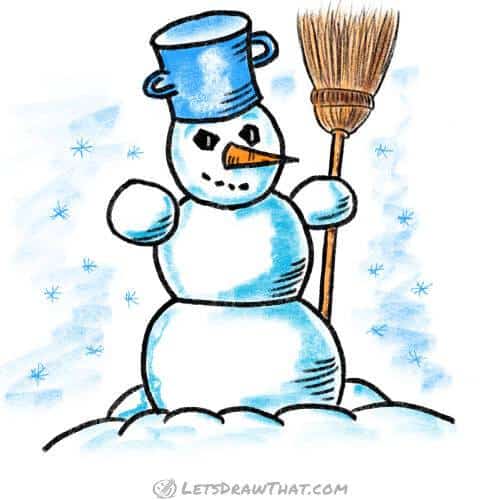
As usual, colouring is optional but finishes our drawing so nicely.
We are using light blue to partially shade the snowballs and the snow on the ground -it makes it look so cold and icy!
Just a touch different matching sky blue for the hat. Notice our usual trick of leaving out a white highlight to suggest the roundness of the saucepan.
The nose and broom are a warm orange, with some warm brown for the broom shading – to create a nice contrast to the icy blue.
Well, finally we have used the same sky blue to actually suggest some background sky. And do not forget to draw some snowflakes for a really cold winter feel!
And that is it – the very end of our how to draw a snowman tutorial.