How to draw a snowflake: base sketch step by step
Step 1: Draw the base grid
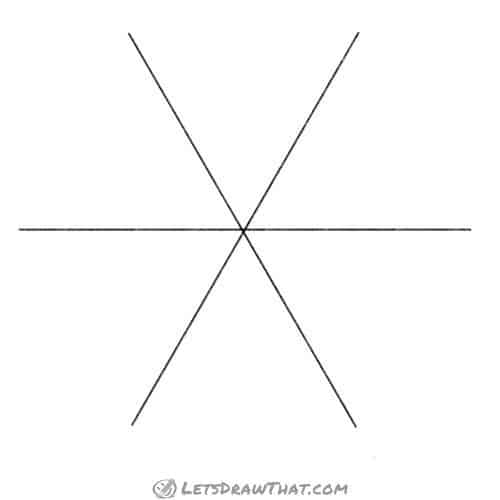
Our snowflake starts with the six arms – three are straight lines spaced at 60-degree angle. You can either just draw these roughly as shown on the picture, or use the compass method in “How to draw a hexagon” tutorial to mark the precise angles.
Step 2: Draw the outer row of branches

Draw two small branches out of each of the six snowflake arms. See the geometric perfection in the snowflake – these come out at 60 degrees again – the same angle as is between the main arms.
Step 3: Draw second row of touching branches
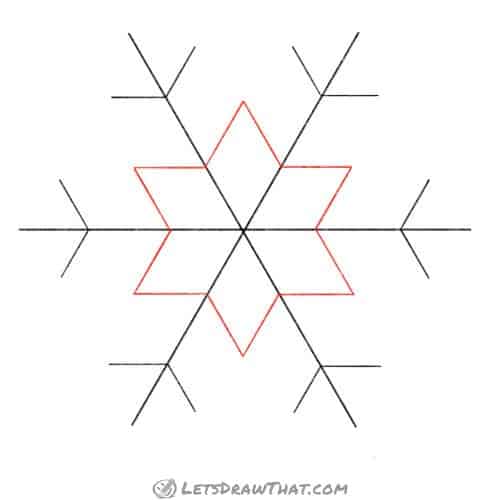
Here comes the neat trick. Draw a second row of exactly the same branches at the same angle. Just this time, position them so their ends are touching – and we get a beautiful six-sided star.
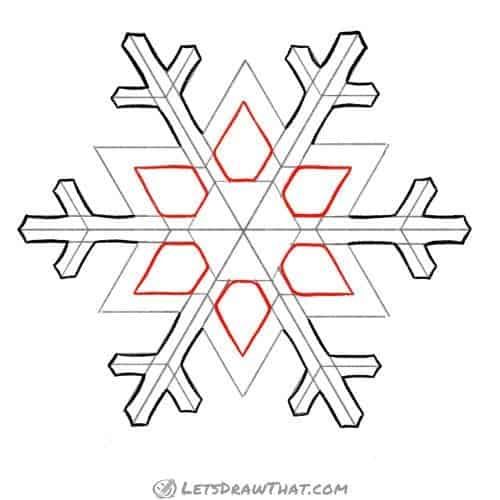
Step 4: Draw a central hexagon

Here is another shape to add some interest to our snowflake that follows the same 60-degree geometry. Join the main arms with straight lines to form a nice hexagon in the middle.
For just a simple and easy way how to draw a snowflake, outline this shape with a thick light blue marker. Or keep going with us.
Step 5: Double up the main snowflake arms

All we are doing from now on is doubling up on all the simple sketch lines.
Start with the main arms – draw two parallel lines at the same distance from the centre line. Close the shape at the top with two short lines. These are again at 60 degrees, to stay with the overall geometry theme.
Step 6: Double up the short branches
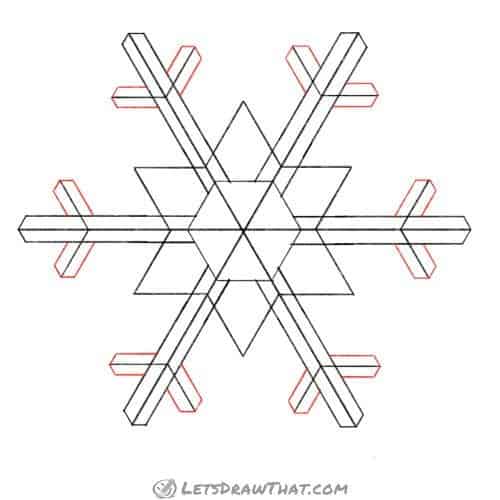
Similar to above, double up on the short branches and close them at the tip.
Step 7: Double up the star

Finally, we add some thickness to the star part of the snowflake. Here we are cheating and just outlining the star on one side (but if that does not work for you, you can again do the same two outer lines using the star as the centre line).
That is the complete sketch of our snowflake drawing.
How to draw a snowflake: outline the drawing
Step 1: Draw the snowflake outer arms

Let’s start outlining the snowflake sketch, starting with the outer branches. You can draw straight lines, directly copying the outer sketch lines. Or, like we are doing here, curve each line slightly to make the snowflake look more natural.
Step 2: Outline the inner nooks
Next, draw the snowflake’s inner shape – again, you can slightly bend the lines and slightly round off the open-angled corners. We have left the outer narrow corner sharp.
Step 3: Outline the outer star shape

Finally, outline the remaining outer star shape. Again, we like the corners rounded off, this time more noticeably. But feel free to leave yours sharp, if you like them better that way.
Step 4: Clean up the sketch and suggest the centre lines

Our how to draw a snowflake tutorial is almost done. Here we have erased all the sketch lines to leave just the snowflake outline. Then we are adding back some light suggestions of the centre lines and double up on the inner hexagon.

How to draw a snowflake: finished drawing
How to draw a snowflake: finished outline drawing

Here is the completed snowflake drawing in one colour.
How to draw a snowflake: finished drawing coloured-in

Our usual final step to colour in the picture is very easy. Since snowflake is white, all we are doing here is adding some suggestion of the light blue shading along the edges and the centre lines.
That is the simple snowflake drawing complete – indeed only one of the many ways how to draw a snowflake. Try adding more layers of the small branch-outs for some more elaborate snowflakes – the technique is the same, it just needs some more patience.