How to draw a reindeer
Let’s learn how to draw a reindeer. With really large cartoony eyes and a big nose, this is definitely a cartoon reindeer drawing, as he happily gallops over the plain.
How to draw a reindeer: base sketch step by step
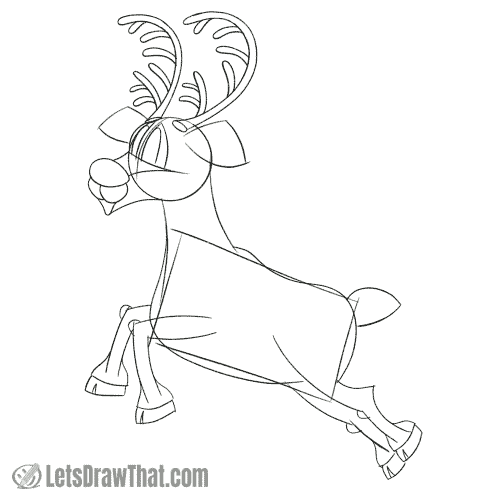
Step 1: Draw the base shapes
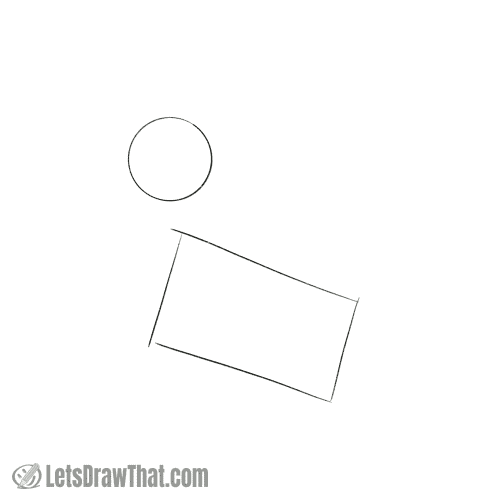
Let’s start our reindeer drawing with the usual simple shapes. Draw a circle for the head. Then add a rectangle for the body. Our body rectangle is at an angle, as the reindeer will be jumping.
Step 2: Draw the neckline and face cross
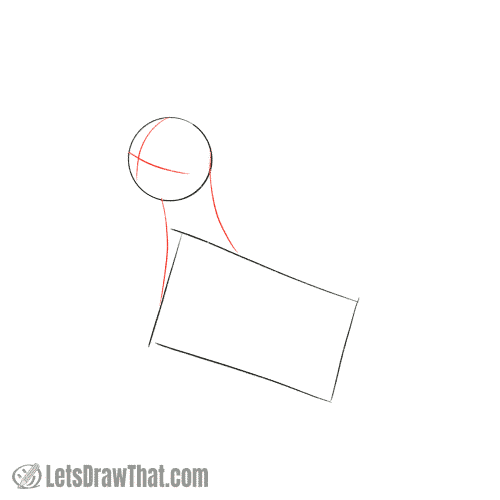
Join the head to the body with two curved necklines. Then draw a face cross – this will help us place the reindeer’s eyes and the nose.
Step 3: Draw the reindeers eyes and nose
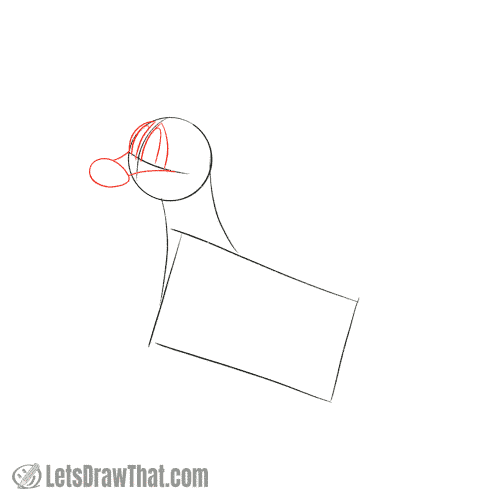
This is what the face line cross is for. Add two large cartoony eyes sitting on the top of the face line. Those are made from bulged out triangles. Notice the rear eye is flatter as it is drawn in perspective. Mark out the eye pupils with upside-down “J” lines.
Then draw the reindeer’s nose. Again, this is a large cartoony nose, drawn as an egg-shaped oval – the side that is closer to us, on the right, is narrower.
Finally, join the nose to the horizontal face line with two curves.
Step 4: Draw the reindeer's mouth

Draw two round cheeks under the nose – the front one is three-quarters of a circle, the rear one is slightly hiding behind the front one. Add a small, open, “U” shaped mouth underneath the cheeks. Then draw the chin as a slightly curved line joining the bottom of the mouth to the bottom of the head circle.
Step 5: Draw the reindeer's antlers, ears and tail

Here our drawing finally starts looking like a reindeer. Draw two antlers from the top of the head (just the main beams, for the time being) curving forward.
Then draw the reindeer’s ears – these are drawn as a wide-open upside-down “V” at the top and closed with a curve at the bottom.
Finally, draw a short tail made of two curves meeting at a pointed end.
Step 6: Finish drawing the reindeer's antlers

Let’s finish the reindeer’s antlers by drawing the short tines. Draw the five short tines that grow directly from the main beam first. Then add some even smaller growth spurs to the first frontal tine.
Step 7: Draw the reindeer's body
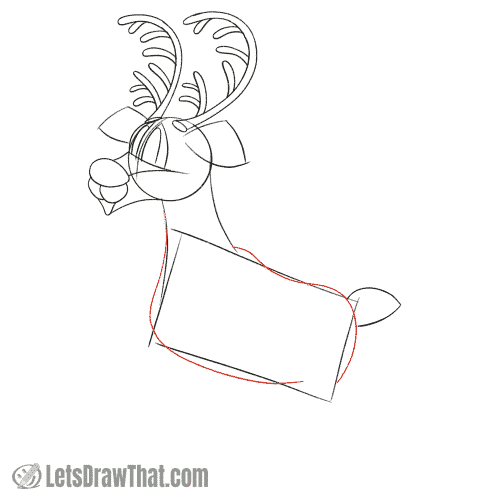
Time to improve the shape of the reindeer’s body – while we are generally following the base rectangle shape, we need to round the body a bit.
Draw the chest and the belly as one smooth line, starting at the front of the neck. The reindeer’s back has a few more curves – first, there is a small hump just past the neck where the front leg shoulder is, followed by a dip in the middle of the back. Finally, round the back of the body to draw the rear leg thigh and bum muscles.
Step 8: Draw the reindeer's legs

Draw the reindeer’s legs next. The rear leg has the typical backwards pointed ankle, similar to the hind legs in our fox, giraffe or cow drawing tutorials. Draw that as a wide-open upside-down “V” double curve. Then add the wide double curve for the front of the leg. Double up the line yet again to draw the other rear leg.
The front legs are bent at a roughly 90-degree angle and are made of two simple bent “V” lines.
Step 9: Draw the reindeer's hoofs

Finish drawing the reindeer’s legs by adding the hoofs at the end. Widen out the legs into feet and double up the lower closing line to draw a hoof. Then add small “V” notches to the hoof to suggest the separate hoof fingers.
That is pretty much how to draw a reindeer. All that is left is to outline the sketch.

How to draw a reindeer: outline the drawing step by step
Step 1: Draw the reindeer's face

We have done most of the hard work when sketching the reindeer. The outline is simply following the sketch, joining and smoothing the lines as needed.
Let’s start with the reindeer’s face. Outline the eyes, rounding the corners a bit. Fill in the pupils black, leaving a small white shine in the eye. Colour in the nose as well – unless you are planning to draw the Christmas version of the Rudolph the red-nosed reindeer, in which case you want to draw just the outer nose line.
Then outline the muzzle sidelines, cheeks, mouth and chin from the sketch.
Step 2: Draw the reindeer's antlers and ears

Next, draw the reindeer’s antlers. Those are again drawn by just following the outer edges of the sketched tines, joining the antler into a single shape.
Then draw out the ears, rounding the top sharp corners. Add a short line to suggest the inner fold in the ear.
Step 3: Draw the legs and fur on the chest

Now, here is something new: Let’s give our reindeer some fur on the chest. Draw a nice bib under the chin, all over the reindeer’s chest using the jagged and zig-zagged line – similar to our scruffy dog or hamster fur.
Next, draw the reindeer’s legs that are closer to us, as they will hide portions of the body outline. Again, simply follow the sketch lines, joining the knee cups and widened ankles with the overall leg outline.
Step 4: Draw the reindeer's body

Well, we have done all the hard work shaping the reindeer’s body in the sketch. So just follow the sketched outline, breaking the body outline for the front leg.
Step 5: Finish drawing the reindeer's legs

Now we can outline the legs that are further from us and hidden behind the reindeer’s body. Again, we are simply following the outer lines from the sketch.
Step 6: Draw the reindeer's hoofs and tail

Here are the final small improvements: Outline the reindeer’s tail, adding some extra furry zig-zags.
Then draw and fill in the hoofs – notice we are also adding some furry zig-zag edges at the end of the legs above the hoofs.

How to draw a reindeer: finished drawing
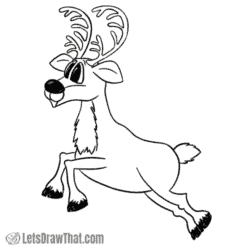
How to draw a reindeer: finished outline drawing

Here is the cleaned-up result of our how to draw a reindeer tutorial – one cartoony reindeer happily galloping over the Norwegian tundra.
How to draw a reindeer: finished drawing coloured-in
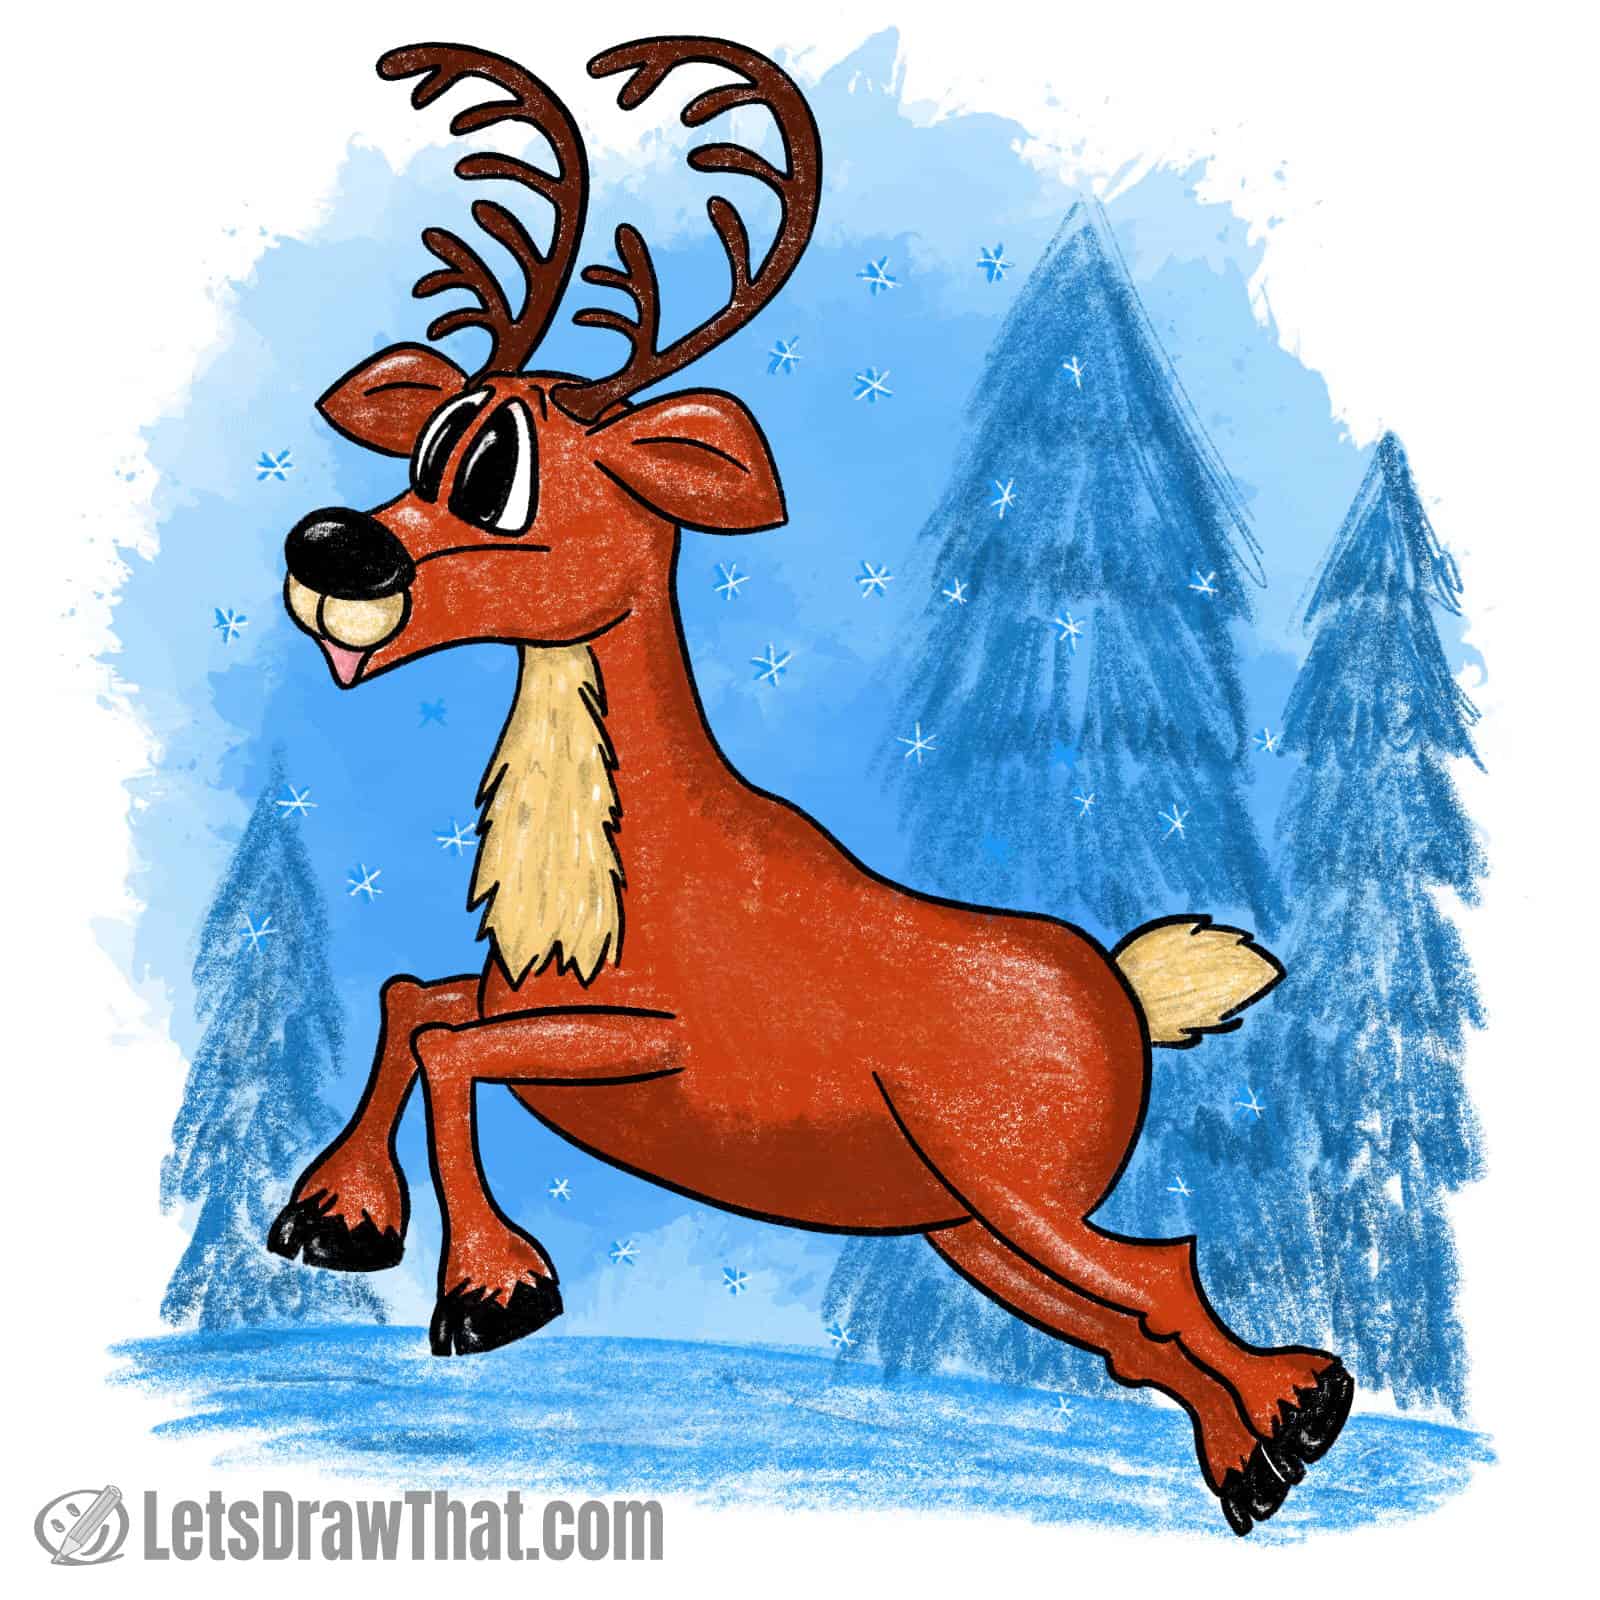
Now that you know how to draw a reindeer, all that is left is to colour in the drawing. Here we are going for a simple all brown young reindeer, with some darker brown antlers. The hoofs, nose and eyes are black, and the chest, cheeks and tail are a light beige colour.
We have drawn the reindeer galloping over a light blue snowy plain, with some fir trees for the background and snowflakes falling in the air to add to the winter atmosphere. (Well, with all the trees, maybe this reindeer has strolled from Norwegian tundra to some Swedish forests after all.)
How to draw Rudolph the red-nosed reindeer
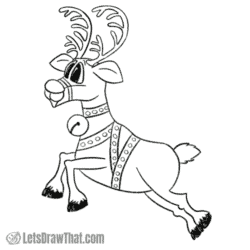
Now, while we are drawing a reindeer, and since it is close to Christmas, we will also show you how to draw Rudolph the red-nosed reindeer – the most famous of all the reindeer that there are! With just a few extra lines, we draw a sleigh pulling harness – and you have another great drawing to expand your Christmas drawings collection.
How to draw Rudolph: base sketch step by step
Step 1: Use the reindeer sketch to draw Rudolph
The most likely time of the year you will want to know how to draw a reindeer will be Christmas. And the most likely reindeer you want to draw will be the lead of Santa’s pack, Rudolph the red-nosed reindeer.
So how do you turn our reindeer drawing into Rudolph? Well, apart from colouring the reindeer’s nose in red, he will also need a harness to pull Santa’s sleigh. Let’s learn how to draw that.
To start, here we have simply copied the reindeer sketch we have done above.
Step 2: Draw the harness belts
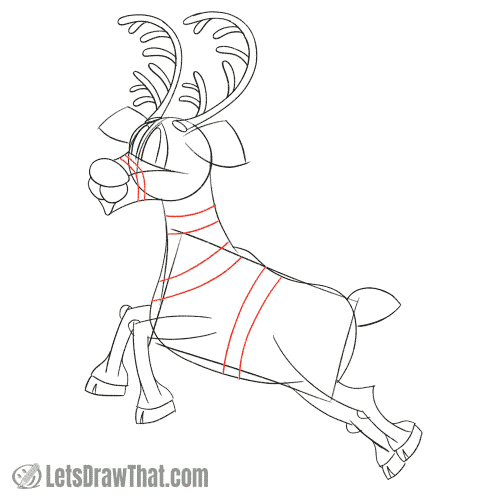
Adding a harness is fairly simple – these are just stripes of leather, drawn with simple arcs.
Draw one from the back of the neck across the reindeer’s chest. Then add another stripe across the body. Add one more small stripe across the reindeer’s muzzle – this one would be used to attach the reins.
The final stripe is around the neck – this one will be used to hang a large jingle bell on.
Step 3: Draw the jingle bell

The last strip to complete the harness joins the chest and body strap, from the back of the neck to the underside of the body.
The very final detail is to give Rudolph a nice large Christmas jingle bell onto his neck. The jingle bell is drawn as a circle, with a small curved split line, finished by a small circular hole.

How to draw Rudolph: outline the drawing step by step
Step 1: Draw the Rudolph's harness and jingle bell

Now it is time to outline the Rudolph drawing. Start with the harness, as it covers parts of the body.
Draw out all the stripes from the sketch. Then add some decorations – here we are going for simple circles to add some detail and bling to the harness.
Finally, outline the jingle bell directly from the sketch as well.
Step 2: Draw the Rudolph's body

Draw the rest of Rudolph’s body, following the sketch.
Well, since we have shown you the detailed steps above, let’s just say that the only differences between the reindeer and Rudolph drawing are the nose being left blank to colour in later. We have also skipped drawing the chest fur to make space for the harness and the jingle bell.

How to draw Rudolph: finished drawing
How to draw Rudolph: finished outline drawing

Here is the cleaned up outline drawing. Look at this – now you know how to draw a Rudolph, by simply dressing a reindeer in a sleigh pulling harness!
And since we have conveniently chosen a galloping pose for the reindeer, you can simply skip drawing the ground to have your Rudolph flying high up through the sky – the pose is the same!
How to draw Rudolph: finished drawing coloured-in

Well, even our final Rudolph colouring step is very similar to the reindeer drawing above.
Rudolph the red-nosed reindeer certainly has to have his nose coloured in red. To keep with the Christmas theme, the harness is coloured in green, with shiny gold decorations. Well, they are a nice golden yellow anyway, same as the jingle bell on Rudolph’s neck.
The background is much easier – since Rudolph is soaring through the sky, all that we need is some light blue background, with a few snowflakes flying through the air for some winter Christmas atmosphere.