How to draw a present: base sketch step by step
Step 1: Draw the front corner
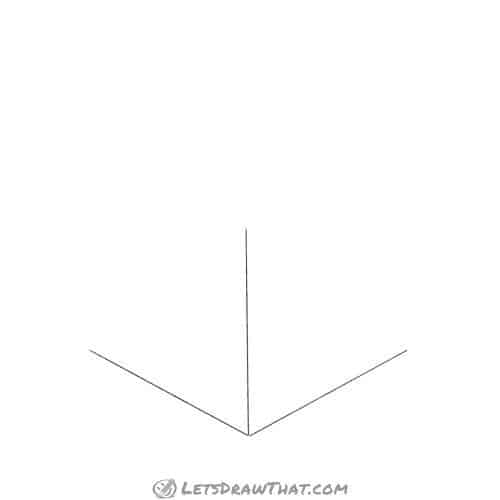
Start drawing the box with a vertical line. Then add the two bottom sides coming sideways out from the central line. They are the same length and open up symmetrically.
Step 2: Add the outer box sides
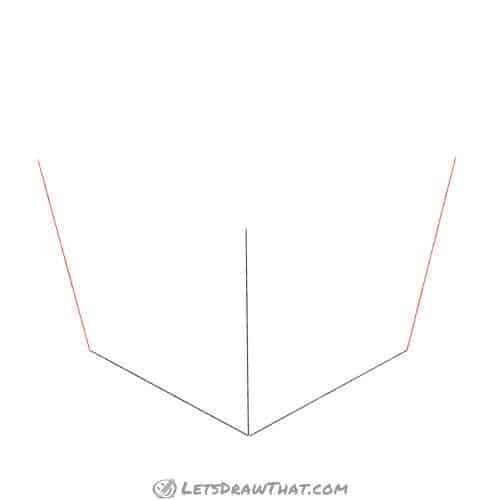
Next, draw the outer sides of the box. These again start from the previously drawn bottom edges and go up, opening slightly. Here we are aiming to show the box at an interesting angle – this is actually a three-point perspective.
Step 3: Start drawing the lid
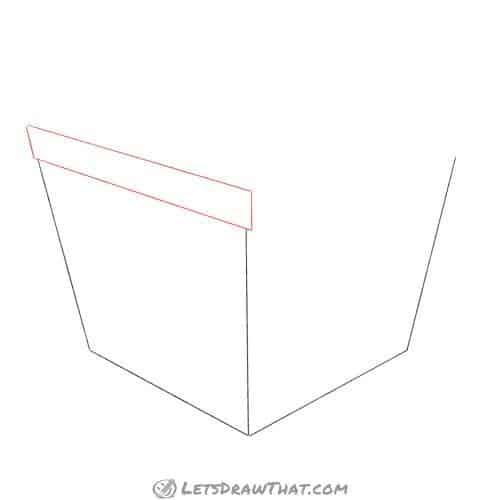
Draw a rectangle on the top of one side of the box – this is the first part of the box lid. The two vertical lines roughly follow the angle of the bottom line, and the two short sides the angle of the vertical sides. The lid will be slightly wider than the box side.
Step 4: Finish the lid

Next, we complete the box lid. Draw a second narrow rectangle for the lid side – again, the angles follow the sides of the box.
Then complete the top of the lid with two long lines – again, these follow the angle of sides of the box.
Step 5: Draw the ribbon cross

Now that we have a box with a lid, it is time to make it into a present. Now the present needs to be wrapped with a ribbon, that crosses around the box.
Mark the middle of the two front lid sides. Then draw two parallel lines across for the ribbon – a cross on the top of the lid and then the lines down along each side of the present.
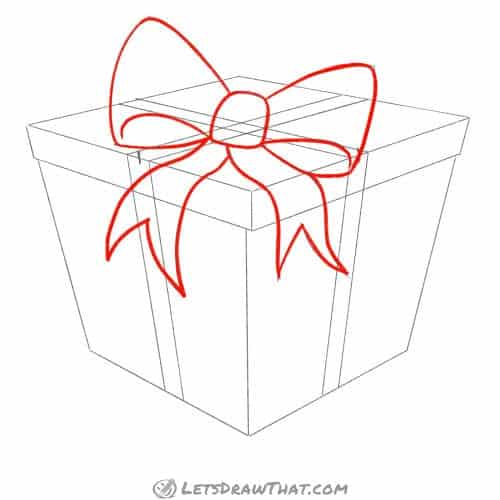
Step 6: Draw the bow

The ribbon on the present needs to be finished with a nice bow. First, draw a small rectangle with rounded sides. Then add the “butterfly wings” widening out from the central fold, again drawn with curved sides.
Step 7: Add the ribbon ends to the bow

Let’s finish the bow with nice ends. The ribbons ends are drawn with two “S” curves each and widen out a bit. Cut out the ends with a “V” to give them a nice finish.
Next, add two more “S” curves to the bow to better mark the ribbon fold. That is the present sketch completed.

How to draw a present: outline the drawing step by step
Step 1: Draw the ribbon bow
Let’s start outlining our present drawing. First, we need to draw the ribbon bow, since it sits on top and hides many lines of the present sketch.
Round off the sharp corners of the “wings” as you are outlining the bow. Apart from that, just follow the sketch line.
Step 2: Draw the ribbon wrapped around the present

The second layer from the top is the ribbon that is wrapped around the present – so draw that one next. Again, all we are changing is slightly rounding off the corners, the rest is a direct outline of the sketch.
An extra detail is adding the short lines to suggest the bow folds as it tightens into the centre – two for each side of the central square.
Step 3: Draw the present box and lid

All that is left is to draw the present box, where it is not hidden behind the bow or ribbon – again a simple outline of the sketch.
How to draw a present: finished drawing
How to draw a present: finished outline drawing

Here is the completed present drawing, after we have erased the sketch lines.
How to draw a present: finished drawing coloured-in

The usual final step in our “How to draw a present” tutorial is to colour in the drawing. Now the present and the box can be any colour you like. Here we are keeping with the Christmas theme, so the ribbon is bright red, and the box dark green. Just to add some contrast, we have coloured the lid in a bright yellow.