How to draw a frog: base sketch step by step
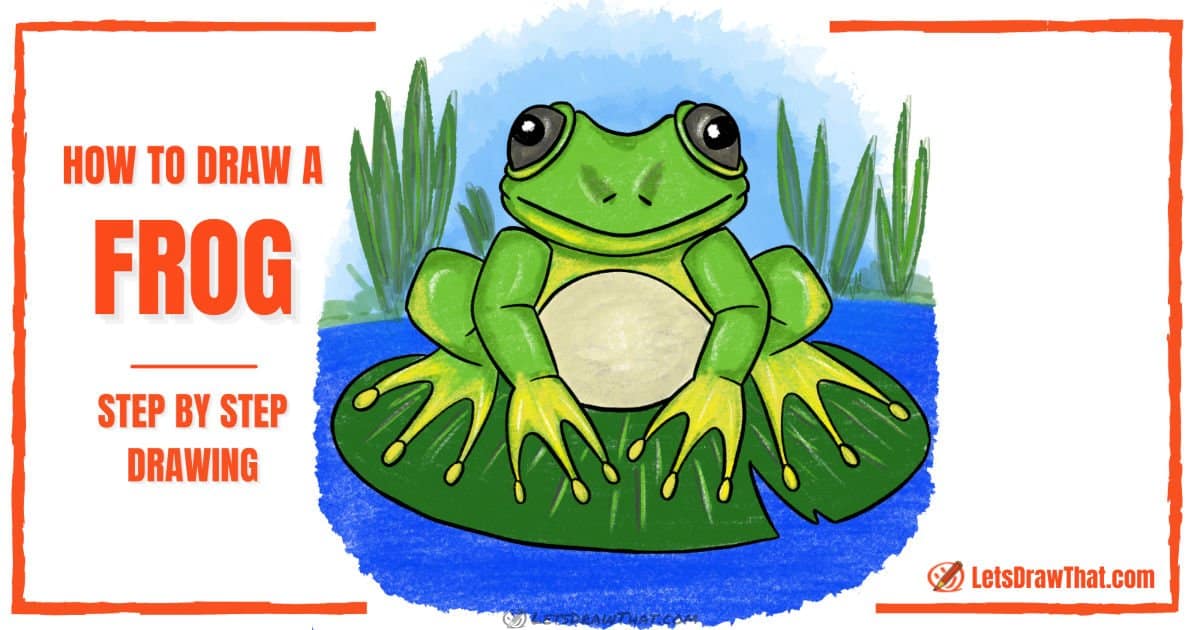
Step 1: Sketch the base head and body shapes
Usually, for an easy drawing, we draw the base head and body shapes as simple ovals. But let’s try something different today, and sketch them bit more square-ish.
Let’s start with the head shape. Draw the two sides first, slightly bent and widening out. Then add the bottom “chin” arc and a slightly flatter arc for the top of the head. See – almost an oval, but with some sharp corners – a kind of rounded rectangle.
Draw the body in a similar way: we only need the bottom arc here – the top is made by the chin – and the two sides.
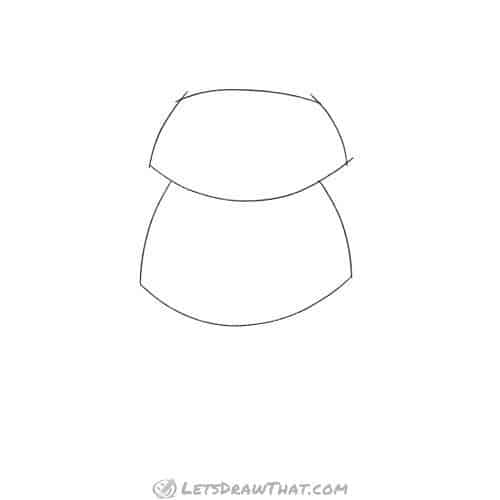
Step 2: Sketch the frog's rear legs

Let’s add some legs to the body next. Going with the square-ish theme, sketch two rounded squares, one on each side of the body – these will be the frog’s folded rear legs.
Then sketch the feet – for now, these are simple widening-out rectangles – convex isosceles trapezoids, if you want to learn some funky geometry terms – with a nicely curved bottom line for the frog’s webbed feet. Finally, mark a centerline on the feet – we will use that later to draw the fingers.
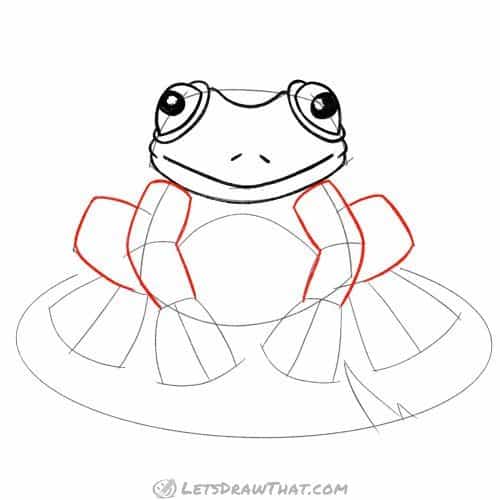
Step 3: Sketch the frog's arms
By now you should be a master at drawing those rounded rectangles. So let’s draw two more, starting at the chin for the frog’s upper arm – these are tilted slightly out to follow the upper body shape. Then add two more rounded rectangles pointed inwards for the forearms.
Finish the arms with the two of those funky trapezoids for the frog’s webbed hands. These are the same as for the rear feet, just a touch smaller.
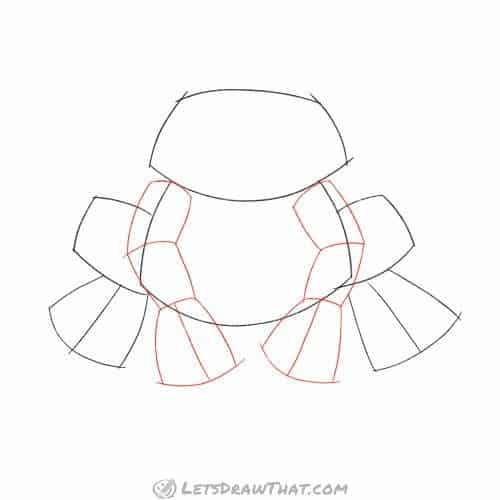
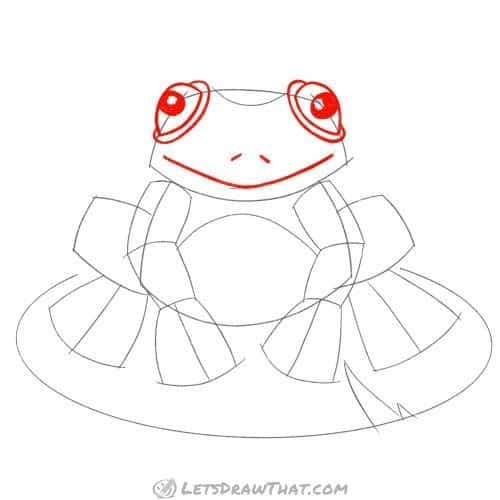
Step 4: Sketch the frog's face

It is time to give our frog a face. Draw two small circles for eyes, place one on each of the two upper head corners.
Then sketch a nice, wide, smiling mouth – continuing with the rounded square theme, we have drawn the mouth from two arcs with a sharper point where they cross in the middle.
Finally, add just two simple short lines to mark the nostrils.
Step 5: Draw the bulging frog's eyes

One of the frog’s trademark features is its big bulging eyes. Let’s add those around the small eye circles we have marked.
Start with the inner drop shape – this is a flat arc from the top line of the head to the side, with some distance from the eye circle. Then draw the bulging dome, so it just touches the eyes on the outside. Now add another half oval all around the eye for the eyelid.
And to complete the frog sketch, let’s add a small dip to the forehead between the eyes and another curve to mark the frog’s belly.
Step 6: Draw a lily pad
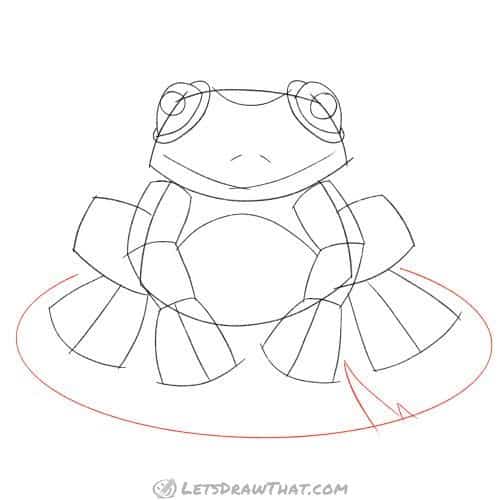
Well, that is the frog sketch complete. As a final improvement, let’s give our froggy a nice lily pad to squat on. This is just a wide oval all around the frog, with two small triangles to mark the cut-out in the pad for some interest. Done.

How to draw a frog: outline the drawing step by step
Step 1: Outline the frog's face
Now it is time to start outlining the frog and improving on our sketch. Outline the eyes, and fill in the pupils, leaving a small white patch in the eye for some shine.
Then outline the mouth, rounding off the sharp point in the middle, and draw the nostrils.
Step 2: Draw the frog's head

Let’s improve on the frog’s head next. Outline the dip on the top of the head, and join it to the eyes with small S-curves. Then draw two little C-shaped cheeks just under the frog’s eyes. Finish drawing the head shape by outlining the bottom jaw and smoothing off the sharp corners on the sketch.
Step 3: Draw the arms and legs
Next, draw the frog’s arms and legs. These are a straight outline of the sketch with rounded off sharp corners at the elbows and knees.
Step 4: Draw the frog's webbed feet

Here is another frog trademark – its webbed feet. Draw the two outer lines for each foot with a very slight bend. Then draw the webbing between the fingers as two “U” shaped lines, leaving some space between to give the fingers some thickness.
Step 5: Add final details
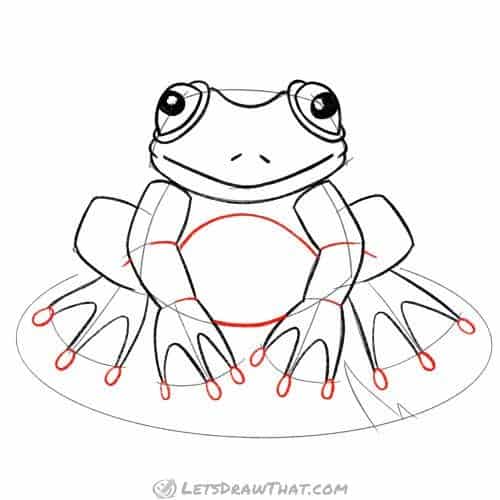
We are almost done drawing the frog, there are only a few details left. First, draw the round toe pads on each finger as small ovals. These work like suction cups and help the frog cling to wet leaves.
Next, finish drawing the frog’s body – add the lower and top belly outline.
Finally, mark small folds on the skin on the arms at the elbows and wrists, and the knee folds on the legs.
Step 6: Draw the lily pad
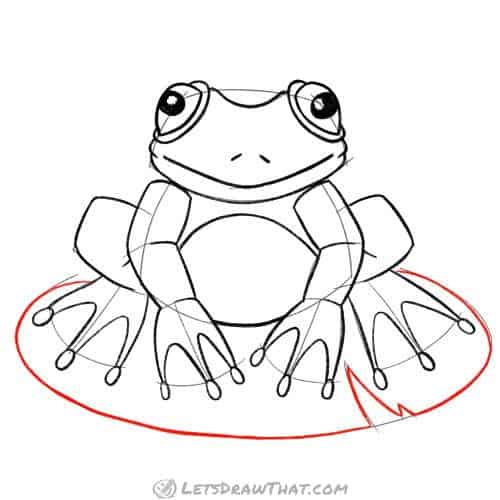
With the frog drawing done, the last simple step is to outline the lily pad our frog is sitting on – just leave out the edge where the pad is open.

How to draw a frog: finished drawing
How to draw a frog: finished outline drawing

Here is the completed frog drawing outline, after we have erased the sketch. While this was fairly easy, you have learned how to draw a frog that looks fairly realistic. It looks very close to a magnificent tree frog, which lives in northwest Australia.
(Well, except that a tree frog would likely not sit on a lily pad. Even if there were any lily ponds in northwest Australia. But she looks happy there. Could it be an Australian frog on holiday in Europe?)
How to draw a frog: finished drawing coloured-in

And our usual last step is colouring the frog picture. Similar to the picture in the link above, we have coloured in our frog with a fresh, light green, with yellow feet and chest. We’ve added some darker green for shading, a beige belly and grey eyes.
Feel free to finish your drawing with some scenery – either the lily pond or a nice green tree canopy.