How to draw a fox: base sketch step by step
Step 1: Draw the fox's base head shape
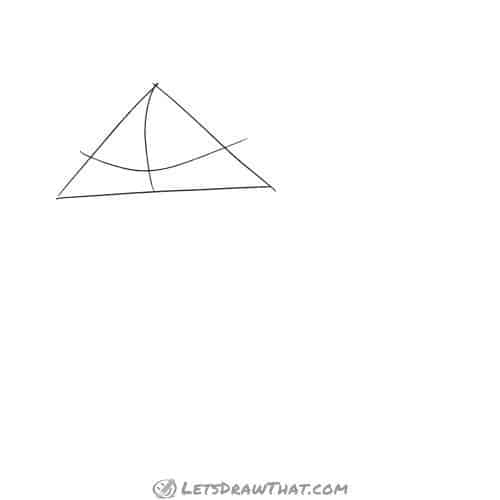
Let’s start our “how to draw a fox” tutorial with the usual sketch of the base body shapes. Now, this one is actually using a fairly unusual shape – our fox will have a triangle for the head!
Next, draw the face cross over the head: one curve in the middle and another across – these will help us place the facial features.
Step 2: Draw two ovals for the fox's body

Now let’s add a body base to the head. Draw two ovals: The front larger one is for the fox’s chest – it slightly overlaps the head and is placed just a touch backwards from the head centreline.
Then draw a smaller oval to the side – this will mark the fox’s bum and rear thigh.
Step 3: Draw the nose and eye base shapes
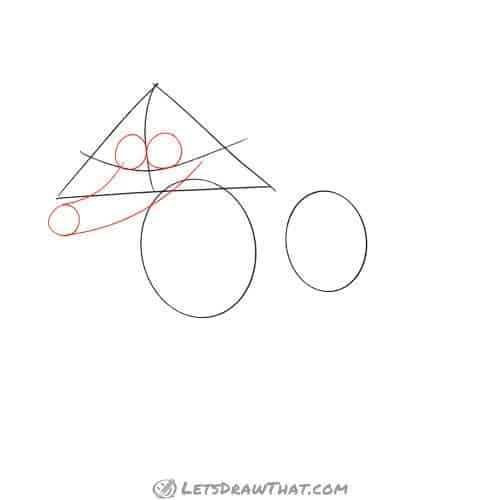
Next, let’s start building the fox’s face. Draw two small circles for the eyes and place them one on each side of the up-down face split line, sitting just on the top of the left-right face cross line.
Then draw another small circle for the fox’s nose and attach it with two curves to the face for a nice long pointy nose. Well, with the long trunk, it almost looks like we are drawing an elephant. Do not worry, we will turn the sketch back into a fox soon.
Step 4: Draw the fox's mouth, ears and finish the body

Let’s finish sketching the fox’s head first. Draw two nice pointy ears sticking up from the top of the head, made of two curves meeting at a pointy tip. Then double up the outer side of each ear to draw the ear cup.
Next, draw a small smiley mouth – a little “S” curve at the right end of the nose. Add a small cheek line at the end of the mouth.
Finally, let’s improve on the fox’s body. Join the two ovals with a smooth curve at the top. For the lower belly edge, start from the very bottom of the larger oval and curve up to meet with the rear thigh oval at about two-thirds down.
Step 5: Draw the fox's front legs

Here comes the tricky part – drawing animal legs. Let’s start by drawing the fox’s front legs, the one closer to us first.
Draw two straight lines, slightly wider apart at the top and narrowing down. Then add the short foot – again two parallel straight lines – bent forward at the ankle. Finish with the paw – a rounded “D” shape with the belly up.
The other front leg is drawn the same – just start drawing at the chest oval, as the rest of the leg is hidden behind the body.
Step 6: Draw the fox's hind legs

Now for drawing the fox’s rear legs: These are made of similar three parts like the front legs, just with different proportions.
The upper thigh lines are much wider apart, starting on the sides of the rear body oval and bending back slightly.
The ankle for the rear foot is much higher, but the foot section is drawn as the same two simple lines coming forward.
Finally, the paws are the exact same “D” shapes as on the front legs.
Step 7: Draw the fox's tail

No fox would be complete without its trademark thick tail – so let’s add one now. The tail attaches halfway up the rear body oval and is made of two bent “S” curves. Draw the smaller, more regular inner bend first. Then add the outer shape, curving it out nice and wide to give the tail a nice thickness in the middle.
We have bent the tail over the rear legs. A neat trick that not only adds some interest to the drawing but also saves you from drawing the rear legs properly, if you are struggling with the proportions. But of course, feel free to curl the tail any other way.
That is the fox sketch done. While it is still a very rough fox drawing, we have correctly laid out all the fox’s body proportions.
How to draw a fox: outline the drawing step by step
Step 1: Draw the fox's nose and face

Let’s improve on our sketch while we are outlining the drawing. Draw the fox’s face first.
Here we are turning the nose tip from a circle into more of a triangle with rounded-off corners. Then the nose, mouth, cheek are a straight outline of the sketch.
The final improvement – as you are drawing out the eyes, add small black dots for the pupils.
Step 2: Draw the fox's head

Next, let’s draw and improve the fox’s head. At the top of the head, follow the triangle outline, rounding off the sharp top corner.
Next, draw the sides of the head. Add three scruffy zig-zag hair lines on each side, only loosely following the sketch. Make each of the hairs slightly different in length.
Finally, close the head shape at the bottom by following the mouth line with a gap.
Step 3: Draw the fox's ears and tail

Here is an easy step: Draw the fox’s ears and tail next – these are just a straight outline of the sketch.
Step 4: Draw the fox's chest hair
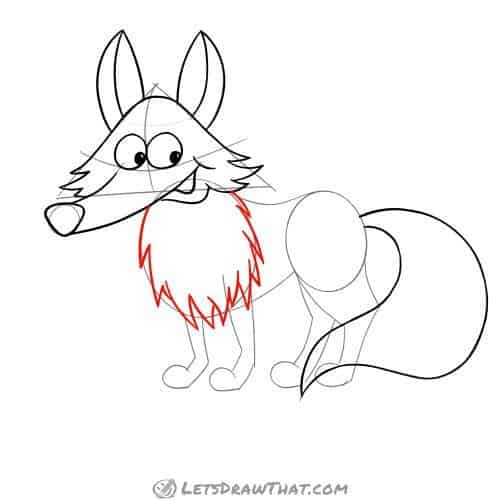
Here comes the next improvement on the sketch – draw the hair on the fox’s chest as a jagged line that follows the chest oval. Again, add some randomness and vary the hairs in length and thickness for the best-looking result.
Step 5: Draw the fox's front legs

Since we have already done all the hard work, drawing the fox’s front legs is a simple outline of the sketch. The improvement here is to add the small “C” shaped splits to the paws to separate the fingers.
Step 6: Draw the fox's body

Draw the fox’s body next, following the sketch lines where they are not hidden.
Start with the fox’s back. Draw one smooth line following from the back curve to the rear thigh oval and down along the leg to the tail.
Then draw the front edge of the hind leg, extending the line along the oval above where the belly ends.
Finish with the belly line – and do not forget the small bits which show between the chest hair.
Step 7: Draw the fox's hind legs

Another easy step: outline the hind legs, where they are not hidden behind the tail. Again, this is just a direct outline of the sketch.
Then add the small “C” shaped finger splits to the paws.
Step 8: Add the final details
Here are the final, small but important improvements to finish our fox drawing:
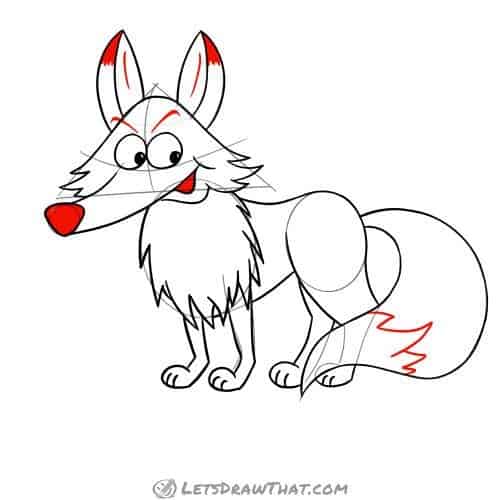
Colour the nose tip and the mouth in black. And while you are at it, also colour in the ear tips. Add extra short lines to the middle of the ears to suggest more structure.
Draw two raised up “V” eyebrows. These are definitely cartoony additions but give our fox a cute and very cheeky expression.
The final detail is to draw another jagged zig-zag hairline to separate the white tail tip from the rest of the tail.
How to draw a fox: finished drawing
How to draw a fox: finished outline drawing
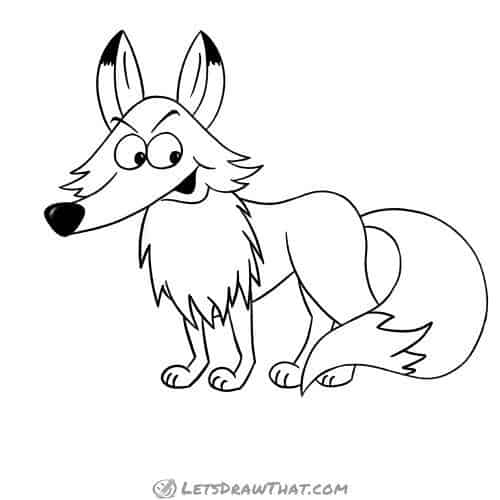
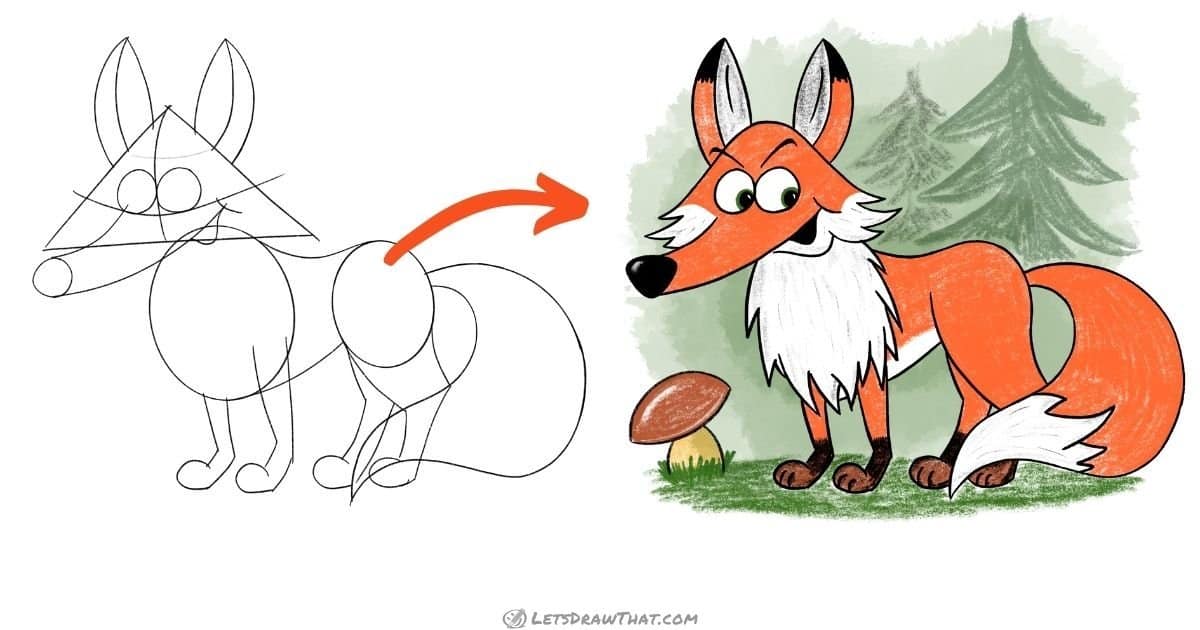
Here is the result of our “how to draw a fox” tutorial: a completed outline of a fox drawing once we have erased the sketch lines.
This one turned out to be a very cheeky looking Mister Longnosed Fox. By the way, you can change the fox’s expression a lot by just playing around with the placement of the eyebrows and the two black pupils in the eyes.
How to draw a fox: finished drawing coloured-in
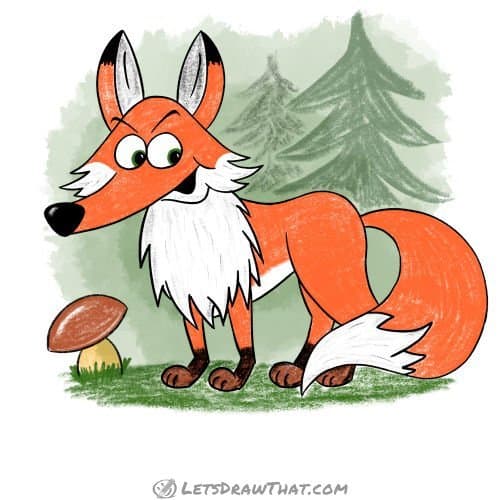
And here is the final coloured-in fox drawing. Real foxes have orangy-brown fur, which for our cartoon fox is simplified to a nice bright orange.
Leave the chest, tail tip and the fur on the lower half of the head just plain white, or add just some light grey texture lines as we did.
Finally, colour the paws dark brown with black “socks” on the foot part.
Our fox is standing in the middle of the forest with a mushroom and some spruce trees in the background. And that is it – the very end of our “how to draw a fox” tutorial.