How to draw a farmer: base sketch step by step
Step 1: Sketch the farmer's basic body shape

Let’s start the farmer drawing by building the base figure from some simple shapes.
Draw a circle for the head. Next, add a rectangle under it – this will be the farmer’s body. Draw two more, skinnier rectangles underneath the body, slightly at angle and opening into a “V”, for the two legs.
Step 2: Sketch the farmer's arms and feet

Let’s lay out more simple shapes to indicate the farmer’s pose.
Start with the upper arms, drawn as two more rectangles, attached at an angle to the top of the body at the shoulders. The left lower arm will be hidden, but draw another smaller rectangle bending back up for the right arm that will hold a pitchfork.
Sketch the farmer’s boots as a half circle for the boot tip, a slightly curved line for the sole and a couple of short lines to attach each boot to the legs.
Step 3: Sketch the farmer's hands holding the basket and pitchfork shaft
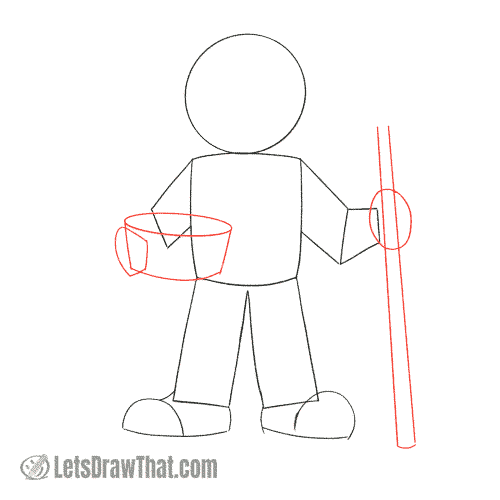
Let’s finish the arms drawn in the previous step with the hands and some farmer props.
The arm on the left side will hold a basket of fresh produce. Draw the top of the basket as a flat oval. Add two lines extending down for the sides. Finish the basket with a line for the bottom that follows the curvature of the top opening. Sketch the hand holding the bowl as a half-circle half-rectangle shape that covers the outer side of the bowl.
Then, draw the right hand holding the pitchfork. Draw an oval for the closed fist. Next, draw the straight shaft for the pitchfork through the middle of the fist all the way down to the ground.
Step 4: Draw the farmer's hat and improve the face

Split the head circle into quarters with two face cross lines – these will help us place the features.
Draw the brim of the hat as kind of a “C” shaped sausage sitting on the horizontal split line. Add the top of the hat – almost a rectangle slightly narrowing at the top.
Then let’s make the farmer’s face skinnier and more rectangular. Draw two lines down from where the hat crosses the head circle, and draw a flat chin at the bottom.
Step 5: Sketch the farmer's face and fingers

Let’s keep the farmer’s face simple: Draw two eyes just above the horizontal centerline. Here we are using just simple upside-down “U” shapes to suggest closed eyes, with another, flatter curve above them for the eyebrows. Our farmer looks very contented with his harvest.
The farmer’s mouth is hidden behind a thick moustache – so no need to draw it. The moustache is drawn from two “S” curves for the top and simple “C” curves for the bottom, starting thick in the middle and twisting into sharp, pointy tips.
Finally, split the hands into fingers. The fist holding the shaft needs a thumb, drawn as a small “B”. Then the right half of the oval, as well as the left hand are just split into individual fingers with curved lines.
Step 6: Sketch in the produce and the tines
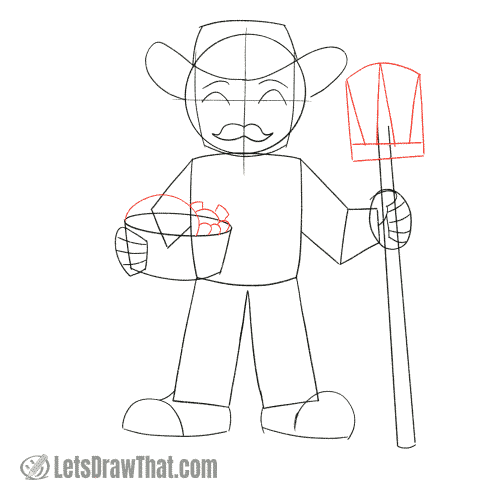
Let’s fill up the basket with some freshly-grown fruits and vegetables. For now, these are just the basic shapes – one large oval for the pumpkin, three small circles for the strawberries, with a larger one behind them for an apple, plus two rectangles that we will turn into carrots sticking out at the back.
Next, add the top of the pitchfork. Start with a rectangle for the base and add three triangular spikes, or tines.
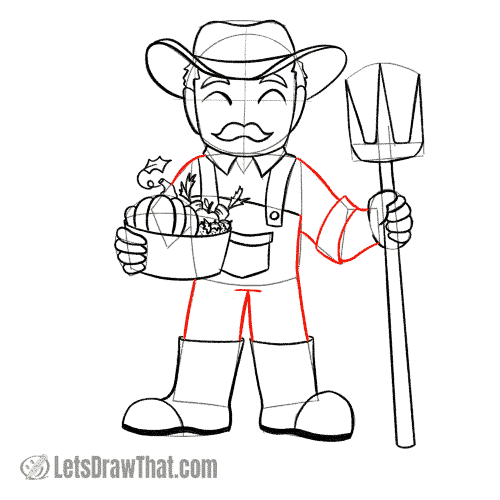
Step 7: Draw the farmer's clothing details

Let’s finish the sketch by adding some details to the farmer’s clothing.
Start with the shirt collar. Draw an “M” just under the chin and connect it with a curve from each side to the shoulders.
Next, add the folded sleeve shirt cuff right above the elbow – just a curved rectangle to fit the size of the arm.
Now, mark out the overalls. Draw a line going across the torso for the bib. Add two skinny rectangles for the straps and a rectangle with a pointy bottom for the pocket.
How to draw a farmer: outline the drawing step by step
Step 1: Draw the farmer's hat

It is time to outline and improve the simple farmer drawing, starting with his hat.
Outline the brim line from the sketch first. Then double up the brim line near the sides of the head to give it some thickness, where we view it straight on.
Now move on to the hat crown – outline the sides as they are in the sketch, but add a little dip in the middle to show the top hat crease.
Finally, add a shallow curve to the front to draw the hatband.
Step 2: Draw the farmer's hands and pitchfork

Outline the farmer’s hands. Round off the ends of the individual fingers to separate each of them from the blob they were in the sketch.
After that, outline the pitchfork, rounding off the sides and in between the tines. Leave out the part of the handle where it gets covered by the hand though!
Step 3: Draw the basket and the harvest in it

Outline the sides of the basket and then draw the harvest in it. The fruits and veggies are just tiny, so adding some leaves and stalks to the base shapes mostly does the trick.
However, if you are stuck, check our simple pumpkin drawing and strawberry drawing tutorials. For the carrots, the leaves from the holly drawing tutorial would work well too!
Step 4: Draw the farmer's face
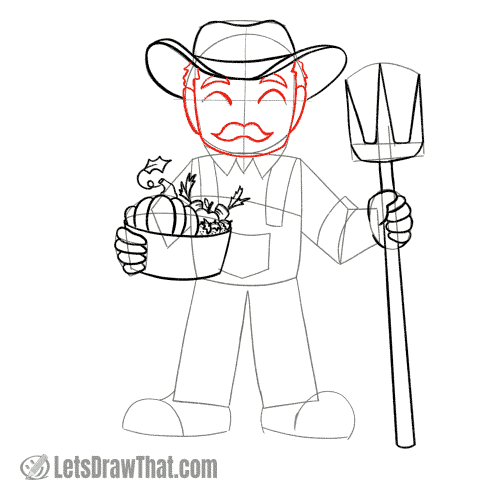
Let’s draw the farmer’s face properly now. Outline the closed eyes and the moustache directly from the sketch. Thicken the eyebrows, doubling up on the sketch line, making them into small half-moon shapes.
Next, add some short spiky hair on the sides under the hat – these are the same zig-zag lines we use for animal hair, such as on the monkey or hamster drawings. With the hair done, you can draw the face outline – the cheeks and chin.
Finally, let’s add some ears. Place them starting near the eye centerline going down to the level of the tips of the moustache.
Step 5: Draw the farmer's clothing details

Outline the details on the farmer’s clothing.
Start with the shirt collar. Move down to the straps of the overalls, adding a little button where the straps and the bib meet.
Outline the top of the bib next, leaving out the parts covered by the straps. Finally, outline the pocket, doubling up on the top edge.
Step 6: Draw the farmer's gumboots

Here, let’s draw the farmer’s boots properly, giving him a pair of gumboots to wander around the muddy farm.
Draw the curved edges for the top of the boots about halfway down the legs. Then join them all the way down to the round boot toes.
Now notice the small details there: Draw a small dip for the heel on the inner side of the shoes. Thicken up the sole for hard, sturdy shoes. Add another small dip on the sole to separate the heel from the toe. Finally, outline the round toes.
Step 7: Draw the rest of the farmer's body
With most of the hard work done, let’s finish drawing the parts of the body that haven’t been outlined yet, smoothing out the joints and corners as we go.
Draw the fold on the shirt sleeve. Then finish the upper arms from shoulders and the lower arm to fist. Last, finish drawing the farmer’s trousers.
Step 8: Add hatching and final details

Here are the final improvements to our farmer drawing:
Add some cross-hatch texture on the hat and the basket, to indicate they’ve been woven out of straw.
Add in some fold lines to the shirt at the armpit. Finally, draw the “Y” split and buttons under the neck to make the shirt a button-up shirt.

How to draw a farmer: finished drawing
How to draw a farmer: finished outline drawing

And here is the polished result of our “how to draw a farmer” tutorial once we have erased the sketch lines.
With the pitchfork, gumboots, overalls, hat and a basket of veggies, we are certainly pulling some stereotypes for the farmer here, but there is no denying what this man does for a living.
How to draw a farmer: finished drawing coloured-in

Now that you know how to draw a farmer, all that is left is to colour in the drawing.
Since the straw hat and basket need to be a dark yellow “straw” colour, we decided for having a matching yellow shirt. To add some contrast, we have coloured the farmer’s overalls dark green.
The gumboots are dark grey, with the pitchfork steel being a light grey. We have used the same grey colour for the farmer’s hair and moustache, which adds another stereotype and makes him an older man.
The wooden handle is brown, and we have used the same colour on the hatband and for the checkered texture on the shirt.
And that is it – now you know how to draw a farmer! You might want to add some farm animals to your drawing – check out the have pig, cow or sheep drawing tutorials next!